Introduction

This blog is a user's perspective on the Micro Four Thirds camera system. Read more ...

Lens Buyer's Guide. Panasonic GH4 review.

My lens reviews: Olympus 9mm f/8 fisheye, Lumix G 12-32mm f/3.5-5.6, Leica 25mm f/1.4, Lumix X 12-35mm f/2.8, Lumix X 35-100mm f/2.8, Sigma 30mm f/2.8, Sigma 19mm f/2.8, Lumix X PZ 14-42mm f/3.5-5.6, Lumix X PZ 45-175mm f/4-5.6, Olympus M.Zuiko 45mm f/1.8, Panasonic Lumix G 100-300mm f/4-5.6, Panasonic Leica Lumix DG Macro-Elmarit 45mm f/2.8 1:1 Macro, Panasonic Lumix G 45-200mm f/4-5.6, Panasonic Lumix G 20mm f/1.7 pancake, Panasonic Lumix G 14mm f/2.5 pancake, Panasonic Lumix G HD 14-140mm f/4-5.8, Panasonic Lumix G HD 14-140mm f/3.5-5.6, Panasonic Lumix G 8mm f/3.5 fisheye, Lumix G 7-14mm f/4, Samyang 7.5mm f/3.5 fisheye, Tokina 300mm f/6.3 mirror reflex tele, Lensbaby 5.8mm f/3.5 circular fisheye lens
The blog contains affiliate links. As an Amazon Associate I earn from qualifying purchases.

Saturday, 22 October 2011

Bokeh comparison @ 200mm and 300mm

I like the long tele zoom Panasonic Lumix G 100-300mm f/4-5.6. It is unexpectedly sharp, considering the price, and generally fun to use.

However, after some use, I see some examples where the background blur is a bit distracting. The bokeh some times exhibit a bit of ringing, which means that it doesn't blur the background as effectively as one could wish for.

I decided to test the bokeh with some out of focus highlights. To do this, I photographed the same subject using three lenses, the Panasonic Lumix G 100-300mm f/4-5.6, Nikkor 200mm f/4 AIS, and Panasonic Lumix G 45-200mm f/4-5.6. The three lenses are shown below:
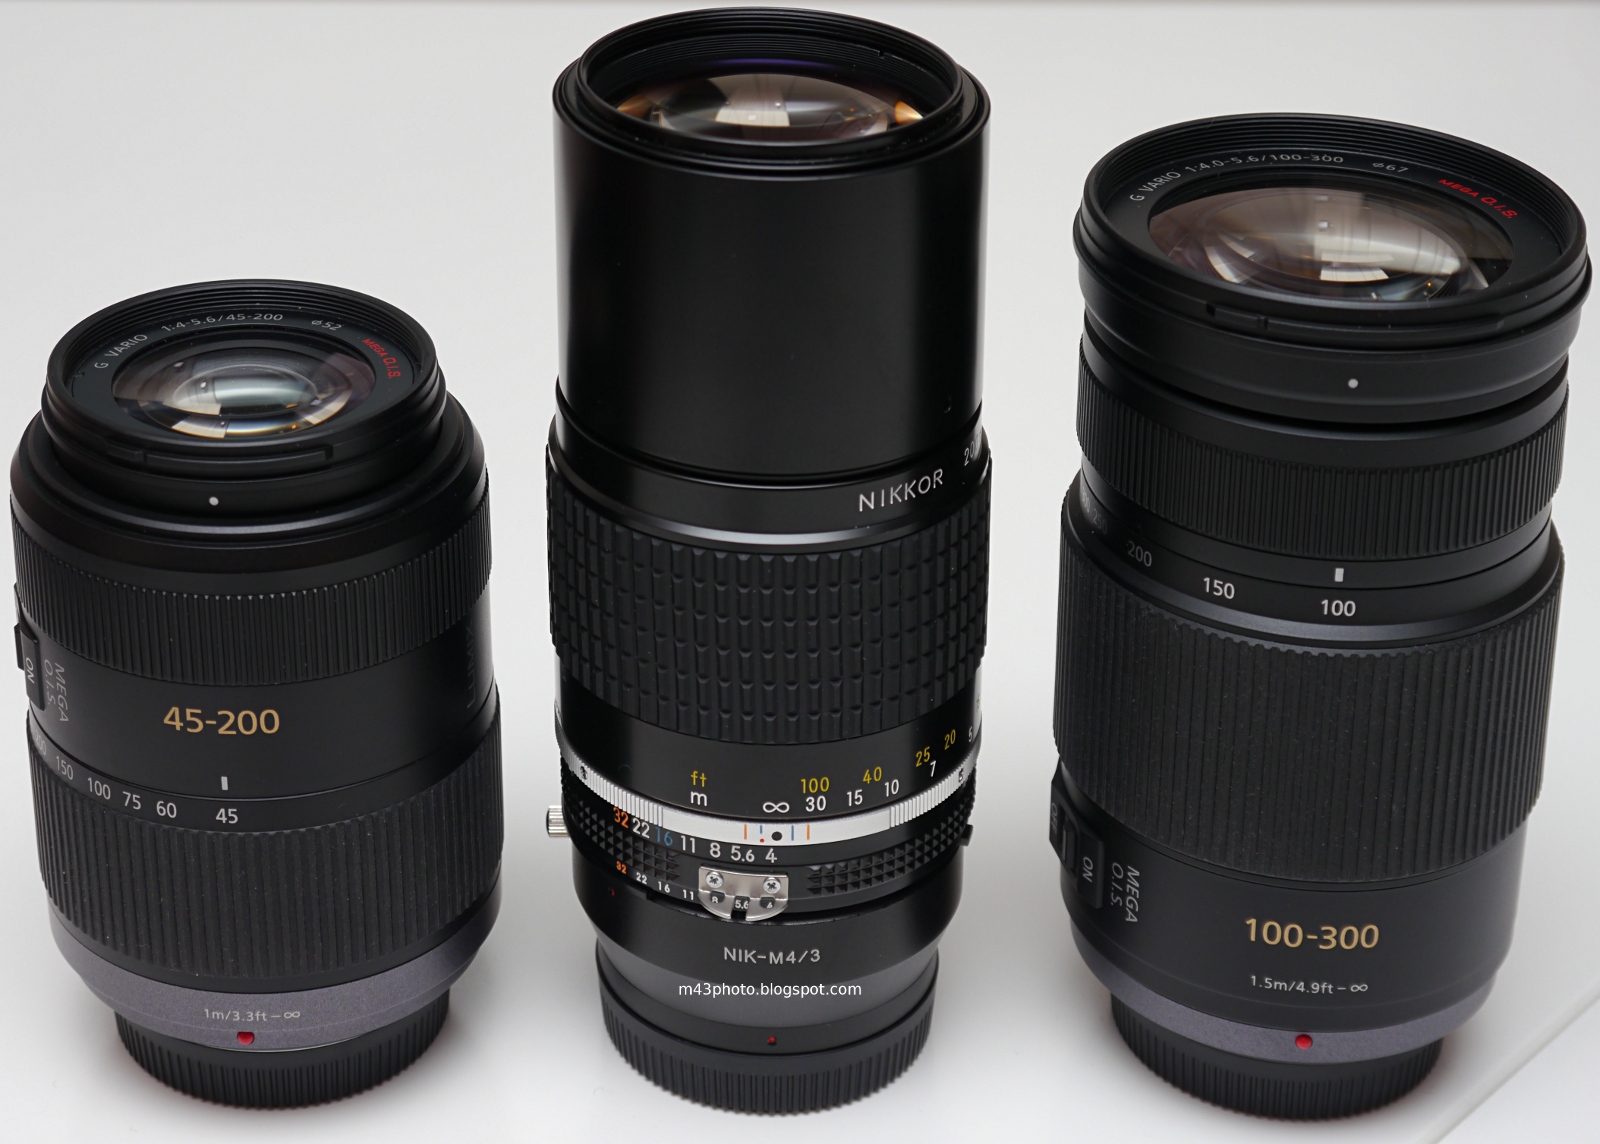

The Nikkor 200mm f/4 AIS lens in the centre is shown including the adapter needed to connect it to a Micro Four Thirds camera.

@ 200mm

The images were taken at dusk, with the camera on a sturdy tripod, and focused on the tree about 2 meters from the camera. I used ISO 160, the base ISO for the Panasonic GH2 camera. As I took the images late dusk, the lightning changed quickly, and they may have different exposure.

Here are the images, click to enlarge:


Lumix G 45-200mm @ 200mm f/5.6

Nikkor 200mm f/4

Lumix G 100-300mm @ 200mm f/4.9

I have made some enlargements as well. These are 100% crops from the centre of the images.


Bokeh

Based on this study, I cannot see any problems with the bokeh of these lenses. They all look just fine. One problem with the Nikkor 200mm f/4 AIS lens, though, is that the aperture diaphragm blades are not rounded. Hence, when stopping down, the lens gives nine-sided out of focus discs, they don't have a rounded edge:


Sharpness

When it comes to the sharpness, the crops above are not suited for comparing the sharpness across the lenses. The Lumix lenses support autofocus, of course, and after viewing the images on PC, I noticed that the camera has prioritized to get the edge of the tree in focus. When focusing the Nikkor 200mm lens manually, I focused on the centre of the branch. So they are not comparable. However, after looking at the images, my conclusion is the same as before: The Panasonic Lumix G 100-300mm f/4-5.6 is significantly sharper than the Panasonic Lumix G 45-200mm f/4-5.6 at 200mm. The Nikkor 200mm f/4 lens appears to sit between them, in terms of sharpness.

@ 300mm

The Panasonic Lumix G 100-300mm f/4-5.6 is my only lens capable of doing 300mm focal length. So I don't have anything to compare with. But here are a couple of images taken at 300mm f/5.6 and f/8:


Again, the bokeh looks just fine, no perceived problems here.

Conclusion

While I believe the Panasonic Lumix G 100-300mm f/4-5.6 is prone to giving slightly distracting bokeh in certain cases, I could not reveal any in this simple test.

We see clearly that the Nikkor 200mm f/4 AIS lens has non-circular out of focus rendering when stopped down, due to non-rounded aperture diaphragm blades. This is not so good for the resulting pictures.

I think that this simple test illustrates another example that legacy lenses are not perfect for use on modern cameras. While the lens is reasonably good in terms of sharpness, the primitive aperture makes it problematic when stopped down. In a previous study, I saw that the Pentax FA50 f/1.4 normal lens exhibits quite distracting bokeh between f/1.4 and f/2. The whole point of getting a fast legacy normal lens is to use it pretty much wide open, and that example shows that it can be non-optimal for such use.

So take care if you buy older manual lenses for use on Micro Four Thirds: Do some pre purchase research to make sure the lens fits your needs.

Wednesday, 5 October 2011

Sharpness comparisons @ 100mm and 200mm

Panasonic has got several Micro Four Thirds lenses that span the tele focus range, with the Lumix G 45-200mm f/4-5.6, Lumix G HD 14-140mm f/4-5.8, and Lumix G 100-300mm f/4-5.6 being three of them. The last one is the recently announced powerzoom capable Lumix X PZ 45-175mm f/4-5.6.

The Lumix G 45-200mm f/4-5.6 is a value tele zoom lens, with a useful focus range reaching from the typical portait to long tele area. It gives a good value for money for those who want to try out the tele range.

Marketed as a video optimized lens, the Lumix G HD 14-140mm f/4-5.8 is in fact versatile superzoom lens for photo and video use alike. It is large, expensive, and generally regarded as being very good.

The largest of the three, the Lumix G 100-300mm f/4-5.6, is a very long tele zoom, useful for various event photography, like spectator sports, birdwatching, safari, and so on. For this use, the price is in fact rather reasonable.

The three lenses are seen below:


But how do their sharpness compare? To try to answer this, I've tried to compare them where they overlap. In this experiment, I put the camera on a sturdy tripod, shot at ISO 160 with the Panasonic GH2, and used a delayed shutter to avoid camera shake. I also turned off OIS. I set the white balance to "overcast" for all the images.

I left the exposure at auto at all time, and sadly, the exposure turned out to be slightly different for some of the images. That's a bit negative for this comparison, but I think we can live with it.

Sharpness at 100mm

Here are the full images shot at 100mm, scaled down and sharpened. Click for larger images.


Lumix 45-200 @ 100mm f/4.7Lumix 100-300 @ 100mm f/4Lumix 14-140mm @ 100mm f/5.8

To better compare the sharpness, let's look at 100% crops. I have not applied any sharpening to these 1:1 images. These are taken from the image center. Click for larger images.

As it was a bit windy, I recommend that you don't look at the leaves to evaluate the sharpness. They may be negatively affected by motion blur due to the wind.


Sharpness at 200mm

Here are the full images shot at 200mm, scaled down and sharpened. Click for larger images.


Lumix 45-200 @ 200mm f/5.6Lumix 100-300 @ 200mm f/4.9

To better compare the sharpness, let's look at 100% crops. I have not applied any sharpening to these 1:1 images. These are taken from the image center. Click for larger images.


And from the top right corner:


Conclusion

Based on this study, it is quite clear that the Lumix G 100-300mm f/4-5.6 is the sharpest of the three lenses. It appears to be quite sharp even wide open. On the other hand, one could say that this is not surprising: It was used in the shorter end in this study, compared with the Lumix G 45-200mm f/4-5.6 which was used in the longer end of its zoom range. Also, the Lumix G 100-300mm lens has the lowest zoom ratio, which allows the designers to make less compromises.

The Lumix G HD 14-140mm f/4-5.8 disappoints a bit. But then again, it is a well known fact that it is not at its sharpest in the longer end, and 100mm is surely a long focal length for this lens.

The bokeh appears to be comparable between the 45-200mm lens and the 100-300mm lens. Perhaps one could say that the Lumix G 45-200mm is slightly more busy with the longer of these lenses, with some more "ringing" around the out of focus highlights. But they are pretty similar.

Monday, 3 October 2011

Lumix G 100-300mm f/4-5.6

The Panasonic Lumix G 100-300mm f/4-5.6 Mega O.I.S. is a long tele zoom. This kind of lens would normally be used by people who are interested in photographing birds, wildlife, spectator sports, safaris, and so on.


More mature DSLR camera systems are, generally speaking, better suited for these applications. This is due to a better continuous autofocus, which is possible with the PDAF system used in DSLR cameras. Hence, people with these interests, are probably using Canon and Nikon cameras, rather than Micro Four Thirds. However, with the introduction of the Lumix G 100-300mm, M4/3 users have a possibility to check this out.

Tuesday, 20 September 2011

Lens buyer's guide

So, you have a Micro Four Thirds camera? Now, what lenses should you buy?

Before trying to answer this question, let's take a step back and ask: Why would you need more lenses?

Compact cameras and interchangeable lens cameras

A user coming from the compact camera world may be confused by the apparent need for more lenses. Even fairly inexpensive compact cameras comprise a feature packed lens: A zoom range of 12x or more, starting at a very wide angle, macro functionality, and even pretty decent maximum aperture (a low f-value). All this in a small package.

When "upgrading" to a Micro Four Thirds camera with the kit lens, they may easily be disappointed. They now have a larger, more expensive camera, which only features a 3x zoom lens, starting at 28mm equivalent wide angle, and no macro functionality. How is this an upgrade at all?

The answer to this lies in the size of the imaging sensor. Compact cameras generally have a very small sensor, which allows the manufacturer to design very small lenses that have all the functionality most people would want. With a larger sensor, it is physically impossible to design a lens which does the same, at least within reasonable economical constraints.

This picture illustrates the relative size of sensors. The Four Thirds sensor (red) is one quarter the size of the classic 135 negative film (black), but still a lot larger than the sensor in mobile phones and basic compact cameras (orange):


So why don't all cameras have small sensors, so that the built-in lens can solve all the photographic needs of the user?

Thursday, 8 September 2011

Noise comparison, aperture change

I have previously compared the focus noise of various lenses. The conclusions from my analysis were hardly surprising, for example, the Lumix G 20mm f/1.7 pancake lens had a rather loud focus noise, due to the traditional focus assembly which moves all the lens groups back and forth.

The lenses with an internal focus mechanism generally featured lower noise, with the Panasonic Leica Lumix DG Macro-Elmarit 45mm f/2.8 1:1 Macro and Lumix G HD 14-140mm f/4-5.8 as exceptions. In the latter case, I believe the microphone was too close to the lens, giving biased results.

You could ask why worry about the aperture change noise. After all, the aperture is generally stopped down just before the shutter is released. And for all Micro Four Thirds cameras, the shutter noise is rather high. So the aperture noise is simply drowned by the shutter noise anyway.

However, there are times when you don't trigger the shutter. This could be when using the new high speed, low resolution mode of the Panasonic GH2. Or, quite simply, when recording videos.

Also, some time in the future, we are going to get cameras without mechanical shutters. When the global shutter technology is mature enough, we will see this in Micro Four Thirds cameras. Then, the only noise we will hear is the focus noise and aperture noise.

To measure the aperture change noise, I placed a mobile phone near the camera, running the "Decibel Ultra" app, to measure the noise level. While I don't trust the absolute measurement of the phone, I think it is good enough to look at the relative levels of noise.

The GH2, and many other Micro Four Thirds cameras, has the feature of stopping down the aperture to preview the depth of focus (DOF). This is very useful, especially for macro photography. I use this feature to toggle the aperture between maximum and f/7.1.

The test


Results

I have only noted down the peak decibel measurements. The results:

LensMeasurementsAverage

Lumix G 8mm fisheye
77 76 7777 dB
Lumix G 14mm79 7778 dB
Lumix G 20mm76 75 73 7675 dB
Leica Lumix DG 45mm macro80 82 81 8382 dB
Lumix G 45-20083 80 81 84 8382 dB
Lumix G 14-4275 76 75 7575 dB
Lumix G HD 14-14078 78 8179 dB

Conclusions

According to the marketing material, the HD designation of the Lumix G HD 14-140mm f/4-5.8 superzoom lens means that it should have fast autofocus, low noise autofocus, and near stepless low noise aperture.

After my analysis of the AF speed, the AF noise and now, the aperture noise, I cannot see that the lens is that special. It performs pretty much like the basic kit lens. What I haven't looked at, though is the aperture change, which is quoted as "near stepless". Accurate to 1/6 stop, is what I have seen quoted.

That said, the Lumix G HD 14-140mm f/4-5.8 zoom lens does have a softer sound when changing aperture.

In terms of aperture noise, the lenses appear to perform quite similar. And this is not strange: The aperture diaphragm mechanisms are probably rather similar between the lenses.

Thursday, 25 August 2011

Interesting macro images with a fisheye lens

If you want a very wide lens for the Micro Four Thirds system, there are two choices: The Panasonic Lumix G 7-14mm f/4 and the Olympus M.Zuiko 9-18mm f/4-5.6. The Panasonic lens is the widest, and is also the most expensive. Both are considered to be quite good.

But it's easy to forget that there is a third choice, the Panasonic Lumic G 8mm f/3.5 fisheye lens.

When considering which of these wide lenses to buy, I landed on the unconventional choice: The fisheye lens. My reasoning was that it has the widest field of view, and is the most compact. The compactness can be illustrated by this picture:


But I was also fascinated by the very short minimum focus distance. In the specifications, this close focus distance is stated as 0.10m. This doesn't sound very impressive. But keep in mind that the focus distance is measured from the sensor plane. So the distance from the front of the lens is only about a couple of cm, or about one inch.

This close focus distance opens up a number of creative possibilities. Below is one example. I put a LEGO figure very close to the lens. It is actually slightly closer than the minimum focus distance. But to keep it reasonably in focus still, I set a very small aperture, f/18. And I used manual focus to make sure the focus was as close as possible.


The resulting image, when cropped a bit, is this:


I think the distorted perspective due to the very wide field of view makes the image interesting.

A big drawback with this method is that the lens casts shadow on the subject. It is very difficult to achieve a proper lightning, as the field of view is very wide. Putting a light source close, so that it illuminates the clown's face, will usually make the light source visible in the picture. Which is not the intention, clearly.

Let's see what we can do when taking the lens outdoors. Here is a picture of a butterfly:


Unlike the clown picture, this image is completely uncropped. It was taken in the same way, by setting the focus as close as possible, and using a small aperture, f/11, for a very deep depth of field. I used ISO 250 and 1/60 second shutter speed.

To take the picture, I put the front of the lens about 2cm from the butterfly. Of course, this made it rather stressed, and it left the scene shortly after. So the time I had to compose the image was very short.

Looking at the composition, it is clear that it leaves quite a bit to be desired. For example, the butterfly is squarely in the middle of the image, which is usually a bit boring. It is common to put interesting objects about 1/3 from the frame edges, to make the image more exciting. This is usually referred to as the rule of thirds. Some Panasonic cameras can be configured to show the guidelines that correspond to the rule of thirds in the display, to aid in the composition. Here is an example from the Panasonic GH1:


The Panasonic GH1 display, configured to show the rule of thirds guidelines in white. Placing interesting items where these lines meet usually gives an interesting composition. It is common to place the horizon along one of these lines.

Also, it would be fine if the flower shape was repeated more times in the frame.  We can see one uncluttered flower in the right part of the image, but two more would be fine.

Finally the background could be more interesting.  Let's say we had a couple walking down the path behind the butterfly.  That would surely make the image a lot better.

But planning all this is very difficult, since the butterfly will leave the scene after a split second when putting the camera in it's face, literally.  I still think this image illustrates well the creative potential of the lens.

Looking at how a typical macro image of a butterfly looks like, let's consider this one taken with the Panasonic Leica 45mm f/2.8 1:1 macro lens:


This is what a macro picture usually looks like. Even though it was taken with a small aperture, f/7.1, the depth of field is still very thin. So the background is completely out of focus. The other exposure details are: ISO 100, 1/100 second.

The thin depth of focus is an advantage: It means that you don't need to worry about the composition of the background. The background will be blurred out. As long as the bokeh is pleasing, you can put your energy into keeping the subject interesting.

But it can also be a disadvantage. The background could potentially be used to make the image more interesting. Putting an insect into an environment, rather than just picturing it with the background blurred out, can make a very stunning photo.

But a macro lens will virtually always keep the background out of focus, even with a very small aperture. This is due to the relatively long focal length. The macro lens used in the picture above has a focal length of 45mm, which is pretty common for such a lens.

The fisheye lens, on the other hand, has a very short focal length, only 8mm. This gives a deeper depth of focus (DOF), and keeps the background more in focus.

The conclusion here is that the fisheye lens can be used to make very interesting close up images. But as the background is more in focus compared to when using a macro lens, the composition can be very tricky.

Sunday, 14 August 2011

"Dances with fire", example Lumix 14mm video

This video was recorded using the Panasonic GH2 and the Lumix G 14mm f/2.5 pancake lens.


I left everything on auto, and just pushed the red video button. This gives me a 720p AVCHD video stream. Since I dislike the highest resolution 1080i mode, due to the interlace, I tend to use 720p progressive mode. I have the European version of the camera, so the frame rate is 50fps.

Sadly, the camera does not seem to record the image parameters when making video captures. So I don't know for sure what aperture, shutter speed and ISO was used. But I would guess the camera selected the largest aperture, f/2.5. And the shutter speed was probably as slow as possible for a 50 fps video, so around 1/60 second. The ISO was probably pushed up quite a lot, I would guess around 1600-3200.

Focus

I had autofocus selected (AFS). It would probably have been a good idea here to prefocus, and then select manual focus (MF) during the video capture. That is to avoid having the focus hunt during the video capture. You can see that the camera jogs the focus back and forth now and then, to verify that the image is in focus. But since the Lumix G 14mm lens focuses very fast, this is barely noticeable, even in this low light situation.

With the Lumix G 20mm f/1.7 pancake, the focus is slower, and it can wander off for some seconds when recording a video. For the 20mm lens, it is best to have some control over the focus during videos.

White Balance

The white balance was also left on auto (AWB). This gives a slightly yellow tint to the images. Perhaps I could have tweaked the white balance better. But this is hard to do when you don't have time to plan the video capture in advance. On the other hand, the yellow colours are actually true to the actual lightning conditions.

Flare

Notice that there is some flare in the video. You can see that the flames generate greenish ghosting symmetrically opposite along the optical axis. This is quite common when you have strong light sources inside the image frame.

This illustration shows the relationship between the actual light source and the flare:


A lens hood would not have helped, since the hood is only designed to keep out light which comes from outside the image frame.

Generally, flare is more of a problem the more lens elements the lens is composed out of. So generally, you would find flare to be a bigger problem for a zoom lens, which can easily have more than ten individual lens elements, than for a prime lens. The Lumix G 14mm f/2.5 pancake lens only has six lens elements. However, the optical formula and the quality of the lens elements is also important for the flare characteristics.

Using a protective lens filter on the front of the lens can give you more lens problems, especially for low quality lens filters.

Audio

I used the onboard microphone, and left the levels on auto. It sounds like the sound is clipped some times. But I would guess this is actually due to the sound system being run to loud, and not due to the microphone.

Using an external microphone probably has the potential to give better sound in the video recording. But it makes the setup look much more professional, which might scare some people, and hence negatively affect the video. Using the GH2 with the 14mm pancake lens gives a very compact and non-obtrusive package, which is handy for recording everyday life.

Lumix 14mm as a video lens.

The very fast autofocus and the inaudible focus action make the Lumix G 14mm f/2.5 an ideal video lens.

It has a generously wide field of view, which is useful when video recording a group of people. The wide field of view also makes it easy to handhold the camera without the hand shake affecting the video stream too much.

The small size and unobtrusive looks also makes it easy to get close to people without scaring them, which is a big plus if you intend to video record people.

On the other hand, a zoom also comes handy for video use. For some more flexibility, I would recommend the Lumix G 14-42mm f/3.5-5.6 basic kit zoom. It is light, very fast focusing, and pretty good quality.

Monday, 8 August 2011

A tale of a broken Lumix kit lens

Contrary to much of the online opinion, I think that the basic kit lens from Panasonic, the Lumix G 14-42mm f/3.5-5.6, is rather good. Considering the price, the size and the weight, I think it gives a good performance. The autofocus is fast, the sharpness is generally good.

However, when evaluating the bokeh characteristics of the lens, I noticed that the out of focus highlights were non-round. This is found for some lenses, for example the Lumix Leica 45mm f/2.8 1:1 macro lens has elliptical out of focus highlight rendering outside of the centre of the frame. But I found that the Lumix G 14-42mm lens had more like potato shaped highlights.

A closer examination revealed that the aperture diaphragm was indeed misaligned, giving non-round out of focus highlights for all stopped down aperture sizes. If found this to be so bad, that I took the lens back to the shop where I bought it in the first place.

The store keeper has some problem verifying that his off the shelf lens did not exhibit the same non-round aperture. I helped him by taking a photo with the lens mounted to the Panasonic GF2 camera at f/9, 2 seconds, and removed the lens during the exposure. Looking towards the light through the lens showed that his copy had a round aperture.

So he accepted my lens as defective, and sent it for repair.

After one month, I started enquiring about the lens. I always got the same answer: "The lens is just around the corner, should be in our store the beginning of the next week."

It was not until after three months that the lens finally did arrive in the store. When I went to pick it up, I was told that they simply replaced the lens with a new one. Why let me wait for three months when they would just give me a new copy?

Coming home, I once again checked if the aperture was rounded. See for yourself, this image was taken with the Lumix Leica 45mm f/2.8 1:1 macro lens:


In fact, my new lens exhibits exactly the same problem as the one I returned in the first place. I did check that the new lens has a different serial number, so it is not the same lens that I returned.

Letting me wait three months for a new lens is bad. But giving me a new lens which has the same problem as the one I returned is simply appalling.

Epilogue

I took the lens back to the retailer again. This time, they offered to change my lens directly from their stock. We tested two lenses, and neither had completely round apertures. One was as bad as my own lens, and the other was pretty rounded. So I took the best one.

I don't expect perfectness from a lens this cheap. So I am happy with the near round aperture opening.

Sunday, 7 August 2011

Bokeh, part 1

The term "bokeh" is commonly found when reading about photography. I would like to discuss bokeh in this series of articles. I don't intend to cover all aspects of bokeh, and I realize that not all would agree with my opinions. So you should view this as my personal opinions, and not as facts.

When using the word "bokeh", one normally means the nature of out-of-focus rendering. How the lens renders objects that are out of focus, the bokeh, depends on a number of factors, for example, the lens itself, the objects photographed, and settings like the focus distance and the aperture.

It does not make sense to say that "a lens has bokeh", or that "there is bokeh in a photograph". Rather, the term can be used to describe the out of focus rendering, e.g., "this lens gives me good bokeh", or "in this photo, the bokeh is distracting".