Introduction

This blog is a user's perspective on the Micro Four Thirds camera system. Read more ...

Lens Buyer's Guide. Panasonic GH4 review.

My lens reviews: Olympus 9mm f/8 fisheye, Lumix G 12-32mm f/3.5-5.6, Leica 25mm f/1.4, Lumix X 12-35mm f/2.8, Lumix X 35-100mm f/2.8, Sigma 30mm f/2.8, Sigma 19mm f/2.8, Lumix X PZ 14-42mm f/3.5-5.6, Lumix X PZ 45-175mm f/4-5.6, Olympus M.Zuiko 45mm f/1.8, Panasonic Lumix G 100-300mm f/4-5.6, Panasonic Leica Lumix DG Macro-Elmarit 45mm f/2.8 1:1 Macro, Panasonic Lumix G 45-200mm f/4-5.6, Panasonic Lumix G 20mm f/1.7 pancake, Panasonic Lumix G 14mm f/2.5 pancake, Panasonic Lumix G HD 14-140mm f/4-5.8, Panasonic Lumix G HD 14-140mm f/3.5-5.6, Panasonic Lumix G 8mm f/3.5 fisheye, Lumix G 7-14mm f/4, Samyang 7.5mm f/3.5 fisheye, Tokina 300mm f/6.3 mirror reflex tele, Lensbaby 5.8mm f/3.5 circular fisheye lens
The blog contains affiliate links. As an Amazon Associate I earn from qualifying purchases.
Showing posts with label video. Show all posts

Thursday, 4 May 2017

GH5 IBIS is as good as Olympus

The Lumix GH5 is the first GH series camera to have IBIS, in body image stabilization. This means that even prime lenses without any OIS feature can be stabilized, in both photos and videos. But how does it compare with the Olympus E-M5 Mark II, which made waves in this area almost a couple of years ago, with a fantastic video image stabilization?

In this article, I put them head to head. To avoid any possible advantage of using the same brand name lens as camera body, I have used the third party Sigma 30mm f/2.8 Art lenses, which I like a lot:


Both cameras are mounted to a Desmond stereo bracket here. They are both recording in 1080p resolution, with 60FPS framerate. I have both set to f/2.8 aperture, and using continuous autofocus. Here is the comparison:


A note about the autofocus speed of the Lumix GH5. In this video, I set both the AF sliders to max, "AF Speed" and "AF Sensitivity". Without this change, the GH5 would have been hopelessly slower to focus than the Olympus camera in this comparison.


However, in real life use, I don't think I would have set them this high. After all, it is seldom you need the AF to react this fast in real life usage.

My analysis of the outcome, is that the Lumix GH5 is just as good as the Olympus camera when it comes to stabilizing the video stream. So it shows that Panasonic have come a long way with IBIS!

Sunday, 27 December 2015

Using V-Log L with GH4

Some months ago, Panasonic released a V-Log L video option for the Lumix GH4. Here, I intend to give a short introduction to what this is, and how you get started with this video profile.

This is, of course, not a complete course. That would require a lot more than a short read. But this is intended to show you what V-Log L is, and how you get started, if you are interested.

For most people, myself included, V-Log L usage is not a big deal. Most of the time, I am happy with the normal video output from the camera, and I don't spend the extra time and effort with the V-Log L profile. So keep in mind that this is optional: You can still enjoy the camera without caring about V-Log L.

Some would compare the V-Log L profile to using the RAW image format, rather than JPEG, when taking still images. It is not exactly that: The video is still compressed (unlike RAW), and it is processed (not straight from the sensor, like RAW normally is).

However, this comparison still makes some sense, as you would use the V-Log L output much in the same way as you would use RAW: To be able to make adjustments to the colour and tone curves of the image. For video, this process is called "colour grading".

When enabling the V-Log L profile, the output is flat. What I mean with flat, is that it looks grey, with little colour saturation, and little difference between the light and dark areas. If you uploaded the video straight to Youtube, people would think it looks quite boring.

That is why you go through the grading process first. Here, you apply a Look-Up Table (LUT) to convert the flat profile back to something that looks normal, and you can apply colour and tone corrections on top of that.

Recording in V-Log L


First of all, of course, activate the V-Log L profile, and you should see the corresponding symbol in the top left corner:


As you see here, the image is "flat" in the sense that it is grey and has low contrast.

You can use the normal exposure modes also for V-Log L. However, keep in mind that the camera will often underexpose in V-Log L, and mostly you'll want to correct for that. I usually leave the exposure correction at +1 stop when using V-Log L, as you see above.

For "run and gun" use, where you have varying lightning, this works well. I guess some seasoned videographers would frown at using automatic exposure, as opposed to full manual, but I don't think you should worry about that. Using auto exposure is a good way to get started.

If you use manual exposure, you'll need some tool to make sure that you have the right exposure. As the profile is so flat, it is hard to notice from the screen if the exposure is too low or too high. The "zebra" stripes is a good tool. Set to "Zebra1":


And adjust that to 80%:


That way, anything which is overexposed (burnt out) will get the zebra stripes in the display. Adjust the exposure so that you are just not getting the zebra stripes, for the optimal exposure. Some zebras are ok, but keep in mind that those areas don't get any details in the final output, due to overexposure.

In V-Log L, you can only use ISO between 400 and 6400. You can still use Auto-ISO.

Editing the video


As the video output is so flat, you cannot just upload it to Youtube, you must first grade it. I have been using Adobe Premiere Pro, but most serious video recording software can handle this.

You bring the footage into the editor as usual, and note that it still has the flat look, as it is not yet graded.

To get the right Look-Up Table (LUT), you can get Panasonic's official one from here, scroll to the bottom and look for "LUT (Look-Up Table)." This is a zip file, and inside you will find a file called "VLog_to_V709_forV35_ver100.cube". This is the one you input into the video editor software.

Add the Video Effect "Lumetri Color" to your video stream. Inside this effect, choose "Custom" from the "Input LUT" option. Here, you select the file you just downloaded from the Panasonic site.


After having done this, you can select the output style you want in the "Look" section. I have just selected "Neutral". You can look at the other ones as well, and see if you would like to test some retro film looks. And remember to select "Active" for it all to work.


This makes the video look normal again:


On top of this, I thought the shadows had some green tint, so I moved the centre of the "Colour Wheels" a bit for the Shadows and Midtones. Also, I took down the Saturation a bit, as I thought the colours were a bit strong:


These colour wheels are central to tweaking the video. A common cliche the last years, is to push the shadows towards the blue, and the midtones towards orange. This creates a contrasty effect, and makes the skin tones stand out a lot. You'll see this effect used a lot in, e.g., "Transformers" and "Iron Man 2".

Using an effect like this is going to make your video look modern today, but look dated in some years time. I prefer to keep them more neutral.

After having done all this, I can render the video as usual. Here is the output in Youtube:


Sadly, the focus was a bit off during a lot of this movie. I used the Lumix 25mm f/1.4 lens at f/1.6 and didn't foresee the focus issues it would have. The problem here is that the microphone in the front attracts the focus some of the time, and when the musician moves, the background looks more stable and easier to focus on for the camera. I could have prefocused on the musician's face, and turned off autofocus, that would have solved the problem. This is a lesson learnt for me.

The exposure was: f/1.6, 1/60s, ISO 640.

This video could have been graded better still. As you see, the face of the musician is a bit too red. However, I had a hard time finding the right white balance. I guess an experienced grader would have made this far better.

Conclusion


The V-Log L video option opens up for more possibilities to use custom video profiles in post processing. However, you need to spend more time on editing the video files, and you must invest in an editing software, like Adobe Premiere Pro.

Finally, you can get by pretty well without worrying about the V-Log L at all. Here is an example video I recorded using the normal video profile (not V-Log L), and uploaded directly to Youtube without any post processing:


Most of the time, this looks totally ok. Personally, I am not using the V-Log L a lot. For normal hobbyist use, the standard profile is just fine.

For  a professional, having V-Log L is crucial, since it allows for colour grading clips to match, even if they are recording under different lightning condition, or even by different cameras. But for amateurs, it adds an additional step of post processing, which may not add much extra value.


Wednesday, 12 August 2015

New firmware for Lumix 14-140mm II

Panasonic recently updated the firmware for a number of their lenses (click here). The updates are mostly geared towards the upcoming Lumix GX8, promising to deliver the dual IS feature, using both the lens optical image stabilization, and the camera sensor shift image stabilization at the same time.

One of the lenses affected is the Lumix G 14-140mm f/3.5-5.6 superzoom lens (click for my review). Compared with the older version of the lens, I find that it is better in every way: Smaller, lighter, cheaper initial price, better image quality.

There are some who say that the new version of the lens causes "micro jitters" when recording video handheld, which makes it impossible for use with video. As the lens is advertized for video use especially, this sounds like a very bad thing.

To see if there is a problem after the new v1.1 firmware upgrade, I have tested the lens together with the old version, supposedly free from the micro jitters issue. I've mounted them on a pair of Lumix GX7 cameras, and recorded video at 1080p, 50FPS. To avoid motion blur, which might hide the micro jitters, I set a fast shutter speed at 1/250s.


Both cameras were connected to a Desmond mini stereo bracket. The new version of the lens to the right.

Friday, 1 May 2015

OM-D E-M5 II video quality

The Olympus OM-D E-M5 II is the first Olympus M4/3 camera with a real promise to quality video output. It features 52Mbps output in the "SF" (Super Fine) mode, at 1080p, 60fps (or 50fps if you are in a PAL region country). So how does the video compare with the Lumix GH4, the reference in terms of M4/3 video?

First of all, let's note that there is disappointing news about the E-M5 Mark II video: The sensor is cropped slightly, making your lenses less wide than you expect. Here is an illustration of the sensor area used for video:


This corresponds to an additional crop factor of 1.16. Or in other words, the Olympus 12-40mm f/2.8 becomes 14-46mm when using the video mode. So the effect is not very dramatic.

This crop during video is not uncommon, by the way. The Nikon D7200 can only do 1080p video at 60fps with a 1.3x crop of the sensor. And that is Nikon's premier DX DSLR. While we wait for the D400.

Sunday, 13 October 2013

Video AF comparison, Lumix 25mm f/1.4 vs 20mm f/1.7

The Lumix Leica DG 25mm f/1.4 and Lumix G 20mm f/1.7 pancake are quite similar. Both are fast normal lenses. Still, they are different:


On both lenses, I am using 46mm to 37mm step down rings as lens hoods. If you go down the same route, you will also need a 37mm front lens cap.

Beyond the size difference, the 25mm lens features internal focusing, while the 20mm lens has an old style focus mechanism, where the whole lens array moves back and forth. The internal focus achieves faster focus, and makes less noise. The Lumix 20mm lens on the other hand is known to focus slowly, and for making more noise.

In this article, I aim to see if the difference in focus mechanisms make the Lumix Leica DG 25mm f/1.4 better suited for continuous autofocus during video.

Thursday, 19 September 2013

Fireworks video recording with the GH3 and Samyang 7.5mm fisheye

I've previously used the Panasonic GH2 for recording fireworks, and found that at the maximum video ISO 3200, I still needed to set a very slow shutter speed of around 1/10s to get sufficient exposure. The Panasonic GH3 supports video recording at ISO 6400. When using the Samyang/Rokinon 7.5mm f/3.5 fisheye lens wide open, I can use a shutter speed of 1/25s, and get a normal PAL 25fps framerate.

Here is the video I made, more information about how it was done follows below:


Monday, 15 July 2013

Panasonic Lumix DMC-3D1 review

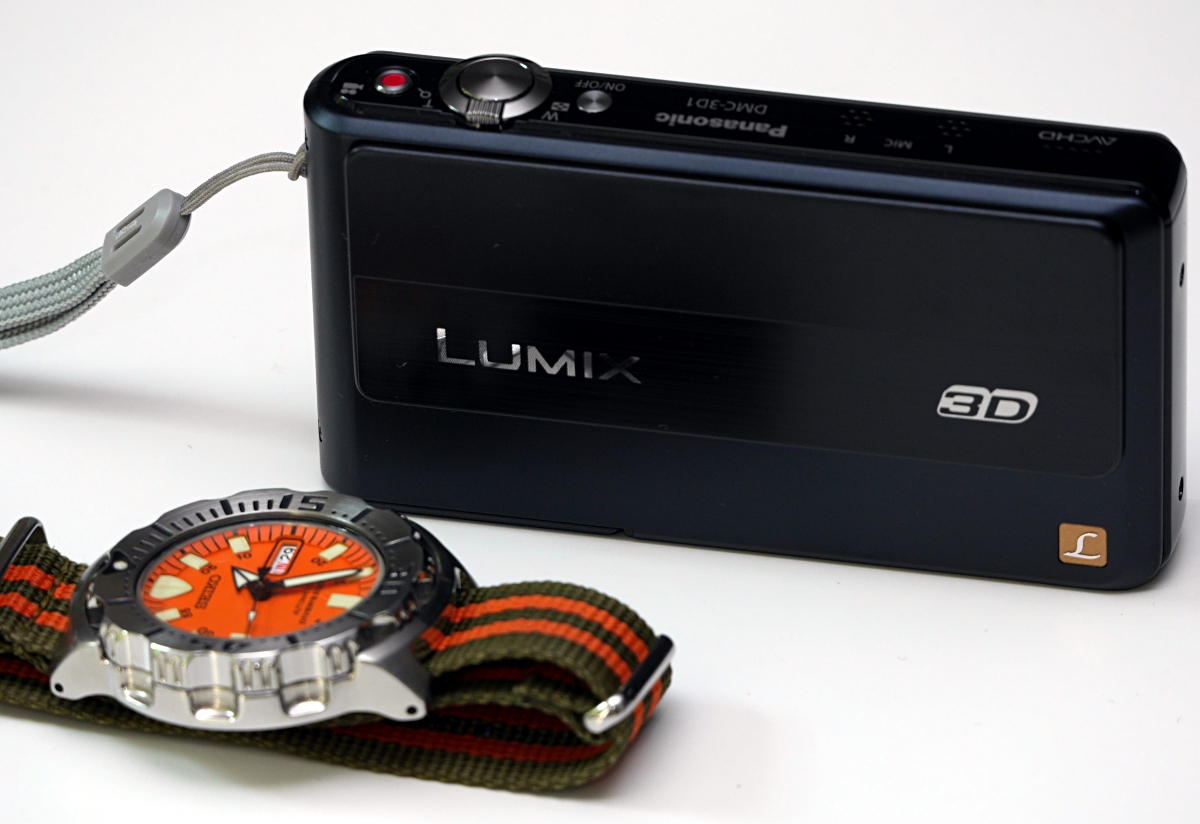
The Panasonic 3D1 is one of the very few twin lens compact 3D cameras available. It is shown below with a Seiko diver's watch for scale:


Nowadays, many cameras feature 3D in their specifications, but they achieve this by letting you swipe the camera horizontally while shooting several images, and then stitching the images together for a 3D effect. While this does indeed give you a 3D effect, it is not a true 3D capture in the sense that the same image is captured at the same time from two different angles. Rather, if there is movement in the image while you are sweeping, you may be capture different images for the left and right frame, which will look bad. Also, this technique does not support video recording.

The Panasonic Lumix 3D1 has got two separate, identical lenses, each covering a 12.1 MP sensor. Sliding down the front cover reveals the lenses, and also powers on the camera:


In my review, I will focus mostly on the 3D features of the camera. When used as a 2D camera, it is nothing special at all, and I cannot imaging that anyone would buy this camera for 2D shooting anyway.

Thursday, 9 May 2013

GH3 video recording at high ISO

The Panasonic GH3 can record video at a maximum of ISO 6400, up from ISO 3200 on the GH2. And the quality is quite good at ISO 6400, see an example comparison at ISO 200, 800, 3200 and 6400 here.

However, there is a rumour that the GH3 can record video at one stop more, ISO 12800, by dialling in +3 in exposure compensation. So, is this true? The quick answer is: Yes. But it's a somewhat strange process. I'll take a look here.

In A (aperture priority) mode


What's going on is this: In the Creative Movie mode, A exposure mode, you set the aperture and the ISO, and the camera sets the shutter speed. When setting the ISO to the max, and then dialling in a positive exposure compensation, nothing happens until you reach +2. Then, you get one more stop of gain (light) until you reach +3. So, it might seem like the camera gives you one more stop of ISO for free.

But what you don't see is the shutter speed. I think it is a big problem with the GH3 that it does not state the shutter speed during video recording, except in full manual M mode. This makes the camera much more difficult to use for video recording.

However, for the moment, you can trust me that the camera tries to give you a 180° shutter in video mode, meaning that the shutter is open half the time, or a shutter speed of 1/50s if you are using a 25 fps video mode. Except if you dial in +3 exposure compensation, then it reverts to a 360° shutter, one full stop more exposure. You see this as a significant gain in brightness, if you are video recording in a too dim environment.

This can be easily demonstrated. See the video below in the next section.

In S (shutter priority) mode


Set in a similar setting, where the lightning is not enough at ISO 6400, full aperture, and 1/25s (or 1/30s for NTSC camera), when dialling in +3 exposure compensation, you get around one more stop of brightness, as compared with the maximum exposure in M mode.

Hence, it is true to say that you effectively get around ISO 12800 by using the Creative Movie mode in S (shutter priority) mode and dialling in +3. This only makes sense when the lightning is very dim. Otherwise, you simply get a very overexposed scene, which is not what you want.

Here is a video demonstrating the features of the A and S modes:


Here are also comparisons of the exposure levels in the video. From left to right, we have the A mode, M mode and S mode. We see that when using the Aperture Priority (A) mode with no compensation, it corresponds to 1/50s (180° shutter). When dialling in +3, though, it corresponds to 1/25s exposure (360° shutter). In S mode, though, we get around one stop more gain at +3 exposure compensation, effectively around ISO 12800:


Conclusion


The GH3 behaviour is a bit strange here. In A mode, it runs a 180° shutter by default, i.e., one stop less than the maximum exposure. Only when you dial in +3, you get the full exposure, one stop more. Specifying a 360° shutter manually in M mode gives exactly the same exposure, i.e., there is no "magical" extra sensitivity when dialling in +3.

The feature might still be useful. If it is too dark for ISO 6400, and you want the camera to use a shutter speed as slow as possible, you can set the exposure compensation to +3. You might find that easier than switching to the M exposure mode, where you could do the same.

In S mode, though, you can also dial in +3, and get one extra stop of gain, but at the same shutter speed. This appears to be a way to get around ISO 12800 in video mode. Note that this only works when the lens aperture is set to the maximum. Otherwise, the camera would rather first increase the aperture to achieve the exposure compensation, rather than increase the ISO sensitivity.

Alternative solution


If you are stuck in ISO 6400, maximum shutter speed (1/25s in 25fps or 1/30s in 30fps, depending on PAL/NTSC region), and you still need more exposure, what can you do? There is a solution, actually. There is another, semi-hidden feature of the GH3. It can record video at even slower shutter speeds, to capture more light in each frame.

For example, I recorded a video at 1/13s shutter speed at a concert, since I needed one stop more brightness even at ISO 6400. Of course, this gives you only 13 unique frames per second, even if the video stream is still 25fps. And you get significantly more motion blur, since each exposure is slower.

Here is a short description of how it was done, and a comparison between 1/25s and 1/13s. You must set the mode dial to "Creative Movie" mode, and then set manual focus, and the "M" exposure mode. Then you can set slow shutter speeds, all the way down to 1/2s. At 1/2s shutter speed, you only get two unique frames per second, of course, so the video might not be very useful.


As you see, 1/13s gives more exposure, and better brightness in the dim lightning, but more motion blur.

Here you can see the full concert videos as well. The one recorded at 1/13s:


And the one recorded at 1/25s, which is dimmer, but has less motion blur:


Both these videos were recorded using the Samyang 7.5mm f/3.5 fisheye lens. The maximum aperture is only f/3.5, which is quite small for a prime lens. On the other hand, it is normal for a fisheye lens. If I had used a lens with a larger aperture, for example the Lumix G 20mm f/1.7 pancake lens, I would not have needed to use a slow shutter speed.

This feature was also available with the GH1 and GH2. I used it to record fireworks with the Samyang fisheye lens, at ISO 3200, f/3.5, 1/13s. Since the GH2 topped out at ISO 3200 in video mode, this was my only option to be able to capture it. Using the GH3, I would probably have used ISO 6400 and 1/25s exposure.


Sunday, 28 April 2013

Autofocus during video comparison, GH2 vs GH3

When the Panasonic GH1 was announced in April 2009, it had a unique selling point: It was the first and only consumer system camera which could autofocus continuously while recording videos. Since this time, the competition has improved a lot, of course, and all mirrorless system cameras can autofocus while recording videos. But they use different technologies, and the performance varies.

The Panasonic GH3 was released with a claim to have the best AF performance of mirrorless cameras ever, as usual for a new premium mirrorless camera. And the AF performance for single still images is very impressive indeed. However, this doesn't really matter. All current Micro Four Thirds camera focus more than fast enough for static still images. Except possibly with the Lumix G 20mm f/1.7 pancake lens, due to its combination of a fast aperture and an old school focus construction.

What's still a challenge, though, is continuous autofocus during video recording, and focus tracking of moving subjects, in AF-C mode.

The Sony SLT cameras solve this by using a fixed translucent mirror, which means being able to use phase difference autofocus (PDAF) also during video recording. This system is able to track moving subjects very well during video, due to the genuine SLR PDAF technology. However, the cameras are not mirrorless, being DSLR systems with fixed mirrors, which means having larger camera bodies, and, usually, larger lenses as well.

The Nikon 1 system and Canon EOS M system solve this by having on-chip PDAF sensors, directly on the imaging sensor. With this technology, they can combine PDAF and CDAF, however, the real world benefits of this system are still undecided.

Panasonic and Olympus have so far used pure CDAF, with no specialized hardware to aid the focusing. They rather rely on image processing to speed up the autofocus. With the Panasonic GH3 being the most recent premium model, let's see if it actually does improve upon the predecessor GH2. To test the cameras head to head, I mounted both on a plank using Manfrotto Superclamps:


On both cameras, I used the Lumix G 14mm f/2.5 pancake lens. The lens focuses very quickly. Even with the same lenses, the GH2 has a slightly wider field of view in video mode, due to the multi aspect sensor feature, which the GH3 misses.

Here are the results in terms of autofocus performance during video recording:


As we see, the Panasonic GH3 performs much better than the GH2 in term of autofocus. Even with the same basic technology, the GH3 has a better image processing capability, which enables it to focus better while recording videos.

Notice that the GH2 needs to jog the focus back and forth to confirm the focus and settle. This is a typical sign of CDAF focus technology. The GH3, on the other hand, appears to nail the focus straight away, as if it was using PDAF. Which it doesn't.

I think it looks like the GH3 is a revolution when it comes to continuous AF during video for Micro Four Thirds. It may be the first camera to make AF during video truly possible.

And this does work well in real life situations. Here, I have recorded a concert using the Olympus 45mm f/1.8 at f/2, ISO 3200. The light was very dim, around EV2. The autofocus was left on during the video, and it generally keeps the image well in focus. In my experience, the GH2 would not have handled such a situation well:


Keep in mind that AF-C while photographing moving subjects is a totally different subject. I would expect the Panasonic GH3 to perform better here as well, as it is capable of AF sampling at up to 240fps with the most recent lenses, the Lumix X 12-35mm f/2.8 and Lumix X 35-100mm f/2.8. However, I have not tested this feature yet.

Monday, 1 April 2013

AF during video, comparison GH2 vs GH3

Recent Micro Four Thirds cameras have very good autofocus performance for still images. Mostly, the performance is among the best in this class, certainly better than DSLR cameras in live view mode. However, there is one area where mirrorless cameras don't perform well at the moment, and that is continuous autofocus: Both during video recording, and for photographing moving objects, e.g., for photographing sports and birds.

Some camera manufacturers have been trying to solve this by adding phase difference sensors (PDAF) on the imaging chip, like the Nikon 1 and Canon EOS M cameras. However, the real world benefit of that solution is still undecided.

Panasonic have said in interviews that the on-sensor PDAF solution is not going to be used for Micro Four Thirds, at least not anytime soon. Rather, Panasonic expects to achieve better continuous autofocus performance by using faster image readout from the chip, better image processing algorithms, and more processing power. Have they achieved this with the most recent Panasonic GH3?

To compare the autofocus performance during video recording with the GH2, I used a Lego Technic contraption to move a cardboard box back and forth at a steady pace. I then set up both cameras, in turn, with the Lumix X 12-35mm f/2.8 lens at 35mm f/2.8 at close range, and recorded video at 1920x1080, progressive, 25fps. Comparing the resulting footage, it is easy to see which camera better finds the focus during the movement. Here is the video footage, for comparison:


It's easy to see that the GH3 achieves correct focus more often than the GH2, in fact, about twice as often, according to my frame counting. The GH3 also has a better overall sharpness: It is possible to see the offset printing pattern more easily with the GH3. This could be partially due to the multi aspect sensor feature that the GH3 misses: It means that you get slightly narrower field of view when using the GH3, as compared with the GH2, and hence, more enlargement of the subject.

One of the new features of the GH3 is the 240fps contrast detection autofocus (CDAF) sensor readout. The GH2 only does 120fps, maximum. The smaller print in the GH3 specifications state that the 240fps is only possible when using the newest f/2.8 zoom lenses, the Lumix X 12-35mm f/2.8 and the Lumix X 35mm-100 f/2.8.

And can the camera use the 240fps feature during video recording? Probably not, since the sensor is busy reading the image at 25fps for the video stream anyway. I previously compared the GH2 video AF performance during 25fps and 50fps video, and found that it does better at 50fps, indicating that more frequent image readout is better for the AF performance. As long as the shutter speed is faster than the video rate, there is surplus time between the frames for CDAF readout. Perhaps the GH3 camera can utilize this for better AF performance?

Conclusion

The Panasonic GH3 camera appears to be able to focus better during video recording than the GH2, even at the same frames per second (fps) rate.


Sunday, 27 January 2013

Sigma 19mm autofocus comparison

The Sigma 19mm f/2.8 EX DN is perhaps a strange lens. In terms of specifications, it is quite close to the Lumix G 20mm f/1.7 pancake lens, except that it is slower, and less compact. So, why would anyone be interested in it?

Lately, it sells at a reasonable price, and besides, it features the normal internal focus system, while the Lumix G 20mm has an old style focus mechanism which moves all the lens elements, being slow and noisy.

I have found that the Sigma 19mm lens is slightly less sharp than the Lumix 20mm lens, at similar apertures. This is consistent with other people's findings.

With still images


What about the autofocus performance, then? Is it faster, as one could guess? Here is a comparison where I put both lenses on the Panasonic GH2, and focused down to around 0.3m:


The Sigma 19mm lens spends 0.28s focusing down to close to the minimum focus distance, while the Lumix 20mm lens needs 0.64s. So the Sigma lens is indeed faster, as we had expected in advance.

During video recording


Another important aspect is continuous autofocus during video. This is still the achilles' heel of the Micro Four Thirds system, and not even the most recent cameras do this well.

To test it, I mounted the Panasonic GH2 with the Lumix G 20mm f/1.7 lens to a wooden plank, and next to it, mounted the Panasonic GF3 camera with the Sigma 19mm f/2.8 lens. I used Manfrotto Superclamps to mount the cameras, just like when I tested the rolling shutter properties of the GH2 and GH3. I set both lenses to f/2.8 for similar depth of focus properties.

Of course, the 19mm lens has a wider field of view. But on the other hand, the GH2 has the multi aspect sensor, oversized sensor property, which gives relatively wider field of view in video compared with the non-multi aspect sensor GF3 camera. So the field of view is probably quite similar for the two cameras.

Here are the two video footages, combined to one clip. To see the focus performance, it is best to view this in 1080p, click on the youtube icon to access this possibility.


The results are not completely consistent, but I think the Sigma 19mm lens and GF3 combo keeps the focus better during the video. One could speculate that the GH2 probably has the better image processing technology, and hence, should have the advantage in terms of handling continuous autofocus. Despite the handicap of being combined with the basic GF3, the Sigma lens performs better.

It would have been better to mount the lenses to the same camera, of course, but I don't have two of the same camera model. Also, I would normally have used the newer GH3 camera, but my camera is sent back for repair. I hope I get it back soon, and that I don't have to wait for three months, like I had to when sending back the Lumix G 14-42mm lens for misaligned aperture diaphragm blades.

Conclusion


What this shows, is that the Sigma 19mm f/2.8 EX DN lens is better for video use, as long as you can live with the f/2.8 aperture. While it is not as sharp as the Lumix G 20mm lens, it is still very sharp, and certainly more than sharp enough for video use. The autofocus is also less audible.

Even if the Sigma 19mm lens is larger, it is still quite non-obtrusive, with a matte black finish.

The Lumix G 20mm f/1.7 pancake lens is a classic Micro Four Thirds lens, praised for the very good sharpness. However, people also find it annoying for the slow and noisy autofocus performance. People have also reported that the focus mechanism can be clogged with dust, due to the moving front elements. The Sigma lens has no moving lens elements on the outside (only internally), and is probably more solid in that way.

Given the low price the Sigma 19mm f/2.8 EX DN sells at, it can be considered a good value for money, and an interesting alternative to the Lumix G 20mm f/1.7.

I haven't tested the "brother" lens, the Sigma 30mm f/2.8 EX DN in the same way, but I would guess that it, too, performs well in terms of autofocus speed.


Thursday, 20 December 2012

GH3 guide to video modes

The Panasonic GH3 comes with a large choice of video modes. In this article, I try to make some sense of the choices. This writeup is not intended for experienced video users, since most likely you already know what modes you prefer.

PAL and NTSC versions


The camera comes in two versions. One for the PAL market, and one for NTSC. The PAL market includes Europe, China, Africa, Australia and New Zealand, while the NTSC market includes the Americas and Japan.

The difference is the set of framerates the cameras can capture in their video modes. PAL cameras can do 25fps and 50fps, and NTSC cameras can do 30fps and 60fps. In addition, both camera models can do 24fps.

The difference in framerates is to match the different TV broadcasting standards. Today, this seems like a strange difference. Not that many people use TV sets anymore, and besides, many modern TV sets can handle both PAL and NTSC input.

If you have a PAL version of the camera, you are stuck with the 24fps, 25fps and 50fps framerate options. And if you have an NTSC camera, you can choose between 24fps, 30fps and 60fps.

There is also a 30 minute video recording limit in some markets, due to tax reasons.

24fps


The 24 frames per second option is useful if you are shooting video for use in motion picture movies. These have used 24fps as a standard for years, while 25/50 (PAL) and 30/60 (NTSC) are more useful for video and television use.

Some newer movie productions even double the framerate to 48fps, for example the movie "The Hobbit".

I would use 24fps only if you know that you are going to be shooting for motion picture/cinema use. Otherwise, use 25/50 (PAL version) or 30/60 (NTSC version).

Video formats


The GH3 gives you the choice of three video formats: MP4, AVCHD and MOV.

MP4 This mode gives you a single video file with the .mp4 extension. In this mode, you get the most compressed files, i.e., the smallest video files. This is good for uploading videos to YouTube, for example, when you are not going to be editing the videos.

AVCHD In this mode, the camera creates a directory catalogue structure with your video files inside. The actual video files have a .mts extension. In terms of compression, this mode sits in the middle, having a compression level comparable to the predecessor GH2.

MOV For the very best video quality, use this mode. Each video capture gives you a single .mov file, and with a high frame rate, the files can become rather huge.

Using the MOV format requires that you have a fast SD memory card. A card with the description "Sandisk Extreme 45MB/s U1 Class 10" does work, also with the 72Mbps All-Intra mode. A card called "Sandisk Extreme 30MB/s Class 10" did not work with the MOV format at all, not even with the 50Mbps mode. That is my experience, anyway.

Interlace and progressive


The interlace video mode originates from older, analogue TV transmission technology, and gives the appearance of a quicker frame refresh rate by updating odd and even numbered rows in every second frame.

This is a rather obsolete technology by now, and I would advice against using interlace video with the GH3. Use it only if you positively know that you need interlaced video, for some reason. The interlace video modes are designated with a lower case i, like here:


Rather, use the progressive mode, designated by the lower case p:


All Intra


The GH3 adds a totally new option, to use the All Intra compression scheme in the MOV video mode. This is the highest bitrate option available, with a staggering 72Mbps output, about three times the maximum of the GH2.

What's special about this mode, is that it does not employ any between frame compression, only inside each frame, hence the name All Intra. It is designated with a capital I:


For the ultimate video quality, should you use this mode? It may be useful if you need a strong consistency between each frame, for example for green screen video shooting. Otherwise, I think it is largely overkill to use this mode. The massive files will clog up your hard drive, with a fairly marginal quality improvement.

Also, there is evidence to support that the normal 50Mbps mode has better video quality, despite having a lower bitrate. The reason is that the All Intra mode is less efficient, it requires a lot higher bitrate to be similar in quality.

So the bottom line on All Intra is: Only use if you speficially need consistence between each frame. Otherwise, the 50Mbps mode is the best for most uses.

720p and 1080p


There are two choices of resolution: High Definition (HD), 1280x720 and Full HD (FHD), 1920x1080. Given this choice, most people would want to use the largest resolution. After all, you can always scale down from FHD to HD, but you cannot scale up from HD to FHD.

Or can you? Some would argue that with the 50/60 fps All Intra (capital I) mode in 720p mode, you could scale the footage up to 1080p, and it would still be very sharp.

Most of the time, though, I would go for FHD 1080p.

Summary


The table below sums up the major video modes available, and the maximum bitrate

HD 1280x720FHD 1920x1080
MP4 25p/30p10Mbps20Mbps
AVCHD 50p/60p28Mbps
AVCHD 50i/60i17/13Mbps24/17/13Mbps
AVCHD 24p24/17Mbps
MOV 24p/25p/30p/50p/60p50Mbps50Mbps
MOV 24p/25p/30p All Intra72Mbps72Mbps
MOV 50p/60p All Intra72Mbps

As you see, the MOV video format gives the highest bitrates, with the All Intra mode at the top with 72Mbps. The All Intra mode is not available for FHD 1080 @ 50fps or 60fps.

Conclusion


If you want a good video quality, for uploading to YouTube and other video sharing services, you can safely use the MP4 format, for reasonably sized video output files. For the very best video quality, use the MOV format.

Personally, I would use FHD (1080 rows), and select 25/30 frames per second when the light is dull, and 50/60 frames per second in bright light. The lower frame rate allows for using a slower shutter speed, hence it is more usable indoors and in other low light situations.

In my experience, the continuous autofocus during video recording works best in the high frame rate, i.e., 50fps or 60fps, depending on if you have a PAL or NTSC version.

On the other hand, note that the high fps modes (50/60) will not work with the Extended Tele Conversion (ETC) mode. ETC is useful for extending the reach of your lens, while retaining the resolution. For this mode to work, you must set a lower frame rate, 24, 25 or 30 fps.

Starting video recording


On a related note, there are two ways to start the video recording. The first is to use the dedicated red video button on the rear. The second is to set the dial mode to "Creative Movie Mode", and then use the shutter button.


These two are quite different, so lets look more closely at them:

1. The red video button. When using the dedicated video button, the camera ignores your mode dial settings, and does it's best to give you a sensible exposure. This usually involves using the lens wide open, unless you have a fast or wide lens, and it is very bright.

This is usually all well, but the camera will often set a very fast shutter speed. When recording videos, the ideal is often to use a 180° shutter, meaning that the shutter speed is twice as fast as the frames per second rating. So if you have a European camera used at 25 fps, you will want to set the shutter speed to 1/50s. The reason why 180° shutter is often used, is that moving objects will have some motion blurring, making the video look more fluid.

This is impossible to control when using the red video button, and, in fact, the camera does not say what shutter speed it uses. To control this, you need to use the Creative Movie Mode.

One advantage when starting video recordings using the red button, is that you can press the shutter during video recordings, to take still images. If you select 4MP picture size, this is done seamlessly, and there are no gaps in the video when taking still images. Using larger still images, though, there will be a small gap in the video stream when you take a still image.

2. Using the Creative Movie Mode. In this mode, you need to use the shutter button to start and stop video recording. Hence, it is not possible to take still images during video capture.

The advantage, though, is that you can set the exposure mode to P, A, S and M, just like when taking still images. In the M mode, you can set the aperture, shutter speed, and ISO settings manually for full control. To change the exposure mode setting, you can touch the LCD display in the top left corner, in the movie camera icon.

Saturday, 8 December 2012

GH3 video example @ ISO 6400

The Panasonic GH3 camera improves upon the GH2 in many ways. One improvement is that you can record videos at ISO 6400 sensitivity, while the GH2 only went up to ISO 3200.

This is quite useful. Some months ago, I was recording fireworks, and found that even with ISO 3200, I had to set the shutter speed to 1/12s, and record at only 12 frames per second. With the GH3, I could have set ISO 6400, and used 25 frames per second, a very common FPS setting.

I have tested the ISO 6400 setting at a dimly lit concert. I used the Lumix X 12-35mm f/2.8 lens at 35mm f/2.8. The video mode was the 1080p, 50 fps, and I set the shutter speed to the slowest possible, 1/50s. Here is the result:


In this case, I could probably have gotten better results by using 25 fps, allowing for 1/25s shutter speed, and reducing the ISO to 3200. But here I wanted to test the ISO 6400 setting.

Note that the lightning at the concert was very difficult, with a lot of red coloured lights. With better lightning, the video outcome would have been vastly better.

Here is an extracted frame from the video. I used Kdenlive in Linux to edit the video:


The video mode I used is denoted "MOV FHD 50p" in the camera, and gives 1920x1080 image frames at 50fps. On an NTSC camera, the fps would be 60. This mode gives you 50Mbps bitrate, about twice as much as the highest bitrate the Panasonic GH2 could produce.

For the ultimate in image quality per frame, you could choose the "MOV I FHD 25p" mode, which encodes the video as ALL-INTRA, with a bitrate of 72Mbps. Again, on an NTSC camera, this would be 30p, not 25p.

Thursday, 6 December 2012

GH3 has less rolling shutter artefacts than GH2!

Rolling shutter denotes a type of shutter mechanism, and can refer to both a mechanical shutter, and an electronic shutter. It also refers to the type of tilting artefacts you get when panning quickly during video recording. Some refer to these artefacts as "jello video".

This is not strictly related only to digital cameras. Older film based cameras often feature a focal plane curtain shutter, which "rolls" across the film plane and exposes the film horizontally or vertically. A very famous example of this is the racing car picture taken in 1913 by Jacques Henri Lartigue using a 4x5 Speed Graphic camera.


The shutter moves relatively slowly on this camera, when compared with modern SLRs, which gives the distortion of the racing car. The distortion is especially visible in the wheels, which appear to be leaning forward. This effect was later copied by cartoonists when they wanted to give the impression of speed.

Sunday, 28 October 2012

Continuous AF during video with the GH2

The Micro Four Thirds mirrorless cameras use a totally different autofocus method than traditional SLR and DSLR cameras. The M4/3 cameras use a technique called Contrast Detection Autofocus (CDAF), whereas SLR systems typically use Phase Detection Autofocus (PDAF), also called Phase Difference Autofocus.

CDAF relies on jogging the autofocus back and forth to find the setting with the most contrast, in which case the camera assumes the image is in focus. For still images, this works very well. My study shows that both the GH1 and GH2 feature very fast autofocus, especially with the kit zoom lenses. I don't think that SLR cameras can do this much faster, at least not faster in a noticeable way.

The GH2 can sample the contrast 120 times per second (120fps), which allows for a faster autofocus, given that the lens is also capable on reacting fast enough. The GH1 could only sample at 60fps.

The Panasonic GH3, due to be available late 2012, further improves upon this by allowing for 240fps CDAF readout. However, Panasonic says that at the moment, only one lens supports this, the Lumix X 12-35mm f/2.8, and only after firmware update, which was announced today, coincidentally.

Continuous autofocus during video recording, though, is one area where the Micro Four Thirds cameras currently do not perform very well.

One thing to keep in mind, is that when taking still images, the sensor is free to be used for AF before you snap the image. When recording video, though, the sensor is busy scanning your video stream, and cannot be used for high speed CDAF sampling in the same way.

The GH2 can record videos at three different rates: 24fps, 25fps and 50fps (24fps, 30fps and 60fps for American versions). The 24fps, 25fps and 30fps modes are popular for their progressive image stream, and high bit rate. However, keep in mind that in these modes, the camera can only sample the contrast at a low rate, hence, I guess that autofocus during video will also be slower.

The interlaced 1080i mode, 50fps for the European version and 60fps for the American version, can scan the image scene twice as fast, and hence one can guess that the AF is also faster.

The test

I have tried to test this with a controlled case. I rigged up a picture which moves back and forth (using a LEGO Technic mechanism). This is used to test the autofocus performance in both the 50i and 25p modes of the GH2, using three different lenses, the Lumix X 45-175mm f/4-5.6, Lumix G HD 14-140mm f/4-5.8 and Olympus 45mm f/1.8. All of these lenses are marketed as video optimized.

Here is a video showing the test setup, and the outcomes of the tests:


Analysis

By looking at the videos, I think it is quite clear that the focus is kept better when recording at 50fps, compared with 25fps. To be more sure, I looked through the first full cycle when using the Lumix X 45-175mm f/4-5.6. The cycle from the rear position, moving forwards and then backwards again to the same position takes 140 frames, or 5.6 seconds.

At 50fps, I counted 71 frames in focus (51%), while at 25fps, the number of frames in focus was 59 (42%). This is hardly a scientific analysis, but I think it confirms that my theoretical guess also holds in practice: When recording at a higher frames per second rate, the continuous autofocus works better.

Conclusion

When the continuous autofocus performance is important, you could consider video recording at a higher frames per second rate. This gives the camera a better chance of keep up the focus, given that there is sufficient light.

On the other hand, the GH2 camera can only provide the interlaced mode at 50fps/60fps at 1080 lines resolution. The interlaced mode probably gives slightly less perceived sharpness anyway.

Future cameras are expected to provide the progressive mode at 1080 lines resolution (1080p) at 50fps/60fps. With this capability, I would certainly recommend using 1080p at 50fps/60fps when the autofocus performance is crucial, and when there is sufficient light.

Technical improvement potential

One could imagine improvement potential within the technical limitations of the autofocus system. As I have demonstrated in this article, the frames per second rating affects the autofocus effectiveness. As the sensor is used to record the video stream, it cannot at the same time be used for autofocus at a faster rate.

However, it is quite often that you don't use a 360° shutter. A 360° shutter means that the shutter stays open all the time. Hence, at 25fps video recording, the shutter speed is 1/25s. At this fps and shutter speed combination, the sensor is always busy reading the video stream.

However, what if you use a 180° shutter? At 25fps, that would correspond to 1/50s shutter speed. At this rate, there is a 1/50s gap between each frame which could be used for reading out CDAF information, see the illustration below:


Using this method, there is room for one exposure, and two additional CDAF readouts per frame when using a 180° shutter. Perhaps the GH2 uses this technique today, I don't know. These technical details tend to be secrets.

Alternative techniques for AF during video

The Micro Four Thirds cameras so far only use CDAF for autofocus, both for still images, and during video. There are some other techniques out there as well.

The Sony Single-Lens Translucent (SLT) cameras use a permanent (non-flapping) mirror which is semi-transparent. This mirror allows for using traditional SLR style PDAF sensors, meaning that the camera can operate the focus very quickly also during video recording.

This has an additional advantage over CDAF: There is no need to jog the focus back and forth to find the maximum contrast, as the Micro Four Thirds cameras do. Hence, you will see that the cameras do not "overshoot" the focus. When needed, the focus changes to the correct distance at the first attempt, given that there is sufficient light.

The disadvantage of the SLT system is the requirement for a traditional mirror box, making the cameras larger and more complicated, as well as requiring the lenses to be designed for a longer register distance, resulting in larger and heavier lenses.

The Nikon 1 system has an alternative approach. It uses an imaging sensor where some of the photosites are PDAF sensors. This allows for a hybrid CDAF and PDAF system: The camera can choose which system to use depending on the situation. In theory, this is the best of both worlds, as it can keep the register distance short, while allowing for faster autofocus during video recording. I have not tried the Nikon 1 myself, though, so I don't know the real world merits of the system.

According to interviews with designers and engineers, there are no plans to change the autofocus system of the Micro Four Thirds cameras. In theory, it should be possible to improve the CDAF system with better and faster image processing. Hence, we can expect the continuous autofocus to gradually improve with newer cameras.

Sunday, 30 September 2012

Air show video using the Lumix 100-300

During the September 1st Royal Norwegian Air Force 100 year anniversary, I tried to video record some of the air plane flybys. This was the very first time I had tried to video record air plane, and I brought the longest lens I have, the Lumix G 100-300mm f/4-5.6 with the Panasonic GH2 camera.

I did not bring any tripod or extra microphone, as I would be standing in a crowd of people, and needed to be fairly agile.

Most of the time, I used the lens in the longest setting, at 300mm, and stopped down the aperture a bit to f/6.3. I could do this at ISO160, the base ISO, and still have a healthy shutter speed of about 1/500s, even when dialing in about +1/3 to 2/3 of exposure compensation. I needed the exposure compensation, as I was mostly shooting into the sun, or close to the sun.

Here I have edited the footage into a video stream of about three minutes with some of the footage:


I used Kdenlive to edit the stream, and I added a bit of post process image stabilization to the video. This was needed, even though I used the OIS feature of the lens. Perhaps I would have been able to go without the extra image stabilization had I used a tripod.

Some things to note about the video:

  • There is quite clearly still some vignetting, even though I did stop down an extra 1/3 of an aperture stop.

  • You can see the lens OIS working, as the brightest central disc area moves about in the frame.

  • The focus is mostly ok. Some times, the camera loses focus for a short period, but it is not a big problem. I had the AF-S mode selected.

  • The sound is not very good. An external microphone would probably have improved it.

  • You can see the evidence of rolling shutter distortion. Here is a frame from a video, where the helicopter blade is bent due to the rolling video shutter:


    When using the mechanical shutter for still images, though, there is virtually no rolling shutter effect:


    This is because the mechanical shutter travels faster than the electronic line by line readout of the sensor is.

Thursday, 20 September 2012

3D video recording with the Lumix 12.5mm f/12 3D lens

I have already written a review of the Lumix G 12.5mm f/12 3D lens. In the review, I concluded that you should not buy the lens. One of the reasons was the lack of the possibility to record 3D videos, which is a strange omission.


However, it is of course possible to fool the camera into believing that the 3D lens is not attached, in which case video recording becomes a possibility. The way to do this, is to put some plastic tape over the electrical contacts of the lens. Then, the camera will not be able to communicate with the lens, and fails to notice its 3D properties, treating it like any other lens.

For this to work, you must enable the "shoot without lens" option on the camera:


Here is a video illustrating how to do this:


Be careful, though. If pieces of the plastic tape comes off and falls into the sensor, that can cause big problems.

Video

Using this method on the GH1 camera, I was able to use much more of the sensor than what is being used when taking 3D still images. As illustrated by the image below, I cropped off the centre 120 pixel column, and used the rest to make an anaglyph 3D video:


This uses a total of 94% of the sensor area.

As I wrote in the review, when the 3D lens is used in the conventional way, only 35% of the sensor area is used. Used this way, there is an additional crop ratio of 2.4, meaning that the lens becomes a short tele lens of 30mm, just like the Sigma 30mm f/2.8 EX DN.

The way I use the lens as a video lens, though, the crop ratio is only 1.6, giving a focal length equivalent of 20mm, a slightly short normal lens. So the field of view of the 3D lens becomes more useful with the plastic tape trick.

On the other hand, the resolution of 900x1080 pixels is quite unusual, and it is likely that you need to crop this to actually use it in any sensible way.

Here is an example video. The video is anaglyph, and must be watched with red/cyan glasses.


There is still some vignetting in the corners, but this proves that it is possible to record 3D videos with the Lumix G 12.5mm f/12 3D lens.

Still images

You can use this trick with still images as well. It gives you a larger image to work with, rather than the 1920x1440 3D image pair you normally get. Here is an example image taken when using the plastic tape trick. The areas used by the 3D lens in the conventional way are highlighted with the rectangles:


Using the lens in the conventional way yields this image:


When using the whole sensor frame output, though, you can get a much larger field of view, using 1930x3016 pixels per 3D image:


This shows that when fooling the camera into not knowing that the 3D lens is connected, you can get a larger sensor area to work with. The disadvantage is that you need to compile it into 3D manually, and also, you are stuck with the portrait format, unless you crop it down to landscape format, though. You could also use the RAW file, this way.

Alternative lens

Loreo also produces a 3D lens for Micro Four Thirds. It uses the same principle: Two lenses project an image on the left and right part of the sensor, and they must be combined into a 3D video. Unlike the Lumix 12.5mm 3D lens, though, the Loreo lens has a more sensible distance between the lenses, the stereo base, giving a more pronounced 3D effect:


The Loreo lens uses the same principle as the Lumix G 12.5mm f/12 3D lens. It projects two images side by side on the sensor. The big difference, though, is that the Loreo lens has a much larger stereo base, and uses mirrors to project the images into the relatively small sensor. The Lumix 3D lens, on the other hand, does not use mirrors at all, and places both lenses inside the sensor area.

So you end up with the same problems when using the Loreo lens as well: You are restricted to the portrait format, both when using still images and video. Of course, you can crop the images down to a horizontal landscape format, but then you lose quite a bit of resolution when cropping.

Saturday, 15 September 2012

Fireworks recorded using GH2 and Samyang 7.5mm f/3.5 fisheye

It was very dark during this firework, so to record it, I had to push the exposure as high as possible. I used the "Creative Movie Mode", with the manual setting ("M"), in which I could dial in ISO 3200 (the maximum), and used the largest aperture on the Samyang 7.5mm fisheye lens: f/3.5.


A little known feature of the Panasonic GH1 and GH2 is that you can record videos with a slower shutter speed than the frames per second setting. I was using the high bit rate 25 fps 1080p mode, and to get sufficient exposure, I set the shutter speed to 1/13s, i.e., slower than 1/25s. This is possible only in the "Creative Movie Mode", in the "M" exposure mode, and with autofocus turned off. Of course, you don't actually get 25 frames per second with a shutter speed of 1/13s, you only get 13 frames per second.

To make the video clip more interesting, I speeded up the video to 200% speed, meaning that the frames per second of the output clip was about 25fps.


I also changed the tempo of the sound, to keep it in sync with the 2x fast video.

Conclusion

The Samyang 7.5mm f/3.5 fisheye lens is very good for recording fireworks. But to get sufficient exposure, you may need to set the shutter speed quite low, lower than 1/30s, giving you fewer frames per second than you are used to. This feature of the Panasonic GH1, GH2 and GH3 cameras is quite useful, and I don't think other Micro Four Thirds cameras can record videos with this slow shutter speeds.

When the GH3 gets released soon, I would guess that it can record videos at ISO 6400, which may solve this issue.