Introduction

This blog is a user's perspective on the Micro Four Thirds camera system. Read more ...

Lens Buyer's Guide. Panasonic GH4 review.

My lens reviews: Olympus 9mm f/8 fisheye, Lumix G 12-32mm f/3.5-5.6, Leica 25mm f/1.4, Lumix X 12-35mm f/2.8, Lumix X 35-100mm f/2.8, Sigma 30mm f/2.8, Sigma 19mm f/2.8, Lumix X PZ 14-42mm f/3.5-5.6, Lumix X PZ 45-175mm f/4-5.6, Olympus M.Zuiko 45mm f/1.8, Panasonic Lumix G 100-300mm f/4-5.6, Panasonic Leica Lumix DG Macro-Elmarit 45mm f/2.8 1:1 Macro, Panasonic Lumix G 45-200mm f/4-5.6, Panasonic Lumix G 20mm f/1.7 pancake, Panasonic Lumix G 14mm f/2.5 pancake, Panasonic Lumix G HD 14-140mm f/4-5.8, Panasonic Lumix G HD 14-140mm f/3.5-5.6, Panasonic Lumix G 8mm f/3.5 fisheye, Lumix G 7-14mm f/4, Samyang 7.5mm f/3.5 fisheye, Tokina 300mm f/6.3 mirror reflex tele, Lensbaby 5.8mm f/3.5 circular fisheye lens
The blog contains affiliate links. As an Amazon Associate I earn from qualifying purchases.

Sunday 30 September 2012

Air show video using the Lumix 100-300

During the September 1st Royal Norwegian Air Force 100 year anniversary, I tried to video record some of the air plane flybys. This was the very first time I had tried to video record air plane, and I brought the longest lens I have, the Lumix G 100-300mm f/4-5.6 with the Panasonic GH2 camera.

I did not bring any tripod or extra microphone, as I would be standing in a crowd of people, and needed to be fairly agile.

Most of the time, I used the lens in the longest setting, at 300mm, and stopped down the aperture a bit to f/6.3. I could do this at ISO160, the base ISO, and still have a healthy shutter speed of about 1/500s, even when dialing in about +1/3 to 2/3 of exposure compensation. I needed the exposure compensation, as I was mostly shooting into the sun, or close to the sun.

Here I have edited the footage into a video stream of about three minutes with some of the footage:


I used Kdenlive to edit the stream, and I added a bit of post process image stabilization to the video. This was needed, even though I used the OIS feature of the lens. Perhaps I would have been able to go without the extra image stabilization had I used a tripod.

Some things to note about the video:

  • There is quite clearly still some vignetting, even though I did stop down an extra 1/3 of an aperture stop.

  • You can see the lens OIS working, as the brightest central disc area moves about in the frame.

  • The focus is mostly ok. Some times, the camera loses focus for a short period, but it is not a big problem. I had the AF-S mode selected.

  • The sound is not very good. An external microphone would probably have improved it.

  • You can see the evidence of rolling shutter distortion. Here is a frame from a video, where the helicopter blade is bent due to the rolling video shutter:


    When using the mechanical shutter for still images, though, there is virtually no rolling shutter effect:


    This is because the mechanical shutter travels faster than the electronic line by line readout of the sensor is.

Friday 28 September 2012

Using a +10 macro lens

There are many ways to achieve macro photo capabilities. The easiest is of course to buy a dedicated macro lens, like the Panasonic-Leica 45mm f/2.8 1:1 macro. However, that is an expensive lens, and I am often looking to test cheaper alternatives. I have looked into a number of options, see the table at the end of this article for a list.

Some macro options involve offsetting the lens further away from the camera, or reversing it, effectively cutting off the electrical communications between the camera and the lens. This has the negative side effect of removing the possibility to control the focus and the aperture of the lens.

Probably the cheapest and the simplest solution is to buy a close up filter to be screwed into the front threads of a lens you already have. These are typically rated as +1, +2, +4 and +10. I decided to try the most extreme, the one rated as +10:


One strange thing about the macro filter I got, is that the glass extends beyond the rear side of the metal ring. This means that when screwing it into a lens, the glass elements might meet, potentially damaging either. To avoid this, I used a 46mm stand off ring between the macro ring and the lens. Here they are mounted to the Lumix X 45-175mm f/4-5.6:


When using the +10 close up filter, the Lumix X 45-175mm f/4-5.6, the lens becomes 1:2 capable at 45mm, and 1:0.6 at 175mm. The working distance is 8cm through the focal length range. Here is a typical setup at 175mm focal length:


And the result image, taken with an aperture of f/13:


Sadly, the image quality is rather poor. As you can see, there are some significant chromatic aberration artefacts. Perhaps close up filters with a lower rating, e.g., +2, provide a better quality. But then again, they also give less magnification.

One big advantage with this method is that you can control the aperture from the camera. The focus can also be controlled, however, at this magnification, you are limited to very small fine tuning of the focus distance only. You must do the focusing by moving the object into focus.

Used on the Sigma 30mm f/2.8

I also tried to use the close up filter on the Sigma 30mm f/2.8 EX DN lens, which shares the 46mm filter thread.

In this case, I could do without the stand off ring. However, I could not screw the close up filter completely into the filter threads, as the glass surfaces would meet, which I don't like.

Using this solution, I was able to get a 1:2 magnification, with a 6cm working distance. Here is the output image:


In this case, I did not see any severe chromatic aberration artefacts, but then again, the enlargement is not nearly as large.

Other options

Here is a summary of various ways to achieve a macro ability:

Methodmagnificationworking distanceaperturefocus
Using a dedicated macro lens, the PL451:1 max6cmautoauto
Macro extension rings, and a legacy normal lens1.4:1 in my example6cmmanual, if the lens has an aperture ringno focus possibilty
Macro reverser ring, with Lumix 14-42mm2.5:1 - 1.15:12-4cmno control of aperture from camerano focus possibilty
Olympus ZD 50mm f/2 lens with extra 65mm extension2:13cmno control of aperture from camerano focus possibilty
Lumix G 45-200mm with reversed normal lens3.5:15cmautoauto, but only small adjustments
Lumix X 45-175mm with +10 close up filter (this article)1:2 (45mm), 1.7:1 (175mm)8cmautoauto, but only small adjustments

Conclusion

This study perhaps shows that there are no free lunches. The cheap macro front filter lens is simple to use, but gives poor image quality. For the ultimate in image quality and simplicity, the best is probably to buy the Panasonic-Leica 45mm f/2.8 1:1 macro. in the first place.


Thursday 20 September 2012

3D video recording with the Lumix 12.5mm f/12 3D lens

I have already written a review of the Lumix G 12.5mm f/12 3D lens. In the review, I concluded that you should not buy the lens. One of the reasons was the lack of the possibility to record 3D videos, which is a strange omission.


However, it is of course possible to fool the camera into believing that the 3D lens is not attached, in which case video recording becomes a possibility. The way to do this, is to put some plastic tape over the electrical contacts of the lens. Then, the camera will not be able to communicate with the lens, and fails to notice its 3D properties, treating it like any other lens.

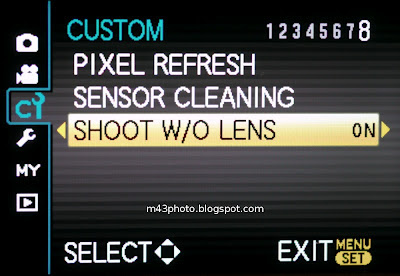
For this to work, you must enable the "shoot without lens" option on the camera:


Here is a video illustrating how to do this:


Be careful, though. If pieces of the plastic tape comes off and falls into the sensor, that can cause big problems.

Video

Using this method on the GH1 camera, I was able to use much more of the sensor than what is being used when taking 3D still images. As illustrated by the image below, I cropped off the centre 120 pixel column, and used the rest to make an anaglyph 3D video:


This uses a total of 94% of the sensor area.

As I wrote in the review, when the 3D lens is used in the conventional way, only 35% of the sensor area is used. Used this way, there is an additional crop ratio of 2.4, meaning that the lens becomes a short tele lens of 30mm, just like the Sigma 30mm f/2.8 EX DN.

The way I use the lens as a video lens, though, the crop ratio is only 1.6, giving a focal length equivalent of 20mm, a slightly short normal lens. So the field of view of the 3D lens becomes more useful with the plastic tape trick.

On the other hand, the resolution of 900x1080 pixels is quite unusual, and it is likely that you need to crop this to actually use it in any sensible way.

Here is an example video. The video is anaglyph, and must be watched with red/cyan glasses.


There is still some vignetting in the corners, but this proves that it is possible to record 3D videos with the Lumix G 12.5mm f/12 3D lens.

Still images

You can use this trick with still images as well. It gives you a larger image to work with, rather than the 1920x1440 3D image pair you normally get. Here is an example image taken when using the plastic tape trick. The areas used by the 3D lens in the conventional way are highlighted with the rectangles:


Using the lens in the conventional way yields this image:


When using the whole sensor frame output, though, you can get a much larger field of view, using 1930x3016 pixels per 3D image:


This shows that when fooling the camera into not knowing that the 3D lens is connected, you can get a larger sensor area to work with. The disadvantage is that you need to compile it into 3D manually, and also, you are stuck with the portrait format, unless you crop it down to landscape format, though. You could also use the RAW file, this way.

Alternative lens

Loreo also produces a 3D lens for Micro Four Thirds. It uses the same principle: Two lenses project an image on the left and right part of the sensor, and they must be combined into a 3D video. Unlike the Lumix 12.5mm 3D lens, though, the Loreo lens has a more sensible distance between the lenses, the stereo base, giving a more pronounced 3D effect:


The Loreo lens uses the same principle as the Lumix G 12.5mm f/12 3D lens. It projects two images side by side on the sensor. The big difference, though, is that the Loreo lens has a much larger stereo base, and uses mirrors to project the images into the relatively small sensor. The Lumix 3D lens, on the other hand, does not use mirrors at all, and places both lenses inside the sensor area.

So you end up with the same problems when using the Loreo lens as well: You are restricted to the portrait format, both when using still images and video. Of course, you can crop the images down to a horizontal landscape format, but then you lose quite a bit of resolution when cropping.

Tuesday 18 September 2012

GH3 comments

So, the new Panasonic GH3 camera has been announced now, after a long wait. How do I view it?

Of course, by this time, I have no first hand experience of the camera what so ever. My knowledge of the camera is solely based on images, video and text online.

In terms of technical specifications, not so much has changed. We have a higher video FPS rating at 1080p, as expected. And we have a higher video bitrate. Under the hood, there is of course a lot of technical details, for example a higher frame rate used for the contrast detection auto focus system (CDAF), which has the potential for better and faster autofocus. And there is a higher sensitivity, as well as the usual promise of a better dynamic range.

Ergonomics

The really big change is the ergonomics. The GH3 is bigger than the GH2:

GH2GH3
Dimensions (w, h, d)124 x 90 x 76 mm133 x 93 x 82 mm
Weight442g540g

The size accommodates a better grip, more space for buttons, three control wheels (the GH2 had one single only), more connectors. As the camera does not really take up that much more space in the bag, I see this as purely a positive thing. The ergonomics of the GH1 and GH2 left quite a bit to be desired. The layout is rather cluttered, and it is easy to press a button by a mistake. The GH3 is going to be much easier to handle, especially with a large lens.

On the flip side, one could argue that the whole purpose of the Micro Four Thirds system was compactness. So why introduce a larger flagship model?

Sensor

The GH3 deviates from the predecessor GH cameras in a significant way: It no longer offers the oversized, multi aspect sensor.

With the multi aspect sensor, the GH1 and GH2 could take photos at 4:3, 3:2 and 16:9 aspect ratios while retaining the same diagonal field of view. This has the advantage of utilizing the lens imaging circle better. More importantly, it could record videos at the 16:9 aspect ratio while retaining the same field of view as well.


Without this feature, the lenses effectively lose some wide angle feature when switching to video. It means that the wide angle property that you were used to when using the GH2 are going be a bit disappointing when switching to the GH3. The difference is not too significant, but noticeable.

When using a fisheye lens on the GH2, for example, you get a 180° diagonal coverage in both photos and videos. With the GH3, though, you get the 180° diagonal field of view only in the 4:3 still image mode, and less than that in video mode. This applies to the Samyang 7.5mm f/3.5 fisheye lens for example.

Conclusion

The GH3 takes the Micro Four Thirds system into the professional territory: With better ergonomics, splash protection, better video bitrate and connectivity. Sadly, it also comes at a significantly higher price point.

While it doesn't live up to all the expectations people had, I am confident that the GH3 will be loved by the users.

Those who are put off by the size increase could still look to the Panasonic G5. While it does not offer quite the same feature set as the GH3, it is still a quite impressive camera given its size.

Saturday 15 September 2012

Fireworks recorded using GH2 and Samyang 7.5mm f/3.5 fisheye

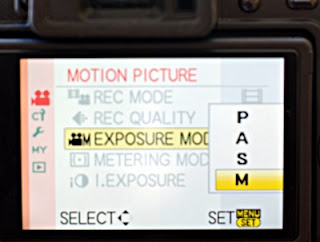
It was very dark during this firework, so to record it, I had to push the exposure as high as possible. I used the "Creative Movie Mode", with the manual setting ("M"), in which I could dial in ISO 3200 (the maximum), and used the largest aperture on the Samyang 7.5mm fisheye lens: f/3.5.


A little known feature of the Panasonic GH1 and GH2 is that you can record videos with a slower shutter speed than the frames per second setting. I was using the high bit rate 25 fps 1080p mode, and to get sufficient exposure, I set the shutter speed to 1/13s, i.e., slower than 1/25s. This is possible only in the "Creative Movie Mode", in the "M" exposure mode, and with autofocus turned off. Of course, you don't actually get 25 frames per second with a shutter speed of 1/13s, you only get 13 frames per second.

To make the video clip more interesting, I speeded up the video to 200% speed, meaning that the frames per second of the output clip was about 25fps.


I also changed the tempo of the sound, to keep it in sync with the 2x fast video.

Conclusion

The Samyang 7.5mm f/3.5 fisheye lens is very good for recording fireworks. But to get sufficient exposure, you may need to set the shutter speed quite low, lower than 1/30s, giving you fewer frames per second than you are used to. This feature of the Panasonic GH1, GH2 and GH3 cameras is quite useful, and I don't think other Micro Four Thirds cameras can record videos with this slow shutter speeds.

When the GH3 gets released soon, I would guess that it can record videos at ISO 6400, which may solve this issue.

Sunday 9 September 2012

Lumix X PZ 14-42mm f/3.5-5.6 Review: Compact, but not the best image quality

The Panasonic Lumix G Vario X PX 14-42mm F3.5-5.6 Power OIS is a kit zoom lens in a very compact form factor. It collapses when not in use, in which case it is about the size of the Lumix G 20mm f/1.7 pancake lens.

Both the zoom and focus are the "fly by wire" type, meaning that they can only be operated through levers on the side. This has both positive and negative aspects: The power zoom (PZ) enables smooth zooming during video. For still image photography, though, I would say that a mechanical zoom ring is more useful than the lever operated power zoom.

When looking at this lens, it is natural to compare it with the Lumix G 14-42mm f/3.5, the more basic kit lens. They are both pictured below:


In the foreground: Lumix X 14-42mm (left) and Lumix G 14-42mm (right). In the background: Lumix X 45-175mm (left) and Lumix G 45-200mm (right).