When the Lumix GH5 arrived in 2017, I thought it was the first Micro Four Thirds camera to be truly usable at ISO 6400. Of course you still get better image quality at lower ISO, but when you need high ISO, it still delivers well.
The Lumix GH6 has an even newer sensor and image processor, so you might expect better performance. I have compared the two cameras by using the same lens on both, the Lumix G 14-42mm f/3.5-5.6 zoom lens. I had both mounted to a bracket so that they can capture the same field of view in 4K mode, 60p, 1/60s shutter:
Here is the comparison:
But the Lumix GH6 has another trick up its sleeve: The "Dynamic Range Boost", or "DR Boost". With this feature, the camera will process the input signals at two different gains at the same time, and then combining them to give better overall dynamic range.
This works in most video modes, but only from ISO 800 and upwards. I used ISO 6400 here, with the Lumix G 14-42mm lens, at f/5.6 and 60 frames per second:
I think these examples show that the Lumix GH6 is even more usable at high ISO. The video looks more clean at ISO 6400, compared with the Lumix GH5.
Looking at the drive mode dial of the Lumix GH6, you'll see that it has changed quite a bit from the GH5. The "6K Photo" has disappeared, first of all. I think this was sad, since I used it quite a lot on the GH5. Contrary to what the name indicates, this is a video mode, not a photo mode. And it gives you 5.5K video recording, not bad for a consumer camera from 2017.
Another interesting feature in the "6K Photo" setting was the "Pre-Burst", able to capture one second of video recording from before you pressed the trigger, which gives a lot of interesting possibilities.
As this mode has disappeared, we get the "High Resolution" mode instead, which takes 8 consecutive pictures, using the in-body image stabilization to slightly move the sensor around to capture a staggering 100MP image, with 11552x8672 pixels. This mode can be used both on a tripod and handheld, and promises to take into consideration objects moving as you take the images, so that they still look sane. But what does this extra resolution look like, and does it give any real world advantage compared with a real high resolution camera? I'll check it out in this article.
For the test, I have used the Lumix GH6 with the Lumix 25mm f/1.4 lens and compared it with the Nikon Z7 fullframe camera, having a 45MP resolution, using a 50mm lens. With the 2x crop factor of the Micro Four Thirds format, both these setups have the same field of view. Both cameras were placed on tripod and used at base ISO for the test.
2. Lumix GH6 in the high resolution mode (100MP) on tripod.
3. Lumix GH6 in the high resolution mode (100MP) handheld.
4. Nikon Z7 45MP.
To better compare the images, I scaled all of them up to 100MP. Here is what the scene looks like:
Here are 100% crops from the centre to compare (click for a larger version):
As you can see, there is a real and very impressive increase in the resolution with the Lumix GH6 high resolution mode. Even in the "handheld mode", without using a tripod, the resolution is clearly larger than that of the Nikon Z7 with a 45MP sensor. Sadly, I took the handheld image a bit later, so the lightning is different, but the resolution is clearly very good all the same.
There are some limitations: The ISO cannot be set higher than 1600 in this mode. The auto ISO function is automatically limited to 1600 when you select high resolution. Also, you cannot use longer exposures than 1 second. But these are fairly small limitations.
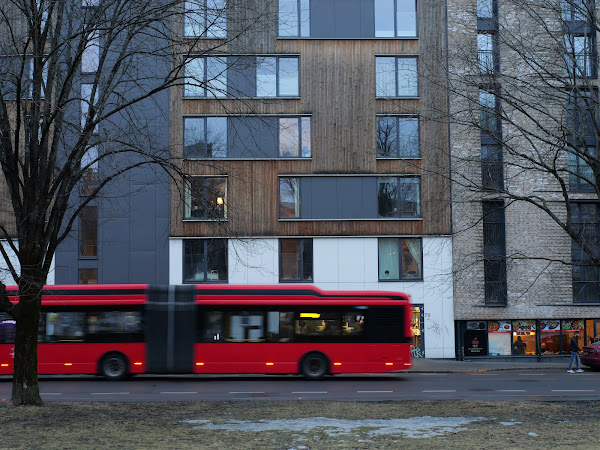
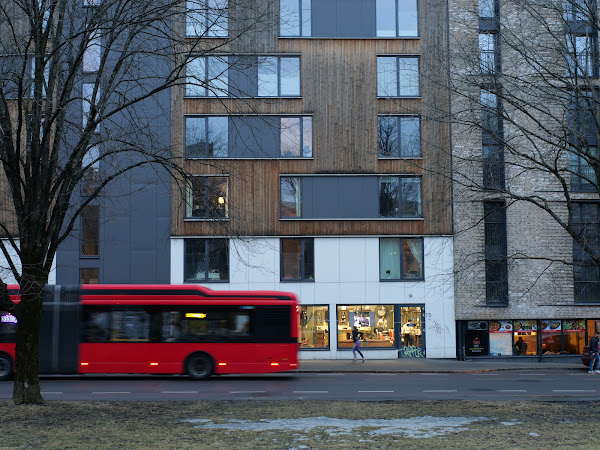
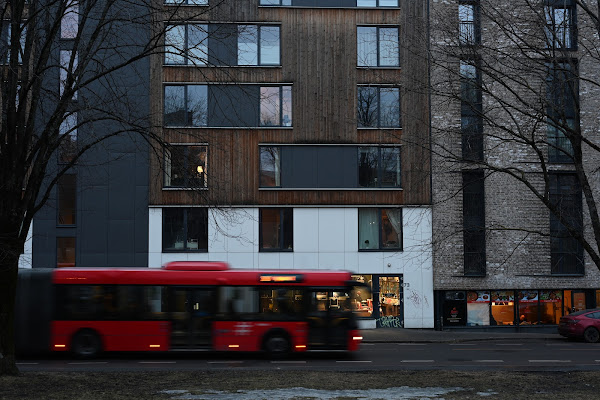
Here is another example image, taken in a quite low light situation: f/4, 1/40s, ISO 1250. In the scene there is movement: A big red bus passing which means that the images captured are different between the 8 frames (click for larger images):
First of all, the movement seems to be handled very well by the Lumix GH6 High Resolution mode. The bus doesn't get chopped up, as you might expect, and the persons walking and running also seem normal.
Looking at the comparative resolution (click to enlarge):
Again, there is an impressive amount of details in the Lumix GH6 High Resolution mode.
How about using the feature for wildlife, then? I tried taking pictures of a crow using the Lumix 100-400mm lens at 400mm f/8. The bird was moving while I photographed, so I noticed that the camera failed to produce the high resolution image in some cases. But here is an example where it did work (click to enlarge):
Normal (25MP)
Hand held high resolution (100MP)
And here are some comparisons (click to enlarge):
In this case, I think there is not really any extra resolution in the high resolution picture. Yes, it has more pixels, but the real resolution is quite similar. I'm guessing that as the bird moved during recording, the camera discarded many of the input files and was not able to make much use of them.
50MP or 100MP?
With the Lumix GH6 you can choose between the "LL" 50MP mode, or the "XL" 100MP modes. How do they compare? I have taken pictures at base ISO using both modes, for a comparison. Here is the scene:
It turns out that in both modes you get 100MP RAW files, but the JPEG files are 8192x6144 (50MP) and 11552x8672 (100MP) respectively.
To compare the details inherent in the JPEG files, here is a comparison:
Based on this, I would say that you get progressively more details by using the higher megapixel modes, however, the real advantage of 100MP over 50MP is perhaps not that significant. So using 50MP goes a long way in terms of capturing more detail.
Finally, here is an example landscape photo, which is probably the main use of the feature:
Normal (25MP)
Hand held high resolution (100MP)
From these crops, we see that there is clearly better resolution in the handheld high resolution shot (100MP). It was taken at 23mm, f/7.1, ISO 1000. It is fair to assume that the resolution would have been even better at base ISO:
Conclusion
The Lumix GH6 high resolution mode is very easy and quick to use, and gives you a very real and signficant increase in resolution. It can be used for pretty much any landscape or cityscape photo. You can get both JPEG and RAW output in this mode.
Also worth noting is that when you use the high resolution mode, you don't only get the combined 100MP image, but also one normal image. So if it turns out that there is excessive movement in the scene while you record, and there are some strange effects because of this, you can still just delete the 100MP image and retain the normal one. Although I have not seen any evidence that movement would be a problem so far. So this mode is completely risk free to use.
When the high resultion mode first appeared on the Olympus OM-D EM5 II, I thought it was mostly a gimmick, and didn't use it much. But with the Lumix GH6, this mode seems usable in real life, and I am looking forward to using it more!
The consumer camera market has changed a lot during the last ten years. A short summary is that the bottom end has disappeared: People don't buy entry level cameras anymore, they have been replaced with smart phones.
What remains is the photo enthusiast groups, who are motivated by the photographic opportunities realized with higher end camera gear. And it is quite widely understood now that a larger imaging sensor gives you better image quality. So is there any future for the Micro Four Thirds format, and is the camera Lumix GH5 still relevant?
This diagram illustrates the relative sensor sizes for Four Thirds, and Full Frame. The Four Thirds sensor is about one quarter the size of Full Frame. As the sensor diagonal is one half, we say that the crop factor is 2x:
For some years, I have used both Micro Four Thirds, and the Full Frame Nikon Z system. Here are two setups with long lenses from both systems:
Despite having a much smaller sensor, the Lumix GH5 is about the same size as the Nikon camera. I think this makes quite good sense: The camera is not only about the sensor, it also needs a user interface, like viewfinder, grip, buttons, display, and so on. And to be usable, the camera needs to have a certain size. In my opinion, the GH5 has struck a nice balance, and it is a very user friendly camera.
When it comes to lenses, the story is different: Nikon Z lenses tend to be way bigger than corresponding lenses for Micro Four Thirds. This is still one of the big advantages of the M4/3 system.
But coming back to image quality, how do the systems compare? For photos, there is no comparison. While the Lumix GH5 takes very good images, the Nikon Z7 is simply way better. As you would expect from a high megapixel count fullframe sensor, the resolution is better, the dynamic range is better, and the low light performance is better. If photos is your main interest, there is certainly a benefit from changing from Micro Four Thirds to Full Frame.
However, when it comes to video, the Lumix GH5 still has a strong edge, despite being at the end of the lifetime. To illustrate, I have edited video examples from both systems into one stream. On the top you have the Nikon Z7 with Nikon 500mm f/5.6, and in the lower part of the frame you have Lumix GH5 with the Leica 100-400mm f/4-6.3 set to 400mm, meaning 800mm equivalent with the 2x crop factor.
On the left, you can see the video as it comes straight out of the camera. On the right hand side, I have applied image stabilization in post processing. As I could record using the 4:3 aspect ratio with the GH5, this gives me some more margin to apply image stabilization later.
We can clearly see that the handhold footage coming from the Lumix GH5 is way more stable, despite using a lens with 800mm reach, longer than the 500mm lens on the Nikon system. Also, the Nikon Z7 footage, even after image stabilization has been applied, has quite some rolling shutter artefacts which makes it harder to use. I could fix most of this as well by using the "Rolling Shutter Repair" effect in Adobe Premiere Pro, but this makes the video less usable.
So while both cameras and both lenses feature image stabilization, the Lumix system is way better at actually giving you stable footage. And the larger sensor in the Nikon camera has slower readout, giving you strong rolling shutter effects that makes it hard to use the video output.
So while Nikon Z7 is much better in terms of image quality, I would still get the Lumix GH5 for video.
And this seems to be Panasonic's strategy too. From Panasonics point if view, Micro Four Thirds is not dead. But they have adjusted the product line-up to match video better. Panasonic have developed the pair of video oriented lenses recently: 10-25mm f/1.7 and 25-50mm f/1.7. These are prestigious, high end lenses that are catered towards video professionals and amateur enthusiasts with deep pockets. Launching these lenses clearly show Panasonic's commitment to the system.
As does their camera news. While the Lumix GH5 is, in my opinion, one of the most capable consumer video camera, it has been updated to Lumix GH5 II, making it relevant for more years to come. And as we know, Panasonic has promised to release the GH6 soon, probably in the autumn.
We see a similar approach from Olympus, or their newer brand name, OMD: Less focus on the entry level cameras, and more focus on what Micro Four Thirds does well: More compact camera equipment, especially tele lenses, to cater for bird and wildlife interested enthusiasts who want lighter gear. The 150-400mm f/4.5 tele zoom lens is one example showing this strategy.
So Micro Four Thirds and Lumix GH5 are still relevant today, but we see that the product strategy is to go for niche markets: Video and birds/wildlife photographers.
With Olympus' recent announcement, there has been some concern about the future of the Micro Four Thirds format: Is Panasonic still committed to developing new products? Considering the two circular fisheye lenses launched within one year, though, the format seems very much alive.
Both of these lenses were designed specifically for the Micro Four Thirds format. Yes, I know that Laowa have also released their lens with a Sony E mount. However, that lens is suboptimal in the sense that the whole image circle only covers a smaller part of the APS-C format, given the smaller size of the Four Thirds sensor it was designed for in the first place.
Since this is a circular fisheye lens with an image circle fully enclosed inside both the M43 and APS-C image sensors, you will get exactly the same image on both systems, only with a bigger black area around it on the larger sensor. Crop factor is just not relevant for these lenses.
Circular fisheye lenses are exotic enough on their own, but the real standout features of these two lenses is the field of view. A value above 180° means that the lens not only covers everything in front of it, but also details behind it. This can be illustrated with this diagram of the Laowa lens:
The Meike lens, being even more extreme in this regard, covers a whopping 220°. Most circular fisheye lenses only cover a maximum of 180°, which is already quite impressive.
Note already now that the Meike lens is quite a bit longer than the Laowa lens. Perhaps surprisingly, this is a huge advantage. The extra length means that the field of view more easily clears the camera grip, although you should still try to keep your fingers behind the camera as much as possible to avoid photographing them. More about that later.
Design and operation
Both lenses have a similar design, being traditional mechanical lenses made out of metal, without any electronics at all. The Meike lens, at a larger size, has a more traditional focus ring and aperture ring. Moving the rings feels somewhat more "cheap" than the Laowa lens, but it is quite usable for sure. The aperture ring is clickless and smooth all around, but it is easy to stop at a full aperture given the generous scale.
The Laowa lens, at a smaller size, has a somewhat more awkward operation, with a thin aperture ring, and a knob to push around for focus operation. The aperture ring has light click stops at full apertures. The focus ring is well dampened and feels nice.
On my Meike lens, the focus ring was not exactly calibrated, meaning that the true infinity focus was off by one millimeter or so on the focus scale. I guess this is quite common, and not really any problem at all. On my Laowa lens, the focus scale seems accurate, but there is probably lens to lens variation here as well.
Both lenses come with a bespoke cap that slips over the front of lens and attaches by friction. You should hold on to these, since a replacement can only be sourced from the manufacturers. The Laowa hood completely covers the focus and aperture rings, and in that way probably keep dust off.
The Meike cap, while it looks ok in the picture below, is in fact quite annoying since it doesn't easily sit straight on the lens. With a slight push, it wobbles around. It doesn't fall off, but it easily seats skewed, which seems like a silly design flaw.
From the rear, both lenses are seen to have small exit pupils:
This is natural, since the lenses only illuminate a small image circle diameter, compared with a traditional lens. However, the Meike lens has a significantly larger exit pupil. This is often associated with higher quality optics, although there is of course no guaranteed correlation. Both lenses have metal bayonet mounts, not just chromed plastic.
Optical quality
These are quite cheap lenses. So are they any good? Let's look into that. To test the image quality, I have photographed the same subject with both. I focued on infinify, and used a tripod.
Here are 100% crops from the centre, and from the corner, at f/2.8, f/4 and f/5.6 (click for larger images):
Centre:
Right edge:
We can see that in the centre, both lenses are very sharp already wide open. This is quite common nowadays: Lens design has improved a lot becuase of their use in digital cameras where sharpness can be easily examined.
In the corner, though, we see a quite big difference. The Meike 3.5mm f/2.8 lens is not very sharp wide open at f/2.8, but sharpens up some when closing down to f/5.6. On the other hand, the Laowa lens is impressively sharp already wide open. Certainly a good feat!
When having such a massive field of view, more than half the visible sphere around you, it is inevitable that you catch some bright light inside your image frame, e.g., the sun. Hence, how the lens handles high contrast is important. You don't want a bight light source to fill the frame with flare and loss of contrast.
To see how the lenses fare, I have photographed a night scene with strong light sources. Click for larger images:
The lenses have different characteristics. The Laowa lens has some ghosting, but less pronounced flare than the Meike lens. The Meike lens seems to retain better contrast and colours, on the other hand. So neither is perfect, but overall I think I would go for the Laowa lens. The flares generated by the Meike lens are just a bit too much.
With these lenses, it is best to use a camera without a grip, and keep your hands as much as possible behind the camera when taking pictures. Otherwise, you will photograph your own fingers, due to the extraordinary wide field of view. I used the Lumix GH5 here:
You can also see that the Laowa lens has a larger image circle, which means that there is some risk that the circular image is slightly cropped on the top and bottom.
Video
As both lenses cover the entire height of the Four Thirds image sensor, you'll need a camera that can record video off the whole sensor to get the circular fisheye effect. This is often called anamorphic mode. The Lumix GH5 can do this, but not many other cameras.
In 16:9 mode, which is mostly used, you will experience that the top and bottom of the image circles are cropped. Here is an example video comparison:
Conclusion
Both these lenses are fun, good quality extreme wide angle fisheyes. While the Meike is slightly wider, both are thoroughly extreme anyway, so they are not significantly different in that respect.
The mechanical construction of both lenses seems to be good, and the lenses should appeal to those who like classic manual focus lenses. The lack of autofocus shouldn't be a big problem. Mostly, you can just set the aperture to f/5.6 and the focus scale to around 1 meter, and virtually all will be in focus.
I wanted to like the Meike lens, with the even wider field of view and nice price point. However, the Laowa lens just seems to have the edge in most ways: Better sharpness, less flares at night, slightly better feel to the mechanical functions, and at a fantastically compact size.
But at the end of the day, if you want an extremely wide lens for the occational novelty picture, you cannot go wrong with either.
Very impressive field of view, easy to use and operate. Seems to have good contrast with strong light sources in the image.
Incredibly compact and light, very good sharpness. Nice lens cap.
Cons
Sharpness along the edges of the image circle could have been better. The lens cap is annoying. Flares during high contrast scenes.
Some ghosting with high contrast scenes. With the shorter length, you more easily photograph your fingers or even the camera grip. Slightly larger image circle than the sensor means that the circle may be slightly cut top and bottom.
Example images
A unique feature of extreme fisheye lenses is the ability to combine close foreground and background in the same shot. Stopping down to f/5.6 is enough to achieve this depth of field:
Using the free software Hugin, the image can be defished:
We have been blessed with some small, good and inexpensive fisheye lenses for the Micro Four Thirds format. The Samyang 7.5mm f/3.5 (my review) especially comes to my mind, being a personal favourite for a almost a decade. Another interesting lens has popped up, the Laowa 4mm f/2.8 210° circular fisheye from Venus Optics.
Compared to the Samyang, it is less expensive, smaller in size, wider, faster and in general more exotic. So is it any good? Let's take a look.
The lens is totally mechanical, with no electronic connections at all. You set the aperture and focus manually, just like with all other traditional pre-autofocus lenses. And this works fine! The aperture ring has light clicks on full aperture stops, and has an adequate level of friction so that it doesn't slip when you set it. Despite the clicks, it can still be set easily to intermediate apertures, especially since there is a generous distance between the stops for the largest apertures.
The focus ring is near the mount, and is so narrow that you have to use the finger index piece provided to operate it. The focus ring is nicely dampened, and feels like it is high quality.
The lens has a metal construction, and would appeal to those who like classic mechanical lenses.
It comes with a metal cap, which is held in place with friction. This functions fine, just slip it over the lens, and it is well protected. Be sure not to lose the cap, since sourcing a new one will be somewhat expensive.
The lens is very small. The diameter is smaller than the rear lens cap, as you can see from the picture above. To see just how small it is, compare it with similar circular fisheye lenses:
While the size dimensions themselves are impressive for the Laowa 4mm lens, what is especially impressive is the field of view at 210°. In this context, 180° means that the lens pictures everything in front of it, including straight up, down, and to the sides.
210° means that in addition, it also sees backwards, behind you. Lenses that could do this used to be extremely exotic and expensive, like the near mythical Nikon 6mm f/2.8 circular fisheye lens with a 220° field of view from 1972. Not only is it gigantic in size, but also very, very expensive.
The field of view can be illustrated with the green segment in the image below:
To achieve this wideness, an extreme lens design is used:
A side effect is, as you can probably guess already, the lens will also pick up the grip on any camera which has a handle protruding from the body, and, of course, your fingers. That is why the lens is pictured with the handle-less Lumix GX850 above.
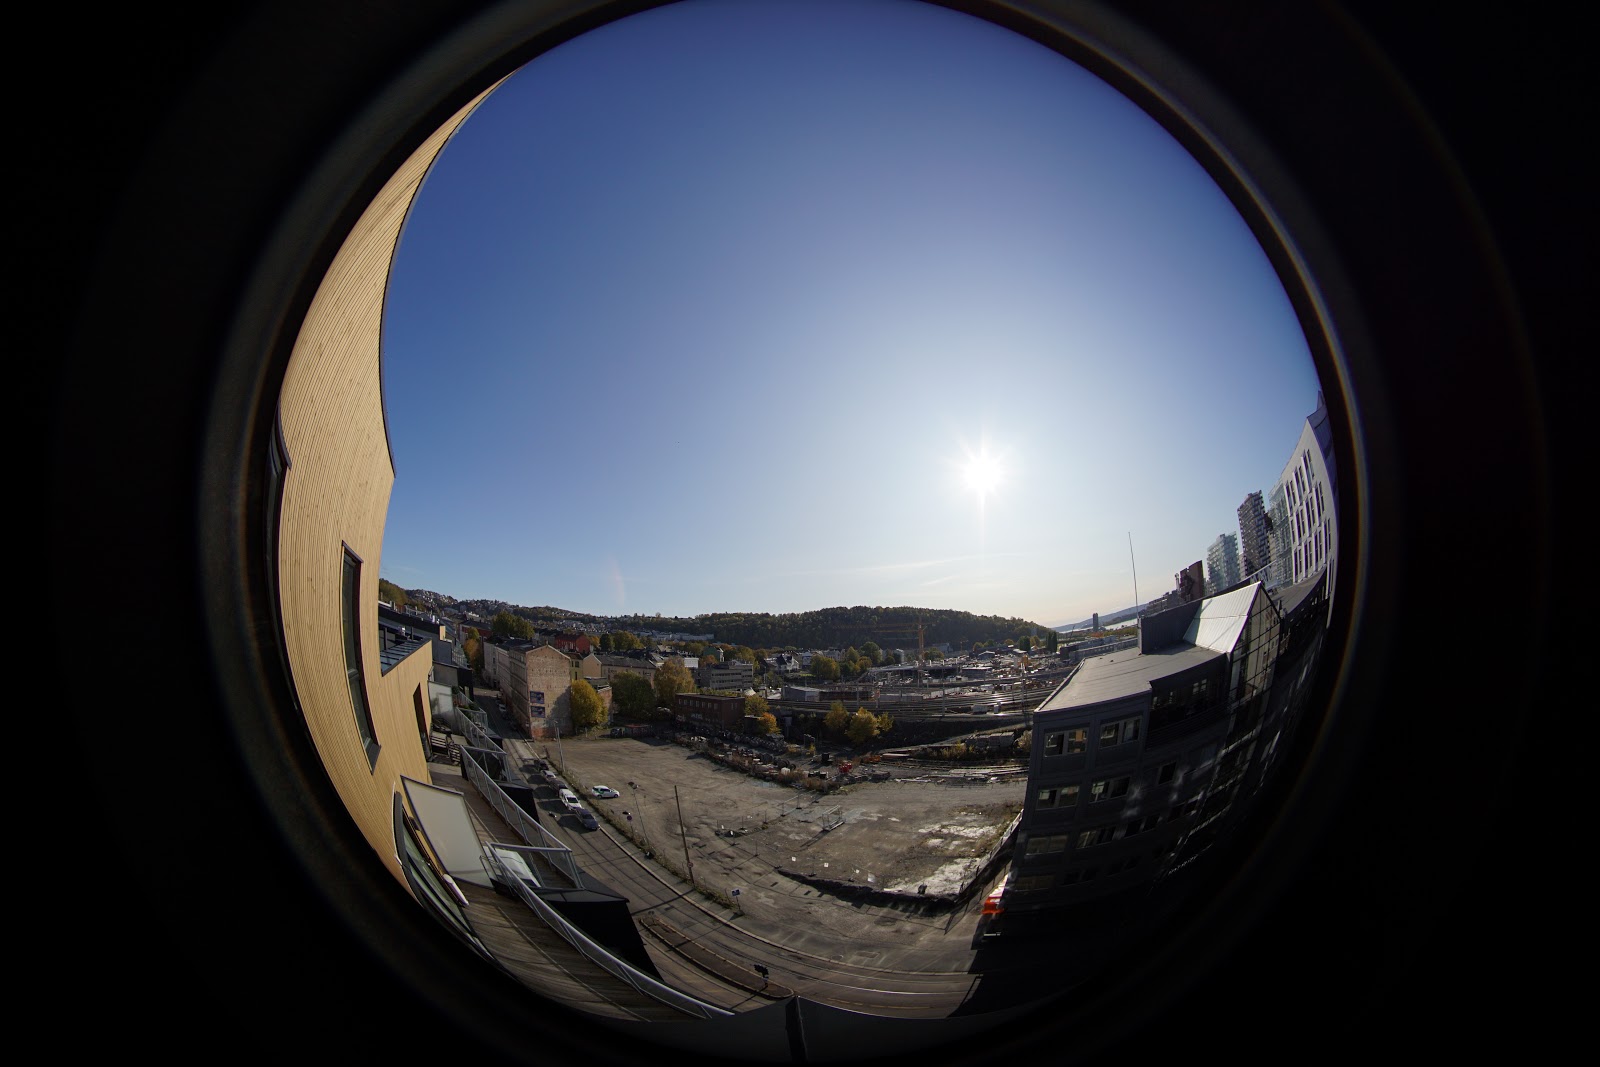
Here is what an image looks like when you use the Lumix GH5, notice the grip and fingers on the right hand side of the image:
Also, with the wide field of view, it takes some practice avoiding the inclusion of your feet or head inside the image as well. Generally, you have to hold the camera out in front of you when using the lens.
And as the lens covers more than half of the sphere around you, you should expect to have the sun, or some other bright light, inside the image quite often. Hence, it is important to see how the lens handles strong contrast. Let's compare it with the two others pictured initially (click to see larger versions of the pictures). The sun is in the centre right part of the images, which is a challenging situation for a wide angle lens. All the images were taken at f/5.6:
The first thing to note is the wider field of view of the first two images, compared with the traditional 180° specification of the Samyang lens.
Second, you'll note that there is the most sun flare in the first image taken with the Laowa lens. This is a sign that the optical design is weaker.
We can also compare the sharpness from the centre of the images. I have scaled them so that they have the same resolution:
And from the right hand side:
Now, it is difficult to compare these. Of course, the cameras have quite different resolutions: 16MP (Lumix GX850), 24MP (Sony a5100), and 45MP (Nikon Z 7). So when scaled to the same resolution, the two latter benefit from having more usable pixels.
The Lumix image is also somewhat less exposed. Still, it is apparent that the usable sharpness is lower on the Laowa 4mm f/2.8. But this is not a deal breaker: With some sharpening applied in post it would look quite good, and notice that the lens retains quite good sharpness off-centre, compared with the peer lenses. So the Laowa fares quite good in this test.
Video
As for the use in video, the lens is somewhat challenging. Only a few Micro Four Thirds cameras can record video from the whole sensor in 4:3 mode, which is required to catch the whole circular fisheye image. The Lumix GH5 can do this.
Other cameras can only record video in 16:9 mode, which will strip the top and bottom ends off the circular image, which is not very useful. Hence, there is currently no M4/3 camera which can record clean video off the whole image circle, without also showing the camera grip in the video.
Here is what it looks like with the Lumix GH5 in 4:3 mode. Note the camera grip is visible on the right hand side:
Compared with the Samyang 7.5mm f/3.5 fisheye
Regular readers will know that the Samyang 7.5mm f/3.5(my review) is one of my favourite lenses. It is one of the Micro Four Thirds lenses I have used the most for the last decade. So how does it compare with the Laowa 4mm circular fisheye lens?
First off, what properties do they share? Both are fully manual lenses, requiring you to set the focus and aperture manually. Also, both are third party lenses, designed by others than those who own the format, trying to capitalize on the popularity of Micro Four Thirds.
And both are fisheye lenses, but in different ways. The Laowa is a circular fisheye lens, meaning that it projects everything within the 210° field of view into a circle in the middle of the sensor plane. Everything outside of this circle is black.
The Samyang, on the other hand, is a full frame fisheye lens. It covers an equally impressive 180° field of view, but only diagonally across the full sensor frame. Horizontally and vertically, it covers a smaller angle of view. So the disadvantage is that it doesn't cover as much of the field of view, but the advantage is that it uses the sensor more efficiently: All of the sensor frame is used. The two types are illustrated here. While most fisheye lenses have a 180° coverage, keep in mind that for the Laowa lens it is 210°:
This makes images coming from the Samyang lens more easy to use: People are more used to seeing rectangular images, as opposed to circular images. Also, video will look good, both in 4:3 and the more common 16:9 format.
The differences can be illustrated with some example images, all taken at f/5.6. Click to enlarge them:
Optically, I would rate the Samyang lens somewhat better. But the Laowa lens performs quite well here, and you'll see that there isn't a lot of flare issues in the high contrast night shots. So both lenses should give you good results.
Regarding the different approaches (circular vs full frame fisheye): I think that if you want one fisheye lens to cover your extreme wide angle needs, the easy choice is the Samyang 7.5mm f/3.5. This lens will give you images straight out of the camera which are interesting and useful, even without any post process defishing, e.g., using the free software Hugin.
On the other hand, the Laowa 4mm f/2.8 is more extreme and has a higher novelty factor, for better and for worse. This lens can give you truly unique images, but to make them useful, you may need to work a bit harder both taking the images in the first place, and on post processing.
Conclusion
The Laowa 4mm f/2.8 210° circular fisheye lens is inexpensive, small, well made, and optically competent, but not perfect. If you would like to have a fun novelty lens for some occasional extremely wide images, then this is a good choice: There is hardly any lens available which is wider, and it is a good quality lens to boot.
Don't be intimidated by the manual focus. If you are taking a scenery shot in good light, just set the aperture to f/5.6, and the focus ring near infinity, and everything is well in focus. If you want to take a closeup picture, to focus correctly can be a bit more tricky, but with some practice this should just take some extra seconds with the nice focus peaking tools that most cameras have.
Example images
Click to enlarge:
By using the Hugin software to defish the images, you can get images like these: