Introduction

This blog is a user's perspective on the Micro Four Thirds camera system. Read more ...

Lens Buyer's Guide. Panasonic GH4 review.

My lens reviews: Olympus 9mm f/8 fisheye, Lumix G 12-32mm f/3.5-5.6, Leica 25mm f/1.4, Lumix X 12-35mm f/2.8, Lumix X 35-100mm f/2.8, Sigma 30mm f/2.8, Sigma 19mm f/2.8, Lumix X PZ 14-42mm f/3.5-5.6, Lumix X PZ 45-175mm f/4-5.6, Olympus M.Zuiko 45mm f/1.8, Panasonic Lumix G 100-300mm f/4-5.6, Panasonic Leica Lumix DG Macro-Elmarit 45mm f/2.8 1:1 Macro, Panasonic Lumix G 45-200mm f/4-5.6, Panasonic Lumix G 20mm f/1.7 pancake, Panasonic Lumix G 14mm f/2.5 pancake, Panasonic Lumix G HD 14-140mm f/4-5.8, Panasonic Lumix G HD 14-140mm f/3.5-5.6, Panasonic Lumix G 8mm f/3.5 fisheye, Lumix G 7-14mm f/4, Samyang 7.5mm f/3.5 fisheye, Tokina 300mm f/6.3 mirror reflex tele, Lensbaby 5.8mm f/3.5 circular fisheye lens
The blog contains affiliate links. As an Amazon Associate I earn from qualifying purchases.

Monday 28 March 2011

Poor man's 3D

3D is popular nowadays. Panasonic have launched their first 3D lens, which is probably not very useful. It only works on newer G-series cameras, and can only be used for stills, not video. And the stereo base, the distance between the two lenses, is only 1 cm. This is suitable for macro images, but too small for most other uses.

If you're photographing still objects, you can take 3D like images with your normal gear. It's just a matter of taking two images with the camera spaced some distance apart.

In fact, this is quite easy if you have an Arca Swiss style quick release plate. This enables some sliding from side to side when the camera is mounted to a tripod. Here is a picture of the Panasonic GH1 with a quick release plate mounted. On the table is another similar plate:


The plates on the picture are not actually produced by Arca Swiss. They are named Benro PU-60.

Using the quick release plate to offset the camera, I obtained these two images of the same subject. The stereo base is about 3cm.  The video shows how easy it is to slide the camera sideways for taking the stereo images:


To avoid having different exposures in the two images, I set the white balance (WB) manually. I also used Manual (M) exposure, and set the shutter and aperture manually.


Now, the next task is to compile these two images into one single image suitable for stereo viewing.

One way is to use different colours.  The image must then be viewed using 3D glasses with different colours. I used the Gimp script "script-fu-make-anaglyph", which does this very quickly. Here is the stereo image for cyan/red glasses:


For red/blue:


And for red/green:


Another way to view the stereo image, is to place them side by side as a pair. This is called cross-eye viewing, and takes some practice. You need to look at the left hand image with your right eye, and at the right hand image with your left eye.

Click on the image below to see it enlarged on your screen.  Put your finger between your face and the computer screen, about 10-20cm from your eyes.  Then focus on your finger, and see that the two images merge and become three.  Focus on the centre image.  If you can do this, it can be quite rewarding, as the stereo effect is very good.


Yet another way, is to compose the two images into an animated GIF:


And here is an animation consisting of three separate images:


Conclusion

This method works well with images of still life. But for moving objects, it is of course impossible to take the same image twice. And the same goes for videos.

Just how to present the 3D images is, as far as I know, not well standardized.

Friday 25 March 2011

Pixel RW-221 wireless RF remote control

Panasonic Lumix G cameras do not come with any remote receiver. Neither infrared (IR) nor radio frequency (RF). I like to have the possibility to trigger the shutter remotely, and so I have been searching for an appropriate remote shutter release.

Of course, there's always the self timer. But it is more of a hassle to use, and it doesn't give you any control over the autofocus.

I have previously tried the JJC JR series Infrared Controller. While it does do the job, it is awkward to use, somewhat unreliable, and has a poor build quality. Also, since it is an IR controller, you need to point the remote towards the receiver.

So I was not happy with the JJC JR remote.

I decided to try an RF remote from Pixel, called "Pixel RW-221 Wireless Remote Control". It is made for the Panasonic G series, as well as the older Panasonic DSLR cameras.

When unpacking, it is immediately clear that this is a higher quality product than the JJC JR remote. The parts have a better look and feel, and the buttons operate better. Also, the cord is spiraled, and has gold plated contacts. It comes with batteries, two sets of two AAA units. Here are the contents:


Clockwise from top left: Spiral cord with 2.5mm jack connectors, the remote receiver with a power button, and a shutter release button, the wireless remote control, batteries (4xAAA), and the operation manual.

The following picture shows the two units open, with batteries installed. You can see the dip switches, which are used to change the RF frequency. This is useful if you have several units, or if your neighbour has the same product.


If you are practical, like me, you can operate the unit without reading the manual. It is very intuitive. The video shows how to use the remote:


The remote is used on a Panasonic Lumix DMC GH1 in the video above, but should work with all Panasonic G series cameras. I have confirmed that it works with the Lumix GH1, GH2, and GH3. The latter has a separate remote control socket, not combined with the mic. It also works with the Lumix GX1, GX7, G5 and G6. The Lumix GM1 does not have a remote control socket, and cannot use this remote.

The right angle plug goes into the camera, and you must make sure to insert it fully. Some times, this requires pushing it in quite hard.

The remote receiver unit doesn't need to sit in the flash socket. But as long as you don't need to mount a flash, it is a practical place for it to stay. When pressing the power button, the red LED flashes to indicate that it is on.

The remote shutter can be half pressed for focus, and pressed fully for triggering the shutter.

There is an auxiliary shutter button on the receiver unit, which works in the same way.

I could not get the Bulb mode to work. It appears to trigger the shutter quickly over and over again. So if you need the Bulb mode, this remote might not solve your needs.

Conclusion

This product can be bought at a reasonable price from various auction sites. It has a good quality feel, and works in an intuitive way. All in all, it is highly recommended for those who need a remote control.

Thursday 24 March 2011

Micro Four Thirds lens pricing

The pricing of some Micro Four Thirds lenses have caused some discussion. For example, the Panasonic Leica 45mm f/2.8 macro and the Panasonic Lumix G 14mm f/2.5 are seen as expensive lenses. And the Panasonic Lumix G 45-200mm is seen as a bargain.

Just for the fun of it, I decided to see if there was any patterns to be found when it comes to lens pricing. I used the US prices, since the US is a big market.

First, one might think that weight is important. After all, glass is heavy, and also expensive to produce. Here is the relationship between the lens weight in grams and price in dollars:


We see rather easily that there is a relationship between weight and price, but it's hardly significant (R2=0.28). There are many outliers, for example the 45mm macro lens, and the 45-200mm tele zoom.

One could also guess that fast lenses are more expensive. So let's look at price versus the maximum aperture of the lens:


What we see, though, is the opposite. Faster lenses are less expensive. However, this is because some of the slower lenses are expensive special lenses, like the wide angle zoom Panasonic Lumix G 7-14mm f/4. We also have long zooms and superzooms in this category. Again, the fit is not very good, R2=0.06.

It is quite obvious that to explain the price, we need to include several parameters, not just the weight or the aperture.

One way to identify interesting variables, is to use Principal Component Analysis (PCA). This is a way to find which variables that best cluster the observations. Here is a plot of the first two principal components:


What we see here, is not surprising, but the presentation is somewhat interesting. First of all, we see that the pancake lenses are fundamentally different from the rest, as they occupy one large part of the image.

Another binary variable is premium. I've put the Lumix 45mm macro, the Lumix 14-14mm HD superzoom, and the Olympus 75-300mm tele zoom lens in this category. However, this variable does not appear to be important in grouping the lenses. It is correlated with other variables, like length, weight, number of lens elements, lens groups, filter thread, and maximum aperture.

Some lenses are still outliers, like the basic kit zooms (since they are light, but have many lens elements).

However, when using the first two principal components to fit the price, there is still a lot of unexplained variation:


Conclusion

What this all boils down to, is that there are too few observations. With more observations, i.e., more lenses, we might be able to fit the price to lens characteristics in a better way. And this is a conclusion we all can agree with, I am sure, that we need more Micro Four Thirds lenses.

Saturday 12 March 2011

GH2, does ETC affect the video quality?

ETC, or Extended Tele Converter, is an interesting feature with the Panasonic GH2. I've previously looked at how it can be used to get closer video recording of the moon using the Lumix G 45-200mm lens.

Essentially, ETC is a digital zoom for video. During normal video recording, the entire sensor area is scaled down to 1920x1080 pixels. When enabling ETC, the camera crops the 1920x1080 pixels from the centre of the sensor. This achieves full HD resolution, as well as a digital zoom. See the illustration:


Since 2800/1080 = 2.6, the ETC mode gives a tele conversion effect of 2.6x. If you use the 720p video mode, the conversion effect becomes larger still, 2800/720 = 3.9.

A question that remains is to see if the video quality is still good using the crop mode. In theory, it could be somewhat worse, since the camera doesn't have the option of scaling down from a larger number of pixels.

On the other hand, we know that the camera doesn't actually sample all the 16MP of sensor pixels for each frame in the video.  That would require too much bandwidth and processing power.  Just how many are sampled is unknown, but given that the electronic shutter 40fps continous mode has 4MP, one can guess that about that many are sampled during video recording.  This is, of course, just speculation.

To study this, I have used the kit zoom lens, Lumix G 14-42mm f/3.5-5.6. Since it has a zoom ratio of 3x, using ETC in the short end should give the same field of view as the longer end without ETC. This is a good basis for comparing the video with and without ETC.

I used 40mm without ETC, and 15mm with ETC. Since 15mm times 2.6 is approximately 40mm, these two modes give about the same field of view. I recorded video using ISO 160, 640 and 2500. Here are the recordings in sequence:


To better evaluate the quality differences, I have compared still images from the video streams (click for a larger version):


It appears that the video stream recorded using ETC has worse image quality than the normal stream, at all ISO values. There is some lack of sharpness and contrast, and more noise in the ETC video streams.

The reasons for these differences could be the sampling from a higher number of pixels when not using the ETC mode, as discussed above. Or it could also be related to the lens sharpness, see the discussion in the Appendix, below.

This does not mean the the ETC videos are useless, far from it. But it is fair to say that there is some image degradation when using ETC. As a rule of thumb, I think you should avoid using ISO higher than 640 when using ETC.

ETC is still a very good tool to use when you need extra reach during video recording. If you don't have any longer lenses, ETC is the only way to get quality videos at longer reach.

Appendix, some technical aspects

I used the new 1080p, 24fps cinema mode. This is the video mode on the Panasonic GH2 which gives the highest bitrate. It is generally recommended to use this 24ftp progressive mode, except when you have significant movement in the picture frame. When there is movement, people generally recommend to use the 60fps (NTSC) or 50fps (PAL) modes.

When the lens was set to 15mm, I stopped down the aperture to f/4. In ETC mode, the camera only uses the centre of the image, where lenses are generally very sharp. I've previously looked at the sharpness of the Lumix G 14-42mm kit lens, and found it to be good wide open at 14mm. So I don't think the centre sharpness at 15mm f/4 is a significant limiting factor when using the ETC mode.

But there is probably some impact on the sharpness due to the lens performance when using ETC. Remember that the ETC mode is more demanding on the lens sharpness, since there is no downscaling. When video recording without ETC, the image is downscaled from a larger sensor area, and the lens doesn't need to be tack sharp. It is like putting the lens designed for a 16MP sensor on a 2MP sensor camera.  It's not very likely that you can identify a lack of sharpness with a 2MP sensor.

In real life use, it is of course silly to use ETC in the short end of the Lumix G 14-42mm f/3.5-5.6 kit zoom. It is better to just zoom in. But I did this to get comparable images with and without ETC.

It is much more relevant to use ETC with the longer end of the Lumix G 45-200mm tele zoom lens. However, many have concluded that it is not very sharp in the longer end, so it may not be sharp enough to get a good video quality with ETC. You may want to stop down the aperture to f/6.3 or f/7.1 for the best result.

Sunday 6 March 2011

Geometric distortion correction

Many Micro Four Thirds lenses feature in-camera geometric distortion correction. Two examples are the Panasonic pancakes, Lumix G 14mm f/2.5 and Lumix G 20mm f/1.7. Both have pretty similar distortion correction needs. When converting the sensor output to the out of camera JPEG image, around 10% of the pixels in the border area are lost.

This is somewhat controversial. Some feel that a quality lens should not require further software correction. In fact, the lack of geometric distortion is a traditional sign of a high quality lens.

I think that this is mostly a non-issue. By allowing some aspects of the image to be adjusted in software, the lens designers can focus on issues which cannot be corrected in post processing. This has the potential of making the lenses better, at a smaller size, and potentially a smaller cost. Panasonic Micro Four Thirds lenses are adjusted for geometric distortion and some chromatic aberrations. The geometric distortion is also corrected in Olympus Micro Four Thirds cameras. At this time, though, Olympus does not correct chromatic aberrations.

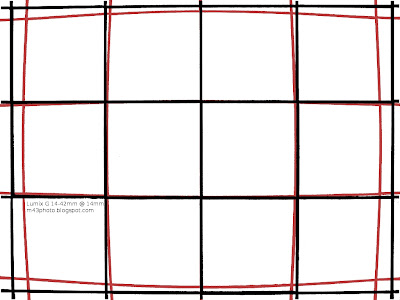
To illustrate the geometric distortion done with various lenses, I have photographed a tiled wall with them, and shown the sensor output compared with the corrected JPEG output.

Here is an example pair from the Lumix G 20mm f/1.7 pancake lens:


uncorrected RAW output
JPEG image

Note that this is in no way a criticism of using RAW images. There are many RAW image converters which will do the distortion correction automatically and seamlessly, and you will never notice that there was any geometric adjustment done at all. I am using the RAW images to visualize the initial image captured by the sensor, as it is the only way to access it.

Here is a comparison of the uncorrected and corrected images for some lenses.  Since I am only interested in the geometric distortion, I have increased the contrast so that the images become monochrome.  I also superimposed the corrected out of camera images (black) onto the original uncorrected images (red).

I have also included the appropriate adjustment needed. The adjustment numbers in percent refers to the "Lens Distortion" filter in The Gimp.

Lumix G 20mm f/1.7: -11%


Lumix G 14mm f/2.5: -16%


Lumix G 14-42mm f/3.5-5.6 @ 14mm: -18%


Lumix G 14-42mm f/3.5-5.6 @ 30mm: 0%


Lumix G 14-140mm f/4-5.8 @ 14mm: -17%


Lumix G 14-140mm f/4-5.8 @ 30mm: -4%


Lumix G 45-200mm f/4-5.6 @ 45mm: +1%


Conclusion

Normal zoom lenses pretty consistently feature barrel distortion in the wide end. The tele zoom Lumix G 45-200mm appears to have some very small pincushion distortion, but very minor.

Some lenses that do not feature any geometric distortion correction are the Lumix 8mm f/3.5 fisheye and Panasonic Leica Lumix DG Macro-Elmarit 45mm f/2.8 1:1 Macro lens.

Wednesday 2 March 2011

Bokeh comparison @ 14mm, take two

I have previously looked at the bokeh of the Lumix G 14mm f/2.5 pancake and Lumix G 14-42mm f/3.5-5.6 lenses.

That comparison featured an image without any highlights in the out of focus background. This time around, I figured I would try a high contrast night exposure, with bright highlights out of focus. Again, I set ISO 160 on the Panasonic GH2. The camera was on a tripod, and the exposures lasted around 1-8 seconds.

Here are the full images from both lenses:


Lumix G 14mm @ f/2.5
Lumix G 14-42mm @ 14mm f/3.5

The focus was set on the post to the left, which is around 30cm from the camera, close to the minimum focus distance for these lenses. I used the A (aperture) exposure mode.

To evaluate the bokeh, let's enlarge some of the areas from the image.

From the centre of the image:


And from the top of the image:


(Click for larger images.)

I think the bokeh from both lenses is a bit "dirty" and "swirly". The 14mm pancake lens has the most ringing in the out of focus rendering.

Conclusion

My conclusion, which is a bit unexpected, is that the zoom lens has the best bokeh. Or perhaps it is better to say it has the least displeasing bokeh, since neither are very good. But the difference is small.

The 14mm pancake lens has non-circular bokeh even at the largest aperture, which is not so usual. The Lumix 20mm f/1.7 pancake lens also exhibits non-round bokeh. So perhaps it is related to the pancake design?

Keep in mind that these enlarged images are 100% views from the 16 megapixel GH2 sensor. most people will probably downscale the image some, in which case the dirtiness and ringing of the bokeh becomes a smaller issue.

Also, bokeh and wide angle is not that much of an issue anyway. To get some out of focus rendering at 14mm focal length, I had to focus close to the minimum distance, and look at objects in the far background. It is not so likely that you'll find the same situation in real life.

For example, if you're photographing people, you'll want to keep then at a distance of around 1 meter or more, to avoid perspective distortion. At this focus distance, you're unlikely to see much bokeh with a 14mm lens, even at f/2.5.

So even if the bokeh for these lenses at 14mm could have been better, you should not see it as a fatal problem.  It is, at worst, a minor annoyance for some types of images.