Nowadays, the most selling camera unit is an action camera, the GoPro Hero 3+. This can be commented in many ways:
The compact camera and consumer camcorder markets are shrinking. This is due to competition from below with smart phones, and competition from above with compact, but advanced mirrorless system cameras. Why buy a compact camera, if your smart phone can do just as well? Due to the shrinking traditional camera market, this action camera has become dominating.
There is little competition in the action camera market. In test after test, the GoPro Hero 3+ Black Edition is crowned the king. Even as Sony and Panasonic launches competing cameras at a lower price and with interesting additional function, e.g., optical image stabilization, they cannot dethrone the GoPro Hero.
I've previously used the Panasonic GH2 for recording fireworks, and found that at the maximum video ISO 3200, I still needed to set a very slow shutter speed of around 1/10s to get sufficient exposure. The Panasonic GH3 supports video recording at ISO 6400. When using the Samyang/Rokinon 7.5mm f/3.5 fisheye lens wide open, I can use a shutter speed of 1/25s, and get a normal PAL 25fps framerate.
Here is the video I made, more information about how it was done follows below:
When I reviewed the Samyang 7.5mm f/3.5 fisheye, it was natural to compare it against the native Lumix G 8mm f/3.5 fisheye lens. Since the Lumix lens costs about 2-3 times the price of the Samyang lens, I would expect that the Lumix lens comes out as the winner.
However, what I found was that the Samyang lens was sharper, even in the extreme corners, and without the in camera CA correction which is done with the Lumix lens when using it on a Panasonic camera.
Some have doubted this result, and I have also been a bit unsure now and then. So I decided to do another test.
This time, I photographed a couple of trees against the bright sky, a useful test for lens sharpness. The focus was set on the centre of the image. With the Lumix lens, I used autofocus, and set a centre spot. With the Samyang lens, I used the 10x focus assist magnification available with the Panasonic GH2 camera. Here are the two images, both at f/3.5:
Samyang 7.5mm f/3.5
Lumix G 8mm f/3.5
To better evaluate the sharpness performance, I have compiled some 100% crops. From the centre of the image:
And from the top right corner:
Based on this study, it is perhaps not correct to say that the Samyang lens is much better. I think the Samyang lens appears to have slightly better sharpness in the corner, but the differences are fairly subtle.
Keep in mind that the Lumix lensis automatically corrected for CA artifacts, though. By looking at the RAW image files, and converting them to JPEG with third party software, we can see how the images were before the software CA corrections. These 100% crops are from the top left corner:
I used the free program UFRaw to convert the RAW images, but any program could have been used here, as long as it allows for doing the conversion without applying CA correction.
Here we see that without the in camera software CA correction, there are some significant red/green fringing artifacts. These are largely removed in the out of camera JPEG image. In the light of this, the Samyang lens's performance is even more impressive, as no in camera CA correction was done.
Conclusion
I wouldn't say that the Samyang 7.5mm f/3.5 fisheye lens is significantly better than the Lumix G 8mm f/3.5 fisheye lens, even if it appears to perform better in this test. So the image quality should not be an important factor when deciding between the two.
You could also consider the fact that they have slightly different projections. The Samyang lens gives images that are slightly less barrel distorted, and may be easier to defish.
The Samyang lens also handles flare better, see a direct comparison between the two in my review. Flare handling is very important for a fisheye lens, since you are quite likely to find the sun or a strong light source inside the image frame, due to the wide field of view.
When focusing manually with the Samyang lens, it is important to keep in mind that you shouldn't blindly trust the focus distance scale. On my lens, it is slightly off, and I reach infinity focus slightly before the infinity mark. This is not uncommon with manual focus lenses. Exact calibration would be very expensive, and the producers usually leave some slack for themselves by allowing the lens to focus beyond infinity.
The autofocus of the Lumix G 8mm f/3.5 fisheye isn't really needed for landscape pictures, as you easily get infinity into focus manually. But when taking closeup images, the autofocus can come rather handy.
It was very dark during this firework, so to record it, I had to push the exposure as high as possible. I used the "Creative Movie Mode", with the manual setting ("M"), in which I could dial in ISO 3200 (the maximum), and used the largest aperture on the Samyang 7.5mm fisheye lens: f/3.5.
A little known feature of the Panasonic GH1 and GH2 is that you can record videos with a slower shutter speed than the frames per second setting. I was using the high bit rate 25 fps 1080p mode, and to get sufficient exposure, I set the shutter speed to 1/13s, i.e., slower than 1/25s. This is possible only in the "Creative Movie Mode", in the "M" exposure mode, and with autofocus turned off. Of course, you don't actually get 25 frames per second with a shutter speed of 1/13s, you only get 13 frames per second.
To make the video clip more interesting, I speeded up the video to 200% speed, meaning that the frames per second of the output clip was about 25fps.
I also changed the tempo of the sound, to keep it in sync with the 2x fast video.
Conclusion
The Samyang 7.5mm f/3.5 fisheye lens is very good for recording fireworks. But to get sufficient exposure, you may need to set the shutter speed quite low, lower than 1/30s, giving you fewer frames per second than you are used to. This feature of the Panasonic GH1, GH2 and GH3 cameras is quite useful, and I don't think other Micro Four Thirds cameras can record videos with this slow shutter speeds.
When the GH3 gets released soon, I would guess that it can record videos at ISO 6400, which may solve this issue.
Adding a higher number of diaphragm blades can make the aperture opening more rounded when stopping down. However, lenses seldom go beyond nine blades, probably for the reasons of cost, complexity, and the risk of having one of them break down.
It turns out that the number of blades is also related to the rendering of flare, strong light sources inside the image frame. I'll look at that later in this article.
Of course, the major difference between these lenses is the price (the Samyang is the cheaper), the image quality (the Samyang is better, in my opinion), and the focus mechanism (only the Lumix lens has autofocus). But in addition: The Samyang has six aperture blades, and the Lumix has seven. These close up pictures show the rear exit pupil at f/5.6 for both lenses. The Lumix G 8mm lens has more rounded aperture blades, but you can still make out seven segments:
Samyang @ f/5.6
Lumix @ f/5.6
Here is a video showing how the aperture blades open up on the Samyang lens:
Affecting the flare
It turns out that the number of aperture blades affect the flare in a fundamental way. It is common to get a star shaped flare when using small apertures. And the number of spikes in the star is the number of diaphragm blades (when that number is even), or twice the number of diaphragm blades (when that number is odd). Hence, using the Samyang should give us stars with six spikes, and using the Lumix should give fourteen. Let's check, by taking pictures at f/22:
Samyang @ f/22
Lumix @ f/22
To see this more clearly, here are enlargements at f/22 and f/11:
It's not so easy to count the number of spikes on the Lumix image to the right, but I think it is still quite clear that it is fourteen.
Conclusion
To my experience, most lenses have an odd number of aperture diaphragm blades, which produces the most spikes on the star shaped flare around bright objects, e.g., the sun. I guess this is because a larger number makes the flare look more blurred, whereas a small number makes the flare more distracting.
A bit of trivia is that Canon has chosen an even number for most of their lenses, while Nikon is going for an odd number. Hence, it is often easy to guess what brand a photographer uses, based on an image where the sun is inside the frame. However, the aperture also needs to be fairly small to see this effect, e.g., f/16 or f/22. So you might not be able to make this out based on any picture.
Fisheye lenses have traditionally been exotic, expensive items. Now, however, Samyang has brought out the 7.5mm f/3.5 fisheye lens for Micro Four Thirds at a reasonable price. Also marketed as Bower, Rokinon and Walimex, this lens brings the fisheye possibilities to the masses.
But, what should you use a fisheye lens for, in the first place? One obvious answer is when you want to capture a very wide scene. The so called full frame fisheye lenses have a 180° diagonal field of view, corresponding to 132° horizontally with the 4:3 aspect ratio. This is significantly wider than the Lumix G 7-14mm f/4 at the widest setting, and that is the widest rectilinear lens on Micro Four Thirds, and very expensive to boot.
However, in my opinion, there are other advantages of fisheye lenses as well, one being that you have the possibility to combine near and far objects in the same image frame. I will illustrate this with an example.
With 14mm
I wanted to photograph a memorial tree together with a plaque on the ground. Here is my first attempt using the Lumix X PZ 14-42mm f/3.5-5.6 lens at 14mm f/8, 1/40s:
As you can see, the memorial plaque on the ground, covered with roses, is simply not readable, even if I did print this image at a large size. So I could try to go a bit closer:
Now, one could conceivably read the text on the plaque, with some effort. But even less of the tree itself is visible now. So this is still not a good compromise.
With fisheye
I switch to the Samyang 7.5mm f/3.5 fisheye lens. Here is one attempt. I focus at about 0.5m distance, and set the aperture to f/11 for a good depth of focus:
Now, the text is readable, the whole tree is visible, and as a bonus, the City Hall, the twin tower brick building to the left, is inside the frame!
To get a slight variation, I move the camera closer to the plaque, and angle it more upwards, using the 3:2 aspect ratio. This gives me the text even more readable, with the whole tree inside the frame. With this picture, I lose the roses placed in the shape of a heart, though:
For web use, and when printing small, I would prefer this last shot, where the text can easily be read.
Side effects
There are some negative effects, though. In the fisheye images, the tree now looks very small. This is not due to the fisheye properties of the lens, but due to the wide angle properties. You would get the same effect when using the Lumix G 7-14mm f/4 in a wide setting.
With wide angle lenses, you can go close to a subject, making the perspective look quite unusual. You'll get near objects looking larger than what is expected, and far objects looking smaller. This is the reason why portrait lenses tend to be long, to avoid these wide angle effects. Taking wide angle portraits of people makes them look "horsey", with large chins and noses.
Another side effect is the fisheye property, of course, making straight lines not passing through the centre of the frame look bent. If you dislike these effects, you have the possibility of defishing the image.
The image now looks quite stretched in the corners. This is not really due to the fisheye properties of the lens, but rather due to the extremely wide perspective. If you had a rectilinear lens capable of this wide field of view, it too would give you the stretched look in the corners. Such a wide rectilinear lens does not exist for Micro Four Thirds, though, and will probably never appear, as it would be very expensive to make.
To avoid this stretched look, one could just choose a smaller amount of defishing. One way could be to use the equirectangular lens model, rather than the orthographic lens model. That yields this image:
Since this last image is not truly defished, it has some residual barrel distortion. But it still looks quite natural.
Conclusion
A full frame fisheye lens can be used for much more than just very wide panoramas and cute close up pictures of animal faces. In fact, having a fisheye lens in your lens bag can solve your composition problems in tricky situations, and give you extra creative possibilities.
The only way in which the Lumix lens is better, is that it gives you autofocus. This is not normally needed for a fisheye lens, but comes in handy if you want to photograph something very close, i.e., closer than about 0.3m (one feet).
The camera also appears to handle the exposure and colours better with the native Lumix lens. With the Samyang lens, the GH2 tends to underexpose, especially in high contrast situations, e.g., night photos. I usually dial in +1 to +1 2/3 exposure compensation at night.
These two images were taken from the same spot, with the camera mounted to a hand rail using the Manfrotto Superclamp. Both images were taken at f/8, and you can notice the Panasonic GH2's tendency to underexpose with the Samyang 7.5mm f/3.5 fisheye lens, especially with the aperture stopped down beyond around f/5.6. Normally, you will want to dial in some overexposure when using this lens stopped down, and when there is high contrast in the image.
Lumix G 7-14mm @ 7mm
Samyang 7.5mm fisheye
Click for larger images. Both were taken at the standard 4:3 aspect ratio. As you can see, the Samyang lens gives significantly wider field of view horizontally, and even a larger vertical field of view, just as my theoretical comparison predicted.
We could also see how the images compare when the fisheye image is defished. Read about how to defish the image using the freeware Hugin here. I used the "Orthographic" lens model, which I think gives the best results with this lens. Here are the images, with the right one being defished:
Lumix G 7-14mm @ 7mm
Samyang 7.5mm fisheye, defished
We see that the defished fisheye image has a much wider aspect ratio, 2.4:1. That is normal, and is due to the fisheye projection model. This means that the fisheye image has a significantly wider horizontal field of view compared with the vertical field of view.
I will later be looking at the sharpness of the two lenses. But let me reveal right now that I was not so impressed with the corner sharpness of the Lumix G 7-14mm in the widest setting, even when stopped down.
This comparison verifies my calculated comparison between the two lenses: The Samyang lens gives a significantly wider field of view. On the other hand, you lose quite a bit of corner resolution due to the defish process. You could still cut off the extreme ends, and end up with a very wide near rectilinear image with an overall good quality.
I have previously looked at how to defish the images from the Samyang 7.5mm f/3.5 fisheye lens. Even with a generic fisheye lens profile, it is easy to defish the output images so that they appear rectilinear. But my example image does not show how wide the output image really is. To illustrate that, I will present the same image taken with an ultra-wide lens.
As is apparent from this table, the fisheye lens has a vastly wider diagonal field of view. However, we also know that the fisheye lens has a more compresses field of view the further we get from the centre. Hence, not all of the 180° diagonal field of view can be used when defishing the image.
This can be illustrated by looking at the defishing process. Here are the same images taken with the Samyang 7.5mm fisheye lens, defished, and taken with the Olympus 9-18mm lens at 9mm:
When it comes to wide lenses, fisheye lenses are the very widest available. The currently widest rectilinear (non-fisheye) lens for the Micro Four Thirds system is the Panasonic Lumix 7-14mm f/4 zoom lens. At the widest setting, it has a diagonal field of view of 114°. This is quite impressive, however, a full frame fisheye lens has a diagonal field of view of 180°.
Two full frame fisheye lenses for the Micro Four Thirds system are the Lumix G 8mm f/3.5 and the Samyang 7.5mm f/3.5. The Lumix lens is rather expensive, but good quality. The Samyang is cheaper, does not feature autofocus, and has good optical qualities.
A disadvantage of fisheye lenses is of course the fisheye projection: They do not feature rectilinear projections like we are used to, but spherical projections. This means that any line not passing through the centre of the frame will appear bent. The further from the centre a line passes, the more bent it becomes.
However, fisheye images can be transformed to rectilinear images, to look more natural. In this article, I use the free software Hugin to transform the image, also called defishing.
Defishing photos
Here is an example image taken with the Samyang 7.5mm f/3.5 at f/5.6. It features Sergels Torg in Stockholm, with straight lines in three directions in the tiles (click to enlarge):
As you can see, the lines that pass near the centre of the frame are the least bent.
To transform the image to rectilinear, I use the Hugin program to defish it. Hugin can do panorama stitching, but in this case, I use it solely to defish an image.
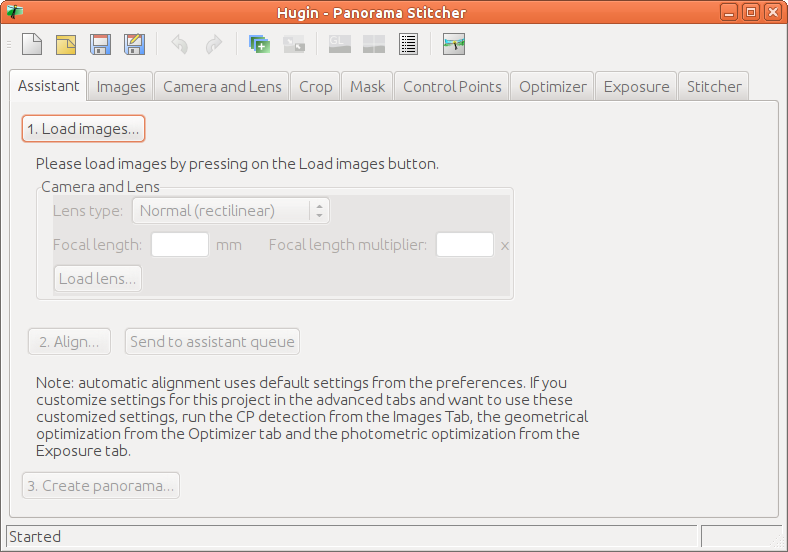
First, click the "Load images..." dialogue button, and load your image into the program:
Next, insert the details about the lens. Here, I am using a Full Frame Fisheye, with a focal length of 7.5mm and a 2x crop factor:
In my experience, using the lens type "Orthographic" also gives good results. Having done this, it is time to tell the program what kind of output projection we want. This can be done by clicking the "Fast Preview panorama" button in the middle top of the window:
This brings up the dialogue window where you can choose the output projection and field of view. Choose "Rectilinear" projection, and a field of view of something like 140° by 110° in the "Projection" tab:
Finally, it is time to save the output file, which is done in the "Stitcher" interface, since this program is, after all, a panorama stitcher program. First, click "Calculate Optimal Size", and then "Stitch Now...":
This brings up a file save dialogue window. Note that the output file will be enormous, and you need to open it in an image editing program, e.g., The Gimp, to crop and resize it. After cropping and resizing, the image looks like this:
There are a lot of things to note about the defished image:
The lines are now (fairly) straight. I did not use a specialized profile for the Samyang 7.5mm f/3.5 fisheye lens, but a generic profile. So the output image is perhaps not perfectly rectilinear. But it is good enough for most uses, I think.
Also, note that the aspect ratio of the image changed. The original image had an aspect ratio of 1.33 (4/3). The defished image has an aspect ratio of 1.92. This is not a mistake. Keep in mind that the fisheye image is more compressed the further from the centre we get. Hence, in the fisheye projection, we pack more angle of view the further from the centre we get. Since the original image was rectangular, this gets exaggerated after defishing.
Finally, the corners of the defished image have been stretched a lot, and the effective resolution is smaller in the corners than in the centre. This can be illustrated by looking at 100% crops from both the original and defished images, from the lower left corner:
Contrary to intuition, perhaps, the fisheye image actually looks more natural in the corner.
In the corner, we also see that the Chromatic Aberration artifacts get exaggerated after defishing. We can see a more pronounced green fringing around the black figure in the image above.
My example above looked at defishing a still image. It is also possible to defish video. I have used the Kdenlive video editing software for this effect. Right click on the video timeline, and select "Defish":
This brings up the "Defish" video effect settings:
I've found that using the "Equiarea" type, and an amount of 855 works well. Alternatively, use "Stereographic" and an amount of 825. Or you can experiment and see what you like the most.
Using this technique, I have made an example of a video sequence both without and with defishing. The video shows the street gamblers often seen in the Stockholm old city:
Again, we see that the output video is almost rectilinear. For most practical purposes, this is good enough. Also, in the corners, the resolution is not as good as in the centre, just as we saw in the image example above. This is especially evident when viewing the video at 1080p.
Conclusion
Defishing image and video is easy. The output images are not perfect, but considering how extremely wide they are, I'd say they are pretty good.
To avoid the stretched look in the corners, you could apply somewhat less defishing effect. This will leave some residual barrel distortion, but also leave more resolution in the corners. This could be an option if you have an image with few straight lines.
The Samyang 7.5mm f/3.5 fisheye lens, also marketed as Rokinon and Bower, is special in that it is one of the first third party lens designs made specially for Micro Four Thirds. Some other manual focus lenses for Micro Four Thirds are older designs with a new mount.
The Samyang fisheye lens is an alternative to the native Panasonic Lumix G 8mm f/3.5 fisheye lens, so it makes sense to compare them. Here they are, with lens caps:
They have different type caps. The Samyang, on the left, has a cap held in place with clips, operated by pressing the side tabs. The Lumix's cap is held in place with friction only. I prefer the latter, since the Samyang cap must be inserted correctly rotated, which is somewhat more awkward.
The Samyang 7.5mm f/3.5 fisheye lens is an interesting addition to the Micro Four Thirds lineup. While most third party Micro Four Thirds lenses so far have been existing manual lens designs given a new mount, this lens is designed for the Micro Four Thirds format from ground up.
How can I tell? A full frame fisheye lens has 180° diagonal field of view. Hence, the lens must match the sensor size exactly. If the lens was designed for APS-C, a larger format, then the corners would not correspond to 180° angle of view. A fisheye lens which does not project to 180° in the corners is pretty much useless. Then it is just a wide angle lens with a lot of geometric distortion.
Compared with the existing Lumix G 8mm f/3.5 fisheye lens, the Samyang lens is a much more traditional design, with a manual focus ring and aperture ring.
Some say the Samyang lens features a different projection type, the Stereographic projection. This is supposed to be less distorted than the Spherical projection traditionally associated with fisheye lenses. Let's look into how their projections differ. Here is a picture taken with both lenses, and also using the Olympus Zuiko Digital 9-18mm Four Thirds wide angle zoom at 9mm:
Samyang 7.5mm
Lumix G 8mm
Olympus 9-18mm @ 9mm
By superimposing both the fisheye images in one image, and doing edge detection, we can see how their projections compare:
And let's look at another example:
Samyang 7.5mm
Lumix G 8mm
Olympus 9-18mm @ 9mm
Superimposing the two gives:
(Click for larger images.)
Conclusion
So, what is the conclusion of all this? First of all, from the second example, we observe that both lenses have pretty much the same diagonal field of view. This experiment does not verify that the diagonal field of view is exactly 180°, as it should be, but at least both lenses have around the same maximum diagonal angle. To be more precise, the Samyang lens appears to render a slightly wider diagonal field of view. This might be due to the shorter focal length, 7.5mm versus 8mm.
Regarding the distortion, we can see that the Samyang lens renders objects which are inside the border of the image a little bit smaller. This means that it distorts the images somewhat less. So the rumor is true: The Samyang lens does give less "fisheye distortion".
But surely, the differences are pretty marginal. You're not likely to notice much difference, unless comparing head to head, as I do in this article. So if you're looking at the Samyang 7.5mm lens to avoid the fisheye distortion, you are going to be disappointed.
One thing to note is that if you plan to convert to rectilinear images in post processing, the Samyang lens has the potential for giving you the widest possible rectilinear images of the two fisheye lenses. This process is called defishing, and you can read about the topic here. It is probably not true that the Samyang lens features stereographic projection. It still has fisheye projection, but with slightly less distortion than the Lumix G 8mm f/3.5 fisheye lens.