Two full frame fisheye lenses for the Micro Four Thirds system are the Lumix G 8mm f/3.5 and the Samyang 7.5mm f/3.5. The Lumix lens is rather expensive, but good quality. The Samyang is cheaper, does not feature autofocus, and has good optical qualities.
A disadvantage of fisheye lenses is of course the fisheye projection: They do not feature rectilinear projections like we are used to, but spherical projections. This means that any line not passing through the centre of the frame will appear bent. The further from the centre a line passes, the more bent it becomes.
However, fisheye images can be transformed to rectilinear images, to look more natural. In this article, I use the free software Hugin to transform the image, also called defishing.
Defishing photos
Here is an example image taken with the Samyang 7.5mm f/3.5 at f/5.6. It features Sergels Torg in Stockholm, with straight lines in three directions in the tiles (click to enlarge):

As you can see, the lines that pass near the centre of the frame are the least bent.
To transform the image to rectilinear, I use the Hugin program to defish it. Hugin can do panorama stitching, but in this case, I use it solely to defish an image.
First, click the "Load images..." dialogue button, and load your image into the program:
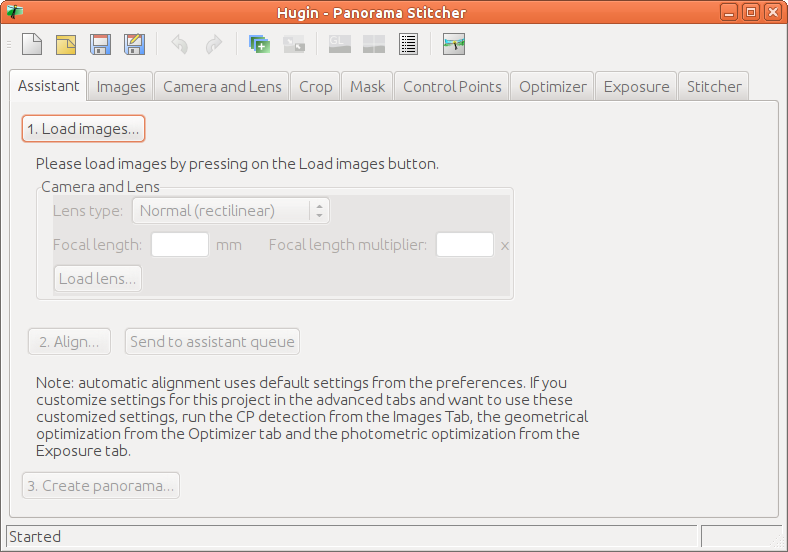
Next, insert the details about the lens. Here, I am using a Full Frame Fisheye, with a focal length of 7.5mm and a 2x crop factor:

In my experience, using the lens type "Orthographic" also gives good results. Having done this, it is time to tell the program what kind of output projection we want. This can be done by clicking the "Fast Preview panorama" button in the middle top of the window:

This brings up the dialogue window where you can choose the output projection and field of view. Choose "Rectilinear" projection, and a field of view of something like 140° by 110° in the "Projection" tab:

Finally, it is time to save the output file, which is done in the "Stitcher" interface, since this program is, after all, a panorama stitcher program. First, click "Calculate Optimal Size", and then "Stitch Now...":

This brings up a file save dialogue window. Note that the output file will be enormous, and you need to open it in an image editing program, e.g., The Gimp, to crop and resize it. After cropping and resizing, the image looks like this:

There are a lot of things to note about the defished image:
The lines are now (fairly) straight. I did not use a specialized profile for the Samyang 7.5mm f/3.5 fisheye lens, but a generic profile. So the output image is perhaps not perfectly rectilinear. But it is good enough for most uses, I think.
Also, note that the aspect ratio of the image changed. The original image had an aspect ratio of 1.33 (4/3). The defished image has an aspect ratio of 1.92. This is not a mistake. Keep in mind that the fisheye image is more compressed the further from the centre we get. Hence, in the fisheye projection, we pack more angle of view the further from the centre we get. Since the original image was rectangular, this gets exaggerated after defishing.
Finally, the corners of the defished image have been stretched a lot, and the effective resolution is smaller in the corners than in the centre. This can be illustrated by looking at 100% crops from both the original and defished images, from the lower left corner:

Contrary to intuition, perhaps, the fisheye image actually looks more natural in the corner.
In the corner, we also see that the Chromatic Aberration artifacts get exaggerated after defishing. We can see a more pronounced green fringing around the black figure in the image above.
I have also used the "Orthographic" lens model for defishing an image, and compared it with an image taken with the Lumix G 7-14mm f/4 ultra wide angle zoom lens. The transformed rectilinear image from the Samyang 7.5mm f/3.5 lens is even wider than that of the Lumix wide angle lens at 7mm, and very sharp, too.
Defishing video
My example above looked at defishing a still image. It is also possible to defish video. I have used the Kdenlive video editing software for this effect. Right click on the video timeline, and select "Defish":

This brings up the "Defish" video effect settings:

I've found that using the "Equiarea" type, and an amount of 855 works well. Alternatively, use "Stereographic" and an amount of 825. Or you can experiment and see what you like the most.
Using this technique, I have made an example of a video sequence both without and with defishing. The video shows the street gamblers often seen in the Stockholm old city:
Again, we see that the output video is almost rectilinear. For most practical purposes, this is good enough. Also, in the corners, the resolution is not as good as in the centre, just as we saw in the image example above. This is especially evident when viewing the video at 1080p.
Conclusion
Defishing image and video is easy. The output images are not perfect, but considering how extremely wide they are, I'd say they are pretty good.
To avoid the stretched look in the corners, you could apply somewhat less defishing effect. This will leave some residual barrel distortion, but also leave more resolution in the corners. This could be an option if you have an image with few straight lines.
In this article, I have looked at how much wider the defished output image is compared with using a rectilinear wide angle lens.
Very interesting results :)
ReplyDeleteAny chance you could compare the defished image with the 7-14mm panny @ 7mm or the 9-18mm olly at 9mm?
In terms of field of view, this guy(http://www.uglyhedgehog.com/t-20057-1.html) took photos with the same landscape at 7mm on the panny and the 7.5mm sammy fished. You can see a big difference in field of view you lose is about one eight less on panny at each end of the diagonal. The example on this page loses very little from the actual image so on that matter only the cheaper manual fishy lens wins. Like a fish eye, it also doesn't have eyelids.
ReplyDeleteThis lens is stereographic so that's the best profile to use in Hugin.
ReplyDeleteAlso it is worthwhile tweaking the focal length (or focal length multiplier) by very small amounts (e.g. 0.02) to get straight verticals (rather than barrel or pincushion distortion).
Finally, the Panini projection is worth playing with.
Thanks. I followed your instructions with Hugin and GIMP (neither of which I had used before) to de-fish some photos with the Samyang 7.5mm on my GF3: it's like gaining a very wide rectilinear lens. I haven't yet tried with stereographic or Panini. Have you tried using the LensFun lens database--if so can you give instructions?
ReplyDeleteSorry, I haven't used LensFun.
DeletePerhaps I have not given Hugin a fair trial, but my defishing efforts have been so very much easier by using PTGui. This applies to photos taken using all formats: 4/3rds, APS-C, FullFrame, etc. I hardly ever use rectilinear projection due to the extreme stretching of the edges. I have found that depending on where the horizon is in an image, sometimes equirectangular, circular, stereographic, or Mercator projection gives me the most pleasing defished product in the real-time PTGui editor. A few of my defished photos are in my Flickr account here: https://www.flickr.com/photos/65906562@N00/
ReplyDeleteSpecifically, the one of the church and the three example photos of the defished front porch images.
Hugin is not fixing it fully for me either. I can get the vertical lines straight but not the horizontal ones. Will try your alternative PTGui.
DeleteThis comment has been removed by the author.
ReplyDeleteGreat read. Thanks. Unfortunately software keeps crashing when it try to load images on Mac 10.8. Still working on it though.
ReplyDeleteI tried defishing this in DarkTable (it has the lens profile built in.) using Stereographic instead of rectilinear. It appears to give better results than rectilinear or orthographic. Can somebody confirm the same?
ReplyDeleteThanks great blog post
ReplyDelete