However, when using the lens on the Panasonic GH1 camera, I've noticed that the distortion correction is not sufficient. There is still some residual barrel distortion after the in camera correction.
Here are a couple of examples. First, let's look at an example at a close focus distance, close to the minimum focus distance of the lens:
Corrected JPEG
Uncorrected RAW
In this example, even when looking at the small image (above, left), it is easy to see that there is still some barrel distortion in the upper, horizontal line. The line is not straight. You can click on the image to view a larger version of it. The corrected image to the left is the JPEG output from the camera.
The right image shows the image as captured by the sensor, without any distortion correction at all. I used the UFRaw RAW processing software. But any software that allows for disabling the distortion correction could be used for this purpose.
And one example with a longer focus distance:
Corrected JPEG
Uncorrected RAW
In this latest example with a longer focus distance, it appears that the remaining distortion is not so significant. I added a red, straight guideline to the left in the JPEG image, above left. You can see that there is some barrel distortion still, but not much.
One could speculate why this is so. I don't think it is a firmware issue, since I have the newest firmware available for my camera.
Another speculation is that Panasonic chose to not correct all the barrel distortion, since that would have decreased the diagonal angle of view. The diagonal angle of view for this lens is specified to 75°. Further correction of the barrel distortion would reduce this figure, albeit with a small margin.
The Lumix G 14mm f/2.5 pancake lens uses internal focusing, and it is not uncommon that these designs lead to changes to the distortion properties, and field of view, at closer focus distances.
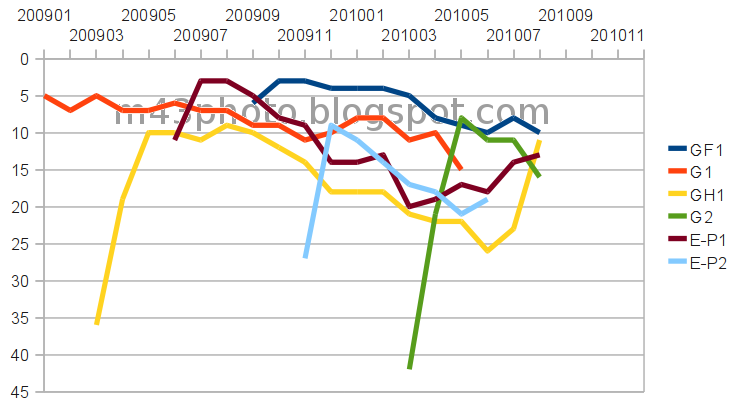
BCN Ranking provides monthly sales statistics for various items in Japan. One of them is system cameras, which includes DSLRs and mirrorless systems.
Here is the most recent sales statistics for Micro Four Thirds camera systems. The number in the graph is the ranking the given month. So a "4" means that the specific model was the fourth most sold model during that month. In the first two places you typically find the basic kit models from Nikon and Canon.
There are a lot of interesting findings here. For example, two Panasonic models have had a second birth: Both the GF1 and GH1 have seen an increase of sales, probably due to the discounted prices awaiting the arrival of the newer models GF2 and GH2. This also applies to the Olympus E-P1 camera, which saw a significant sales increase in the third quarter of 2010.
Another finding is that while the Panasonic Lumix G1 sold pretty stably, it was the Olympus E-P1 which made a big difference in the Japanese market. This is consistent with what I saw in the Nordic market. Even though the G1 has, in my opinion, better photographic functionality, it was the E-P1, with the retro styling, and somewhat slimmer body, which got the landslide sales. The E-P2 never was a big seller, it seems.
In the mean time, some competitors have also launched systems. I was not able to find statistics for the Samsung NX system, but the Sony NEX was easy to find. In the diagram below, it is apparent that the Sony NEX was a big hit in Japan.
The top model Sony NEX 5 got an impressive second place in June 2010, and retained the third place in July and August.
Using a fisheye lens as a macro lens is probably a very strange idea. But the Panasonic Lumix G 8mm Fisheye lens has a remarkably short minimum focus distance, so it actually makes some sense.
The closest focus distance is specified as 0.1m. However, this is measured from the sensor plane. So the distance from the front element is about 0.02m, or 20mm.
This corresponds to a magnification of 0.20x, or 1:5, which is not very impressive. We should keep in mind, though, that the field of view is more compressed in the corners, hence this magnification measure doesn't make much sense for the fisheye lens.
Here's my setup for photographing a LEGO figure at the closest focus distance:
The camera is on a tripod, and the figure is about 2cm from the front lens element. At this close distance, it is inevitable that the lens casts some shadow on the subject.
And here is the resulting image, taken at ISO 100, f/5.6, 1.3 second exposure:
The very close focus distance possible with the Lumix 8mm lens can be used to make interesting compositions. Especially when combined with the deep depth of field associated with a wide angle lens.
There has been some uncertainty as to the actual field of view of the Lumix 14mm f/2.5 pancake lens. While I personally don't doubt Panasonic's specifications, I decided to make my own measurement.
I placed the camera level, facing 90° towards a window. On the window, I placed a measuring band. The distance from the camera's mount to the measuring band is 870mm. This means that the distance to the sensor is 890mm, since the register distance of Micro Four Thirds is 20mm.
It's easier to measure the width when looking at 100% crops of the endpoints:
We can see that the total horizontal distance is 1039mm.
Doing the basic trigonometrical calculation, we get the horizontal angle of view to be: 2*arctan((1039mm/2)/890mm)° = 60.5°.
Now, we want to find the diagonal angle of view. The diagonal width is sqrt(10392+(1039*3/4)2) = 1298.75. Hence, the diagonal angle of view is 2*arctan((1298.75mm/2)/890mm)° = 72.2°.
Panasonic's specifications state that the diagonal angle of view is 75°. However, we know that the angle is specified at infinity focus. And in my case, the focus is just below 1m. It is also a fact that the angle of view can change with the focus, especially with internal or rear focusing mechanisms. So this is probably the explanation for the difference.
Just like most other Micro Four Thirds lenses, the Panasonic Lumix G 14mm f/2.5 pancake lens is corrected for barrel distortion in camera. This is applied when looking through the viewfinder, when producing JPEG images or videos, and when using some RAW converter programs. So many users are probably not aware of this at all.
It is easy to see the effect of the distortion correction when opening the RAW image file in a converter program that allows for not applying distortion correction. One such example is UFRaw.
Here is an example image. It was taken at f/2.5, ISO 400, 1/13 second exposure. Both the out of camera corrected JPEG, and the non-corrected RAW image are shown below:
Corrected JPEG
Uncorrected RAW
It is apparent that there is some barrel distortion in the RAW image. To correct this requires about -14.5 adjustment in the Lens Distortion filter within The Gimp image processing software. This is slightly more than for the Lumix 20mm lens, for which I found that -13.5 was an appropriate adjustment.
This picture shows what sensor area is lost during this conversion: The area outside the white frame is unused when applying the distortion correction.
This corresponds to around 12% of the sensor area, and hence you lose around one megapixel of resolution with the normal 12 megapixel sensor. This is nothing to worry about.
The upside is that if you need a wider field of view, you can use the whole sensor output from the RAW file. The normal diagonal field of view for this lens is 75°. Using the extra sensor area output to the RAW file gives you around 80° field of view. Of course, this will not be distortion corrected, but as long as you don't photograph any straight objects, this shouldn't be any problem. For nature and people, this might not be an issue.
Framing your picture will be difficult, though, since the viewfinder only shows the image after the distortion correction. And you might experience more vignetting in the extreme corners.
The Panasonic Lumix G 14mm pancake lens is the long awaited miniature standard wide prime. Some people have been disappointed by the aperture: The max aperture is f/2.5, which is a tad slow for primes. On the other hand, it is clear that size was important when designing this lens, and a moderate max aperture is needed to design a small lens.
To further reduce the overall size, it comes with new slim line, low profile front and rear lens caps:
In this example capture, you can see that the camera jogs the focus back and forth now and then, probably to verify the correctness of the focus. Also, while zooming, the focus is lost for a short period. The newer Lumix G 100-300mm f/4-5.6 lens is said to have some technology to prevent the loss of focus during zooming.
The recording was done in 720p, and converted/edited using HandBrake and Kdenlive.
Of course, one should be very careful with zooming during video recording. It is almost impossible to get the zooming smooth and undistracting. When zooming is done by professional videographers, the usually use a dedicated zoom motor, which attaches to the zoom ring and rotates it smoothly.
This video example illustrates how you can achieve a nice background blur using one of the cheapest lenses available. The possibility to blur the background to enhance the foreground subject is one of the reasons why some people like using Micro Four Thirds for filming.
Here is another example video capture:
This was filmed using 720p, 50 fps. I set the focal length to 120mm, which corresponds to 240mm on a traditional 35mm film camera.
The camera was not on a tripod, but I rested it against a fence for extra stability. Still, it was difficult to keep it entirely stable. You can see that there is some camera shake.
The 8mm fisheye lens is a specialized lens, meaning that it is not a lens that most people would use a lot. One can imagine several reasons why Panasonic still chose to develop this lens, e.g.:
The short flange distance for the Micro Four Thirds system means that wide angle lenses can be made very compact, illustrating the strengths of the M4/3 concept.
Videographers commonly use fisheye lenses for skateboard, BMX and other types of sports events.
When panning with a rectilinear wide angle lens, the objects can appear as if they change size as they move across the frame. With a fisheye lens, this can look more natural. Hence, some videographers prefer fisheye for wide angle videos, as opposed to traditional wide angle lenses.
Fisheye lenses can be used to make "cute" images and videos, e.g., novelty images of animals where the nose appears very large.
Anyway, the user is of course free to choose what to use this lens for, and does not need to be restricted by the items above.
Most fisheye lenses fall into two categories: Circular fisheye lenses, and full frame fisheye lenses. Circular fisheye lenses cover the field of view of 180° in all directions, and only expose a disc in the centre of the frame. Full frame fisheye lenses, on the other hand, expose the whole sensor area, but only cover 180° in the diagonal.
The Lumix G 8mm fisheye lens is a full frame fisheye lens. A circular fisheye lens on the Four Thirds format sensor would probably have a focal length of around 3-4mm.
Physical appearance
The lens comes with a built in, non removable, hood. The hood also protects the front lens element against objects touching it accidentally. Due to the hood, you can place the lens upside down on a table without the glass touching anything.
The front lens cap is unusual. Rather than the pinch centre caps that we are used to, this one is more like a lid which slides onto the outside of the hood. It is held in place by friction. The outside of the hood is around 61mm wide. You better take good care of the lens cap, since replacing it can cost around US$40.
Comparing the fisheye lens with the Lumix 20mm f/1.7 Pancake lens, reveals that it's size is small:
Quality wise, the lens gives a very good impression. There are no moving parts on the outside (beyond the focus ring), due to the internal focus mechanism.
The aperture can be set from f/3.5 to f/22. Changing the aperture gives a small "click" sound. It is not as silent as the Lumix G HD 14-140mm superzoom lens, but still, I hardly think anyone will find this problematic.
There is no geometric distortion correction in software when using this lens. As opposed to most Micro Four Thirds lenses, which utilize geometric correction in post processing, e.g., the Lumix G 20mm and Lumix G 14mm pancake lenses.
Autofocus
This lens has a very quick autofocus system. Except when photographing very close objects, you barely notice the focus at all: It appears to be in focus instantly when half pressing the shutter.
Moreover, the autofocus is virtually inaudible. It is barely noticeable in use.
I would recommend using multi point AF with this lens. The spot autofocus can be a bit awkward, with the very wide angle of view.
The closest focus distance possible is very short, specified to 0.1m. Keep in mind, though, that this is measured from the sensor, meaning that the minimum focus distance is very close to the front lens element. At this distance, it is ineviteable that the lens casts some shadow on the subject.
Manual focus is possible by using the focus ring. It is made of ribbed plastic, and for that reason it is not as easy to operate as a rubber ring would have been. On the other hand, the plastic ring is probably much more solid, and will not wear out any time soon. The ring feels fairly dampened and smooth, about the same as the Lumix 20mm focus ring.
Sharpness
My experience so far indicates that the sharpness is very good, even at f/3.5.
The typical way to evaluate the sharpness and artifacts of a wide angle lens, is to take a picture of foliage with the sky in the background. So here they are:
f/3.5, 1/13000, ISO 200
f/5.6, 1/500, ISO 200
To better evaluate the sharpness, let's look at some 100% crops from certain areas in the image (click for a larger image):
As we see from these crops, the image is very sharp from f/3.5, even in the corners. When stopping down the aperture to f/5.6, the corners sharpen up even more.
My study of the chromatic aberrations (CA) artifacts reveals that the lens has around 2-3 pixels wide red/green fringing in the corners of the frame, caused by high contrast areas. This is corrected by post processing software in the camera, and by some RAW converters. There is still some residual purple fringing in the corners after this in camera image processing, but it's mostly not a problem.
Flare
The Lumix G 8mm fisheye lens covers a very wide field of view. For this reason, it can be difficult not to have a strong light source in the frame, e.g., the sun. Hence, it is important that the lens handles flare well. Otherwise, one strong light source could ruin your shot.
I have included an extreme example below. Here, the sun is in the centre of the frame, just behind the figures.
And here is an enlargement of the persons, who has the sun just behind them. This is a 100% crop, meaning that it has not been resized:
Here we see that the sun does indeed reduce the contrast. However, considering how difficult this scene is to render, given the very high contrast, I think the lens does a good job. So flare is not a big problem with this lens, I would say.
Example images
This specific fisheye lens is the full frame type, meaning that the image fills the entire rectangular frame. The diagonal coverage is stated to be 180°.
A fisheye lens generates images that are not rectilinear, as we are used to, but rather hemispherical. This looks like an excessive amount of barrel distortion.
This distortion is very apparent when photographing rectangular shapes, like, for example, the Apple store in New York:
However, when photographing organic forms, the distortion might not be a huge problem. Here is the sled dog Balto, the only one to get a statue in Central Park while still being alive:
It is easy to see that the head is too large, and that the hind part of the dog is too small. This is due to the fisheye distortion. But on first glance, the shapes do not look very wrong. Only when the intention is an anatomically correct image, would the distortion be a problem.
Fisheye lenses can be defished, i.e., transformed to a rectilinear projection. In this example, I used the program Hugin to do the transformation. The original picture of the Tourneau store was taken with a 16:9 aspect ratio:
The diagonal field of view is 180°. In the 16:9 aspect ratio, the ratio of field of view becomes even more narrow, due to the curvature of the projection. The field of view is 136° horizontally, and 76° vertically. Here's how the defished image looks:
Here's an example video, filmed at 720p with the Panasonic Lumix GH1. It was filmed while holding the camera above my head at arms length, so it is a tad shaky. Doubleclick on the video to go to the YouTube view, which may work better than this embedded view.
Compared with the Lumix G 7-14mm f/4
It is natural to compare this fisheye lens with the Panasonic Lumix G 7-14mm f/4 ultra wide zoom lens. They are both extremely wide lenses, and their pricing are fairly similar.
When it comes to the lens construction, the 8mm fisheye lens is a much simpler design. It features 10 lens elements in 9 groups, while the 7-14mm zoom has 16 lens elements in 12 groups. In terms of exotic elements, it is also simpler: 1 ED glass element (4 in the 7-14mm), and no aspherical elements (2 in the 7-14mm).
There's no significant difference in the speed. The wide angle zoom has a maximum aperture of f/4, which is only slightly smaller than f/3.5. While the fisheye wins in this respect, the difference is hardly significant.
The fisheye lens has a close focusing distance of 0.1 meter, which is very, very close. The corresponding distance is 0.25 meter for the 7-14mm zoom, which is also close, but still not comparable. While you may not use this close focusing distance a lot with the fisheye, the front lens element is less than an inch from the subject at this distance, it can still be used for some interesting effects.
In terms of overall usefulness, the 7-14mm zoom wins, no question about it. In the longer end, it becomes a "normal" wide angle lens, useful for a lot of shooting situations. The fisheye lens, on the other hand, remains an exotic, specialized lens all the time.
The 8mm fisheye lens is still attractive due to it's very wide angle of view, and the small size (37% shorter and 45% lighter).
Conclusion
This is a very good and compact lens. But it's usefulness is a bit limited for most people, and it is expensive.
Due to its lower cost and good optics, the Samyang 7.5mm f/3.5 fisheye lens can be a good alternative to the Lumix G 8mm f/3.5 fisheye lens.
The Samyang lens also has a more common fisheye projection model, and is easier defished, in my experience. If you plan on doing that, then the Samyang may be a better choice.
For Photokina 2010, Lensbaby introduced their newest product: The Tilt Transformer. It can be had for Micro Four Thirds cameras, and for Sony NEX E-mount. It can be bought stand alone, or with a Composer lens element.
Below are both products: The Composer (left) and the Tilt Transformer (right):
The Tilt Transformer (right) can be mounted to a Micro Four Thirds camera. This device acts as an adapter for Nikon F lenses, and also as a tilting platform.
The Composer (left) is a very simple lens. Turning the black ring around the lens pushes the lens elements back and forth, thus giving manual focus capability. To change the aperture, you need to disassemble the lens, and change the aperture plate. The lens comes with round plates with curcular holes, corresponding to apertures from f/1.8 to f/22.
One would perhaps think that the Composer can also be used as a lens on Nikon cameras, since the Tilt Transformer accepts Nikon lenses. However, this does not appear to be true. It is probably not a good idea to try to mount the Composer to a Nikon camera, since the lens element protrudes far into the camera, possibly interfering with the mirror.
The next picture shows the two devices mounted together:
In this configuration, it acts as a standalone lens for Micro Four Thirds cameras, with tilt capability built in. Loosening the ribbed metal ring allows you to rotate and tilt the adapter and Composer lens element. You can tighten the ring to fix the rotation and tilt in place.
Build quality
Unlike most native Micro Four Thirds lenses, the chassis of this lens is composed largely of metal. Still, it does not have a very good quality feeling: For example, the finish of extruded parts is somewhat rough. Also, what annoyed me, was that when mounted on a camera, the connection is a bit loose. Even the cheapest adapters fit the camera well, in my experience, but when mounting the Tilt Transformer on the camera, there is some play in the connection. It can be jerked a bit back and forth, unlike any other lenses I have tried on a Micro Four Thirds camera.
In use
When loosening the ribbed metal ring, you can adjust the amount of tilt. This adjustment is not dampened well. The tilting adapter moves quite jerkily. Again, I think this is a bit disappointing. Tightening the locking ring fixes the position of the adapter, and this functions well.
Manual focusing is pretty easy. The focus ring is very light to operate, and there is a lot of rotation, meaning that fine tuning is easy.
Changing the aperture is, of course, a bit of a hassle. You must unscrew the front section of the lens, remove the aperture disc with the supplied magnet tool, and then insert a new disc with the aperture of your choice, before putting back the front lens section.
Example image
This is the very first image I took using this adapter/lens combination. I used the f/4 aperture plate, and tilted the lens a bit to the side. Then I rotated the focus ring so that the middle part of the image was in focus, and pushed the shutter release. That's it. The picture was taken with a Panasonic Lumix GH1. (Click for a larger image.)
So is this image interesting? Well, it does have a "miniature" look to it, due to the selective focus. With some practice, the effect can be made much better.


