Introduction

This blog is a user's perspective on the Micro Four Thirds camera system. Read more ...

Lens Buyer's Guide. Panasonic GH4 review.

My lens reviews: Olympus 9mm f/8 fisheye, Lumix G 12-32mm f/3.5-5.6, Leica 25mm f/1.4, Lumix X 12-35mm f/2.8, Lumix X 35-100mm f/2.8, Sigma 30mm f/2.8, Sigma 19mm f/2.8, Lumix X PZ 14-42mm f/3.5-5.6, Lumix X PZ 45-175mm f/4-5.6, Olympus M.Zuiko 45mm f/1.8, Panasonic Lumix G 100-300mm f/4-5.6, Panasonic Leica Lumix DG Macro-Elmarit 45mm f/2.8 1:1 Macro, Panasonic Lumix G 45-200mm f/4-5.6, Panasonic Lumix G 20mm f/1.7 pancake, Panasonic Lumix G 14mm f/2.5 pancake, Panasonic Lumix G HD 14-140mm f/4-5.8, Panasonic Lumix G HD 14-140mm f/3.5-5.6, Panasonic Lumix G 8mm f/3.5 fisheye, Lumix G 7-14mm f/4, Samyang 7.5mm f/3.5 fisheye, Tokina 300mm f/6.3 mirror reflex tele, Lensbaby 5.8mm f/3.5 circular fisheye lens
The blog contains affiliate links. As an Amazon Associate I earn from qualifying purchases.

Monday, 26 March 2012

Defishing fisheye images

When it comes to wide lenses, fisheye lenses are the very widest available. The currently widest rectilinear (non-fisheye) lens for the Micro Four Thirds system is the Panasonic Lumix 7-14mm f/4 zoom lens. At the widest setting, it has a diagonal field of view of 114°. This is quite impressive, however, a full frame fisheye lens has a diagonal field of view of 180°.

Two full frame fisheye lenses for the Micro Four Thirds system are the Lumix G 8mm f/3.5 and the Samyang 7.5mm f/3.5. The Lumix lens is rather expensive, but good quality. The Samyang is cheaper, does not feature autofocus, and has good optical qualities.

A disadvantage of fisheye lenses is of course the fisheye projection: They do not feature rectilinear projections like we are used to, but spherical projections. This means that any line not passing through the centre of the frame will appear bent. The further from the centre a line passes, the more bent it becomes.

However, fisheye images can be transformed to rectilinear images, to look more natural. In this article, I use the free software Hugin to transform the image, also called defishing.

Defishing photos

Here is an example image taken with the Samyang 7.5mm f/3.5 at f/5.6. It features Sergels Torg in Stockholm, with straight lines in three directions in the tiles (click to enlarge):


As you can see, the lines that pass near the centre of the frame are the least bent.

To transform the image to rectilinear, I use the Hugin program to defish it. Hugin can do panorama stitching, but in this case, I use it solely to defish an image.

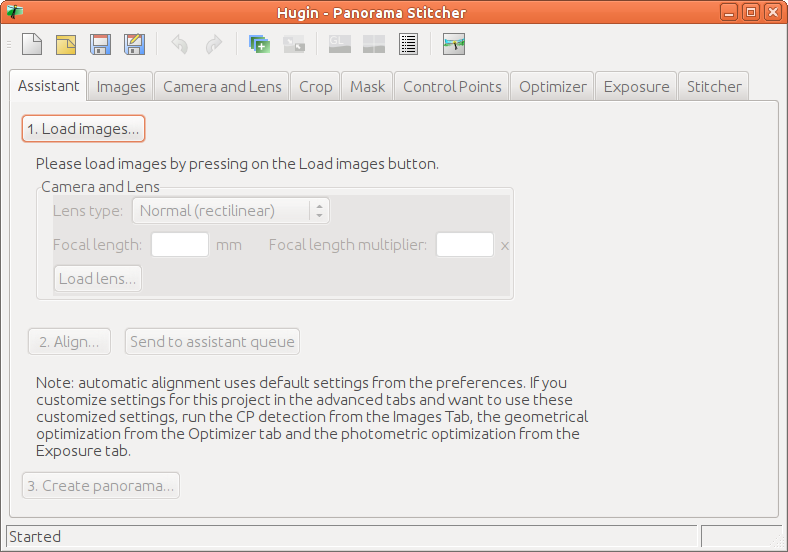
First, click the "Load images..." dialogue button, and load your image into the program:

Next, insert the details about the lens. Here, I am using a Full Frame Fisheye, with a focal length of 7.5mm and a 2x crop factor:


In my experience, using the lens type "Orthographic" also gives good results. Having done this, it is time to tell the program what kind of output projection we want. This can be done by clicking the "Fast Preview panorama" button in the middle top of the window:


This brings up the dialogue window where you can choose the output projection and field of view. Choose "Rectilinear" projection, and a field of view of something like 140° by 110° in the "Projection" tab:


Finally, it is time to save the output file, which is done in the "Stitcher" interface, since this program is, after all, a panorama stitcher program. First, click "Calculate Optimal Size", and then "Stitch Now...":


This brings up a file save dialogue window. Note that the output file will be enormous, and you need to open it in an image editing program, e.g., The Gimp, to crop and resize it. After cropping and resizing, the image looks like this:


There are a lot of things to note about the defished image:

The lines are now (fairly) straight. I did not use a specialized profile for the Samyang 7.5mm f/3.5 fisheye lens, but a generic profile. So the output image is perhaps not perfectly rectilinear. But it is good enough for most uses, I think.

Also, note that the aspect ratio of the image changed. The original image had an aspect ratio of 1.33 (4/3). The defished image has an aspect ratio of 1.92. This is not a mistake. Keep in mind that the fisheye image is more compressed the further from the centre we get. Hence, in the fisheye projection, we pack more angle of view the further from the centre we get. Since the original image was rectangular, this gets exaggerated after defishing.

Finally, the corners of the defished image have been stretched a lot, and the effective resolution is smaller in the corners than in the centre. This can be illustrated by looking at 100% crops from both the original and defished images, from the lower left corner:


Contrary to intuition, perhaps, the fisheye image actually looks more natural in the corner.

In the corner, we also see that the Chromatic Aberration artifacts get exaggerated after defishing. We can see a more pronounced green fringing around the black figure in the image above.

I have also used the "Orthographic" lens model for defishing an image, and compared it with an image taken with the Lumix G 7-14mm f/4 ultra wide angle zoom lens. The transformed rectilinear image from the Samyang 7.5mm f/3.5 lens is even wider than that of the Lumix wide angle lens at 7mm, and very sharp, too.

Defishing video

My example above looked at defishing a still image. It is also possible to defish video. I have used the Kdenlive video editing software for this effect. Right click on the video timeline, and select "Defish":


This brings up the "Defish" video effect settings:


I've found that using the "Equiarea" type, and an amount of 855 works well. Alternatively, use "Stereographic" and an amount of 825. Or you can experiment and see what you like the most.

Using this technique, I have made an example of a video sequence both without and with defishing. The video shows the street gamblers often seen in the Stockholm old city:


Again, we see that the output video is almost rectilinear. For most practical purposes, this is good enough. Also, in the corners, the resolution is not as good as in the centre, just as we saw in the image example above. This is especially evident when viewing the video at 1080p.

Conclusion

Defishing image and video is easy. The output images are not perfect, but considering how extremely wide they are, I'd say they are pretty good.

To avoid the stretched look in the corners, you could apply somewhat less defishing effect. This will leave some residual barrel distortion, but also leave more resolution in the corners. This could be an option if you have an image with few straight lines.

In this article, I have looked at how much wider the defished output image is compared with using a rectilinear wide angle lens.

Monday, 27 February 2012

Samyang 7.5mm f/3.5 fisheye lens review

The Samyang 7.5mm f/3.5 fisheye lens, also marketed as Rokinon and Bower, is special in that it is one of the first third party lens designs made specially for Micro Four Thirds. Some other manual focus lenses for Micro Four Thirds are older designs with a new mount.

The Samyang fisheye lens is an alternative to the native Panasonic Lumix G 8mm f/3.5 fisheye lens, so it makes sense to compare them. Here they are, with lens caps:


They have different type caps. The Samyang, on the left, has a cap held in place with clips, operated by pressing the side tabs. The Lumix's cap is held in place with friction only. I prefer the latter, since the Samyang cap must be inserted correctly rotated, which is somewhat more awkward.

Sunday, 26 February 2012

Reverser ring for macro

There are many ways to achieve macro possibilities. The simplest is of course to buy a dedicated macro lens, like the Leica-Lumix 45mm f/2.8 1:1 macro. This lens does macro very good, and is easy and fun to use. The only negative side is that it is rather expensive, probably in part because of the premium Leica branding.

Another way is to get a cheap legacy lens, and some macro extension rings. If the lens has a mechanical aperture ring and focus ring, then it is quite easy to use with macro. Of course, you must control the focus and aperture manually on the ring, and there is no EXIF information to the camera. For even better control, you could buy some macro bellows, for stepless extension distance.

A third method would be to buy a macro lens to put into the filter threads of the lens. There are a number of third party macro filters to buy, and Panasonic has even launched their own, which can be used with the Lumix G 14mm f/2.5 pancake, and the Lumix G X PZ 14-42mm powerzoom pancake kit lens. I have not tried any of these.

A fourth method is to buy a macro reverser ring. A reverser ring is quite simply an attachment which allows mounting a lens reversed on the camera. I have tried one such ring, easily available on various auction sites for around US$10. It is a simple thing. On one side, it has a Micro Four Thirds lens mount. The red dot makes mounting easy:


On the other side, it has a 52mm lens thread:


The 52mm threads is a good choice, since it fits a number of lenses.


Here is the adapter mounted to the Panasonic GH2. It will of course fit any Micro Four Thirds camera.


Mounting a Nikkor 24mm f/2 AIS lens

I have got an old, rather banged up Nikkor 24mm f/2 AIS lens. It has got a 52mm front lens thread, and hence fits well onto the adapter. Here is a video showing how to mount it:


After mounting the lens, you can still control the aperture with the mechanical aperture ring, which is a good thing. When used like this, the lens has a very short focus distance, good for macro, but it also has a very thin depth of focus. Hence, you will normally want to stop down the aperture to at least f/5.6 to get more in focus. Normally, you will focus at f/2 (for the best focus accuracy), and stop down to f/5.6 (or more) before taking the picture.

I took this test picture of a ruler (in millimeter) to test the magnification:


The test picture shows that the magnification is 17.3:13 (with 17.3mm being the horizontal width of the Four Thirds sensor, and 13mm being the width of the object depicted). This corresponds to 1:0.75 magnification, also written as 1.33x. This is slightly more magnification than what is possible with the Leica-Lumix 45mm f/2.8 1:1 macro. On the other hand, no focus is possible at all with this solution. You can only take pictures at 1.33x magnification.

Mounting a Lumix G 14-42mm f/3.5-5.6 kit zoom lens

The Lumix G 14-42mm kit zoom lens also has a 52mm front thread. Hence, you can mount it to this adapter. Here is a video showing how to mount it:


Using this is quite different from the manual Nikkor 24mm f/2. First of all, the negative sides: The Lumix G 14-42mm lens does not have an aperture ring. Hence, you cannot easily adjust the aperture. This makes macro use difficult, since you will normally need to stop down the aperture for more depth of focus (DOF).

The positive side is that you can use the zoom ring for changing the magnification rate. The focus distance is also changed at the same time, but at this enlargement, it makes more sense to use the word "magnification" than "focus". At 14mm, you get the maximum magnification, and the minimum at 42mm. Let's take a look at this.

@14mm

Again, I photograph the ruler to find the magnification:


The ruler shows 7mm, hence the magnification is 1:0.4, or 2.5x:


The working distance is 2cm, which is quite short. I try to photograph a LEGO figure here, and as you can see, the subject is almost touching the rear end of the lens:


Here is the result, at 14mm f/3.5. I focused on the eye, but due to the very thin DOF, only one eye is in focus:


@42mm

Here is the photo of the ruler, showing a 1:0.87 or 1.15x magnification ratio:


At 42mm, the working distance is 4cm:


And here is the result, at 42mm f/5.6:


Example image

This is a picture a tooth brush, and was taken at 14mm, f/14. I could probably have stopped down the lens even more for more depth of focus.


Also note the dots throughout the image. They are probably dust particles on the sensor, and come into focus when using extremely small apertures, like in this case. Otherwise, they don't cause any negative effects.

Mounting a Lumix G 45-200mm f/4-5.6 tele zoom lens

The Lumix G 45-200mm tele zoom lens has a 52mm front lens filter thread, and hence mounts directly to the adapter.

However, when mounted reversed, it focuses near infinity at 45mm, and nowhere at longer focal lengths. Hence, it is useless for reverse macro use.

Mounting other lenses

Both these lenses have a front thread of 52mm, making them easy to mount. But let's say you have the Lumix G 20mm f/1.7, with a front thread of 46mm. What to do?

You can get a step up ring. Mount a 46mm-52mm step up ring to the front of the lens, and then mount the front of the step up ring to the adapter. A step up ring is very cheap to get on various auction sites.

Take care that mounting a wide attachment to the Lumix G 20mm f/1.7 lens can cause the focus mechanism to jam. So don't power the lens with the step up ring attached.

Conclusion

Using the reverser ring adapter, the Lumix G 14-42mm lens can be mounted reversed, and the zoom ring can be used for focusing. The magnification rate is 1.15x-2.5x, which is not a very large range. For comparison, Canon has a specialized macro lens called Canon 65mm MP-E, with a macro focus range of 1x-5x.

Changing the aperture is not very easy with this lens, but it is needed. You cannot photograph macro images using the lens wide open, since the DOF is too thin. To stop down the lens, you can mount it to a camera, and start a long exposure at f/8, 4s, for example. As the camera is exposing, remove the lens. That way, the lens is stopped down to f/8 when you remove it. Do this at your own risk.

This is a cheap way to achieve macro possibilities with the kit lens, a lens that quite many users probably have already. But is is not very easy to use. First of all, the working distance is very short, so you cannot photograph live insects. They will be scared off.

Second, changing the aperture is awkward. And third, the macro range is limited, at 1.15x to 2.5x.

But if you want to experiment with macro images of static objects, than this is a very inexpensive way to do so.

Thursday, 23 February 2012

Fisheye lenses, different projections?

The Samyang 7.5mm f/3.5 fisheye lens is an interesting addition to the Micro Four Thirds lineup. While most third party Micro Four Thirds lenses so far have been existing manual lens designs given a new mount, this lens is designed for the Micro Four Thirds format from ground up.

How can I tell? A full frame fisheye lens has 180° diagonal field of view. Hence, the lens must match the sensor size exactly. If the lens was designed for APS-C, a larger format, then the corners would not correspond to 180° angle of view. A fisheye lens which does not project to 180° in the corners is pretty much useless. Then it is just a wide angle lens with a lot of geometric distortion.


Compared with the existing Lumix G 8mm f/3.5 fisheye lens, the Samyang lens is a much more traditional design, with a manual focus ring and aperture ring.


Some say the Samyang lens features a different projection type, the Stereographic projection. This is supposed to be less distorted than the Spherical projection traditionally associated with fisheye lenses. Let's look into how their projections differ. Here is a picture taken with both lenses, and also using the Olympus Zuiko Digital 9-18mm Four Thirds wide angle zoom at 9mm:


Samyang 7.5mm
Lumix G 8mm
Olympus 9-18mm @ 9mm
By superimposing both the fisheye images in one image, and doing edge detection, we can see how their projections compare:
And let's look at another example:


Samyang 7.5mm
Lumix G 8mm
Olympus 9-18mm @ 9mm
Superimposing the two gives:

(Click for larger images.)

Conclusion

So, what is the conclusion of all this? First of all, from the second example, we observe that both lenses have pretty much the same diagonal field of view. This experiment does not verify that the diagonal field of view is exactly 180°, as it should be, but at least both lenses have around the same maximum diagonal angle. To be more precise, the Samyang lens appears to render a slightly wider diagonal field of view. This might be due to the shorter focal length, 7.5mm versus 8mm.

Regarding the distortion, we can see that the Samyang lens renders objects which are inside the border of the image a little bit smaller. This means that it distorts the images somewhat less. So the rumor is true: The Samyang lens does give less "fisheye distortion".

But surely, the differences are pretty marginal. You're not likely to notice much difference, unless comparing head to head, as I do in this article. So if you're looking at the Samyang 7.5mm lens to avoid the fisheye distortion, you are going to be disappointed.

One thing to note is that if you plan to convert to rectilinear images in post processing, the Samyang lens has the potential for giving you the widest possible rectilinear images of the two fisheye lenses. This process is called defishing, and you can read about the topic here. It is probably not true that the Samyang lens features stereographic projection. It still has fisheye projection, but with slightly less distortion than the Lumix G 8mm f/3.5 fisheye lens.

Saturday, 11 February 2012

What can we expect from the GH3?

The Panasonic GH series has comprised the premium camera models for Micro Four Thirds. The Panasonic GH1 and GH2 have had the best video quality among mirrorless cameras at the same time, and they are also considered to have the best sensor for photos. They are not intended to be volume models, but rather to sell at a premium price for those who want the best camera.


Panasonic GH1 (left) and GH2 (right)

The Panasonic GH2 was announced in September 2010. I bought it the very first day it was available in my market, which was in December 2010. Hence, this camera is starting to get old. In this article, I would like to speculate a bit about what we can expect from the GH3.

Wednesday, 8 February 2012

Canon G1X, sensor size the same as GH1

The Canon PowerShot G1 X was announced recently, and took a lot of people by surprise. While Nikon have launched their mirrorless, large sensor cameras in the Nikon 1 series, not many rumors existed about Canons mirrorless competitor. It turns out that their answer was a large sensor compact camera, without interchangeable lenses.

The sensor size was also a bit surprising: Larger than Four Thirds, but smaller than APS-C. This sounds like an odd sensor format. But is the sensor format really that odd? Let's try to have a closer look at it.

We know that the Canon G1X sensor is reported to be 18.7mm x 14mm. The Four Thirds sensor size, on the other hand, is somewhat smaller at 17.3mm x 13mm.

But the Panasonic GH1 and GH2 have employed oversized Four Thirds sensors. This design choice was implemented to get the same diagonal field of view in the 16:9 and 4:3 modes, utilizing the full image circle also for video. The Panasonic GH1 has 4000x3000 pixels in 4:3 mode, and is 4352 pixels wide in 16:9 mode. This means that the width of the sensor must be 17.3mm x 4352 / 4000 = 18.8mm. Which is rather close to the reported width of the Canon G1X sensor.  The differences in reported size might be due to rounding off differently.

What about the vertical size? The GH1 sensor is reported to have 14 megapixels in total, which corresponds to a vertical resolution of 3217 pixels. Hence, the vertical size must be 13mm x 3217 / 3000 = 13.9mm. Again this is very close to the reported height of the Canon G1X sensor.

And the total resolution of the Canon sensor? 4352x3264. Again, this is very close to the GH1 horizontal resolution times the estimated vertical resolution based on the total 14 megapixel resolution. This can be illustrated like this:


Both sensors are of the CMOS type, and both have a base ISO of 100.

My conclusion is that the specifications of the Canon PowerShot G1 X sensor are remarkably similar to the Panasonic GH1 sensor. This doesn't mean that they are identical, though. But given that there are not that many sensor manufacturers out there, and certainly not for the Four Thirds sensor size, I would say this is a good indication that Panasonic do in fact produce the sensors for the Canons G1X. As you understand, this is of course purely speculation.

A fundamental difference between the two cameras is that the Panasonic GH1 only gives you a maximum resolution of 12 megapixels for one single exposure, with the option of changing the aspect ratio with the same image circle. 

The Canon G1X, on the other hand, gives the full sensor resolution output for a single exposure.  However, when using video (16:9 aspect ratio), only a smaller image circle is used, meaning that the effective focal length changes.

Monday, 30 January 2012

Why buy a system camera, and why buy a compact camera?

If you're looking for a small camera, there are basically two choices. You can go for a small, interchangeable lens camera, for example based on the Micro Four Thirds standard. Or from one of the competitors, like the Nikon 1 system, Sony NEX, and so on. The other choice is to buy a compact camera without interchangeable lenses.

The main difference between these two camera types is the sensor size. Interchangeable lens cameras tend to have larger sensors than compact cameras. There are some exceptions to this rule, though, for example the Pentax Q system, which has a small sensor in a camera body with changeable lenses, and the Canon G1X, which has a large sensor in a fixed lens camera body.

I recently acquired the Olympus TG-310, a compact, rugged camera with a small sensor, for use when swimming, skiing, and so on. And I was interested in seeing what the real world difference between this camera and my Panasonic GH2 is. The two cameras are shown below, with the Olympus TG-310 to the right:


As mentioned, system cameras and compact fixed lens cameras tend to have different sized sensors. To illustrate that, here is a comparison of the relative sensor sizes of the Four Thirds sensor and the 1/2.3' sensor in the Olympus TG-310 compact camera:


The smaller sensor means that the camera manufacturer can cram more features into the lens more easily. So while the Lumix G 14-42mm kit lens seen on the GH2 above only has a 3x zoom and no macro mode, compact cameras tend to have much a larger zoom ratio, and a macro mode to boot. I write about this difference in the introduction to my Micro Four Thirds lens buying guide.

The specific compact camera still has fairly unimpressive optical features, though. This is because it is a rugged compact, designed to be waterproof, shockproof and freezeproof. Because of this design choice, it has a relatively small lens assembly, to keep the size and weight down. This dictates employing only a 4x zoom ratio.

I bought the camera very cheaply, since it has recently been obsoleted by the newer Olympus TG-320. It appears to share some components with similar cameras from Panasonic, most notably the Lumix DMC-TS10.

Looking at some of the specifications of the two cameras used in this test, we see that they are not altogether that different:

System
GH2 + Lumix G 14-42mm
Olympus TG-310
Effective Megapixels16.114.0
ISO range160-1280080-1600
Focal length range (equiv)28-84 (3x)28-102 (3.6x)
Aperture rangef/3.5-5.6f/3.5-5.9
Minimum focus (normal)0.3m0.6m
Minimum focus (macro)N.A.0.03m
Image stabilizationOpticalSensor shift

But these are just the specifications. Let's see what the difference is in terms of image quality.

Landscape photo

I started with taking a basic landscape photo. I set both cameras to full auto, which is probably what a newbie would do. The zooms were both set to the widest setting. The cameras were handheld. Here are the two images, scaled down a bit, click to enlarge:


GH2, ISO 160, f/4.0, 1/160s
TG-310, ISO80, f/3.5, 1/60s

To compare them better, here are some 100% crops from the images:


While the scaled down images look fairly similar in terms of image quality, it is very clear from the 100% crops that the GH2 in fact has a huge advantage in terms of resolution.

Indoor photo with flash

To further look at the image quality differences, let's look at some images taken indoor with the built-in flash. The subject here is the LEGO Technic 9392 model. Again, I used full auto on both cameras.


GH2, ISO 160, f/5.2, 1/60s, f=33mm
TG-310, ISO100, f/4.7, 1/60s, f=11.8mm

We don't need to look at any crops here, we immediately see that the GH2 image is vastly better. One thing to note, though, is that more of the model is in focus from the Olympus TG-310. It has a deeper depth of focus. This is due to the smaller sensor, which keeps more of the subject in focus. This effect can be both positive or negative, depending on what you want.

Night photo

Finally, I have tried to take night exposures with both cameras. I put them on a tripod, and still left them in full auto, at the widest setting. Here are the results:


GH2, ISO 160, f/5.6, 6s
TG-310, ISO100, f/3.5, 1/30s

In this case, the GH2 noticed that it was on a tripod, and gave me a long exposure of 6 seconds, straight from the full auto mode. This surprised me positively, I had guessed it would push the ISO up to expose it as much as possible during a short shutter time. It also stopped down the aperture to f/5.6, for better depth of focus, and set base ISO. Well done! Just what I would have done myself.

The Olympus TG-310, on the other hand, illuminated the scene with the flash, which gives a pretty good exposure of the handrail in the foreground. But the rest is pitch black.

For the sake of fairness, I gave it another chance, and turned off the flash, while still using full auto. Here is the result, at ISO320, f/3.5, 1/4s:


This image is barely usable, but still much worse than the results from the Panasonic GH2.

Conclusion

A compact camera can be small, cheap, and sport an impressive zoom and macro range. But the image quality tends to be much worse than an interchangeable lens camera with a larger sensor. Of course, there are enthusiast compact cameras too, with a somewhat bigger sensor than basic compact cameras, better and faster optics, and better image processing. But in demanding situations, they still cannot compete with larger sensor cameras.

Another item to point out is the ergonomics. The GH2 is a fairly small interchangeable lens camera, and some complain that the buttons are difficult to operate, being so tiny. But the Olympus TG-310 has even smaller buttons, and requires more dexterity to be operated. It also has fewer buttons, and requires more menu access to change common settings.

Thursday, 26 January 2012

Camera bag for Micro Four Thirds: Lowepro Munich 100

For a long time, I have tried to find a camera bag which is suitable for carrying the Panasonic GH2 with one small lens mounted. However, I have not found such a bag. I even tried to make my own bag, but it was not very successful, honestly.

But I think I have found a suitable bag now. It is the Lowepro Munich 100:


The bag comes with a slim strap, and a segment with velcro, which can be used to divide it into sections. If using the bag for the Panasonic GH2, or a similarly sized camera, there is no space for extra sections in the bag, though.

And that is exactly what makes this bag good for my use: My camera fits very snugly into the bag. It is probably the smallest bag which can accommodate it with a prime lens. The bag can be seen below, with a Panasonic GH1 and the Lumix G 20mm pancake lens:


But not only a pancake lens fits into the bag. The camera with an Olympus M.Zuiko 45mm f/1.8 also fits well, as does the Lumix G 8mm fisheye lens. But the Lumix G 14-42mm is too large. And it is difficult to bring more than one lens in the bag, together with the camera.

The bag is fine also for other Micro Four Thirds cameras with built in viewfinders, e.g., the Panasonic G3, or the Olympus OM-D E-M5. Even though the GH3 is bigger, it still fits in the bag with one of the pancake lenses, but not with the fisheye or the Olympus 45mm.

The bag comes with a slim strap, and I don't like it very much. I prefer a sling type strap, to wear the bag diagonally on the back, and easily be able to pull it to my chest for access. I plan to retrofit such a strap, which should be an easy task.


One could ask: If I only plan to bring one lens with the camera, why use a bag at all? I find that a bag is good to have for protection. If it starts raining, the bag will save the camera and lens. And in my area, it is generally below 0°C during winter. The camera is not harmed by this temperature. But the problem is when you bring the camera indoors after it has been exposed to freezing temperature. Moisture will condensate on the outside and inside of the camera and lens, which will, of course, damage it. So leaving the camera in the bag until it has reached a warmer temperature is a good protection when going from outdoors to indoors during winter.

Tuesday, 10 January 2012

Camera sales statistics from Japan

BCN Ranking produce camera sales statistics from Japan of many kinds. The most interesting, from my point of view, is the category "interchangeable lens cameras". This includes DSLR cameras, typically sold as kits, and mirrorless cameras, including Micro Four Thirds, Sony NEX, Samsung NX, and so on.

Here are the yearly statistics of the 20 most sold models in this category, with 2011 to the right:


To make the statistics more useful, I have compiled it into categories, given by the lens mount. Keep in mind that the percentages are taken from the 20 most selling models only (for 2008-2011):


There is a lot to comment about these statistics. Regarding the big two, Canon and Nikon, Nikon had a smash hit with the D40 in 2006. But since that time, Canon has taken over the leading role.

Pentax were also rather large with the K10D in 2006, offering good features at a reasonable price, but has not been able to retain the same market share since. Their newer models have not had the same combination of value for money and features, in my opinion.

Sony launched their DSLR series aggressively in 2008, and got a very healthy initial market share. Two years later, they repeated the same strategy with the mirrorless Sony NEX system, getting pretty much the same market share.

Micro Four Thirds, of course, has grown quite well in Japan, and are now quite close to Nikon in terms of market share. M4/3 is much more successful than Four Thirds ever was. Olympus has three models on the top twenty list in 2008, but their DSLR models have never since made any significant market impression.

The Panasonic G10 was probably intended to be a volume model, with a low retail cost. Perhaps Panasonic hoped to get a Nikon D40 like hit with it. However, we see that it did not reach the to 20 list at all, and that may be why it was discontinued rather soon.

Also worth noting is that Canon have had two models on the list for three consecutive years: The Canon EOS 5D Mark II and the Canon EOS 7D. This shows that Canon have been able to design camera models that stay relevant and desireable for a long time, however, I anticipate that both are due for a replacement in 2012.