One of the new features of the G2/GH2, is touch screen LCD. Some fans have been negative about this feature, since they are afraid of losing the hard buttons on the camera body. It turns out that the touch LCD is an additional feature, and that it does not replace any hard button functions. So those who dislike a touch screen can ignore it, without losing any vital functionality.
One application where the touch screen makes some sense, is macro photo. It is rather quick to move the focus point around in the frame. Here is an example usage, with the Panasonic Leica 45mm f/2.8 lens:
You can doubleclick on the video to be able to view it in other sizes.
As you see, the response is not very quick. It takes a moment from changing the focus point until the camera actually starts changing the focus.
I'm using the A mode on the mode dial. Using the iA mode typically gives me the focus tracking mode, in which the response from touching until the focus changes is a bit faster. So if you want the focus response to be quicker, set the dial to iA.
In the video, I am sliding my finger over the screen now and then. This is not necessary. You can just point where you want the focus point. My sliding finger action is probably something I've learned from using an Iphone.
This can also be done during video recording. The response speed is the same, as far as I can tell, during video recording.
Of course, the PL45 lens is not the quickest around in terms of autofocus. Using a quicker lens will make the response quicker as well.
I have also made an analysis of the focus speed of the GH2 for a number of lenses, and compared with GH1 for some of them.
Saturday, 11 December 2010

Thursday, 9 December 2010
Panasonic GH2 autofocus speed
Update: Since this test, I have compared the GH1 and GH2 head to head under exactly the same conditions.
I have tested the autofocus speed for the Panasonic Lumix GH2 with various lenses. The test was done by turning on the camera (which leaves the lens at near infinity focus), and then pressing the shutter to see how long time it takes to reach focus. This was filmed using a GH1, and I played back the video in a video editing software, to read out the timings.
There is fairly dull indoor lightning. The lightning corresponds to around EV 6, the same as in my previous test of the GH1. A LEGO figures is placed in the middle of the camera frame, at around 45cm distance. The focus mode used is centre spot.
Here is an example test. In this test, I have the Olympus 9-18mm f/4-5.6 Four Thirds lens mounted to the camera, using an adapter. (Not to be mistaken with the Micro Four Thirds version of the lens.)
This combination gives a rather slow autofocus.
Another example using the Lumix G 14mm f/2.5 pancake:
As you see, the Lumix 14mm lens focuses very fast.
Another example, using the Leica Lumix DG 45mm macro:
This lens does not focus as fast as some of the other lenses, but it's still fair to say that the focus is not slow.
Summary
Here are the timings. I have included a column with the similar autofocus times for the GH1. You should note that the GH1 timings were done with early camera and lens firmware. Later firmware have improved the AF speed.
Conclusions
What we can see, is that the GH2 autofocus speed is very good. The Four Thirds lenses used on adapter are still slow, but they behave better. The Olympus 50mm f/2 macro lens can actually autofocus on the GH2, but the speed is very, very slow. It could be used for stationary objects, but for photographing people, the AF is more or less useless.
The Panasonic Lumix GH1, and the whole first generation of Panasonic G cameras, could not autofocus with the Olympus Four Thirds 50mm f/2 macro lens. This also applies to a host of other Four Thirds lenses that are not optimized for CDAF. The newer GH2 can autofocus with most Four Thirds lenses. However, the focus can be rather slow, as we have seen in this example.
Even the Four Thirds Olympus 9-18mm f/4-5.6 wide angle zoom lens, a fairly recent CDAF optimized lens, has an annoyingly slow autofocus. The AF is usable, but not as fast as we have become used to.
I am also rather happy that the autofocus speed for the Lumix 20mm f/1.7 pancake lens has improved a lot with the GH2. After all, this is a very good lens, and I find the AF speed to be important when photographing people.
As expected, the Lumix G HD 14-140mm superzoom lens remains very fast in terms of AF. It seems that the close focusing range differs for various focal lengths. The close focus range is specified at 50cm, however, it can focus a bit closer in the wide end of the zoom range. I was not able to test the lens in the longer range this time, since it would not reach focus there at 45cm distance.
The new kit zoom Lumix G 14-42mm is also a very competent lens when it comes to focus speed. I think this was to be expected, after all, it is a brand new kit lens, and focus speed is one of the important factors when people buy camera kits.
I have tested the autofocus speed for the Panasonic Lumix GH2 with various lenses. The test was done by turning on the camera (which leaves the lens at near infinity focus), and then pressing the shutter to see how long time it takes to reach focus. This was filmed using a GH1, and I played back the video in a video editing software, to read out the timings.
There is fairly dull indoor lightning. The lightning corresponds to around EV 6, the same as in my previous test of the GH1. A LEGO figures is placed in the middle of the camera frame, at around 45cm distance. The focus mode used is centre spot.
Here is an example test. In this test, I have the Olympus 9-18mm f/4-5.6 Four Thirds lens mounted to the camera, using an adapter. (Not to be mistaken with the Micro Four Thirds version of the lens.)
This combination gives a rather slow autofocus.
Another example using the Lumix G 14mm f/2.5 pancake:
As you see, the Lumix 14mm lens focuses very fast.
Another example, using the Leica Lumix DG 45mm macro:
This lens does not focus as fast as some of the other lenses, but it's still fair to say that the focus is not slow.
Summary
Here are the timings. I have included a column with the similar autofocus times for the GH1. You should note that the GH1 timings were done with early camera and lens firmware. Later firmware have improved the AF speed.
| Lens | Focus time GH1 | Focus time GH2 |
| Lumix G 8mm fisheye | Not tested | 0.24 seconds |
| Lumix G 14mm | Not tested | 0.20 seconds |
| Lumix G 20mm | 1.23 seconds | 0.44 seconds |
| Leica Lumix DG 45mm macro | Not tested | 0.60 seconds |
| Lumix G 14-42 @ 14mm | Not tested | 0.28 seconds |
| Lumix G 14-42 @ 25mm | Not tested | 0.20 seconds |
| Lumix G 14-42 @ 42mm | Not tested | 0.44 seconds |
| Lumix G HD 14-140 @ 18mm | 0.53 seconds | 0.16 seconds |
| Lumix G HD 14-140 @ 50mm | 0.40 seconds | 0.40 seconds |
| Lumix G HD 14-140 @ 140mm | 0.68 seconds | Not tested |
| Lumix G 45-200 @ 45mm | 0.33 seconds | Not tested |
| Lumix G 45-200 @ 100mm | 0.36 seconds | Not tested |
| Lumix G 45-200 @ 200mm | 0.87 seconds | Not tested |
| Olympus ZD 4/3 9-18 @ 9mm | 2.90 seconds | 1.44 seconds |
| Olympus ZD 4/3 9-18 @ 18mm | 1.50 seconds | 1.36 seconds |
| Olympus ZD 4/3 50mm f/2 | No AF | 4.76 seconds |
Conclusions
What we can see, is that the GH2 autofocus speed is very good. The Four Thirds lenses used on adapter are still slow, but they behave better. The Olympus 50mm f/2 macro lens can actually autofocus on the GH2, but the speed is very, very slow. It could be used for stationary objects, but for photographing people, the AF is more or less useless.
The Panasonic Lumix GH1, and the whole first generation of Panasonic G cameras, could not autofocus with the Olympus Four Thirds 50mm f/2 macro lens. This also applies to a host of other Four Thirds lenses that are not optimized for CDAF. The newer GH2 can autofocus with most Four Thirds lenses. However, the focus can be rather slow, as we have seen in this example.
Even the Four Thirds Olympus 9-18mm f/4-5.6 wide angle zoom lens, a fairly recent CDAF optimized lens, has an annoyingly slow autofocus. The AF is usable, but not as fast as we have become used to.
I am also rather happy that the autofocus speed for the Lumix 20mm f/1.7 pancake lens has improved a lot with the GH2. After all, this is a very good lens, and I find the AF speed to be important when photographing people.
As expected, the Lumix G HD 14-140mm superzoom lens remains very fast in terms of AF. It seems that the close focusing range differs for various focal lengths. The close focus range is specified at 50cm, however, it can focus a bit closer in the wide end of the zoom range. I was not able to test the lens in the longer range this time, since it would not reach focus there at 45cm distance.
The new kit zoom Lumix G 14-42mm is also a very competent lens when it comes to focus speed. I think this was to be expected, after all, it is a brand new kit lens, and focus speed is one of the important factors when people buy camera kits.
Sunday, 5 December 2010
Lens hoods
Frequent readers of my blog will know that I like to tinker with lens hoods. Here is a summary of some of the lens hood solutions I like.
Panasonic Lumix G 20mm f/1.7 pancake
This lens does not come with a hood at all. While a hood is probably not much needed from a stray light perspective, I still like to put a hood on my lenses for protection against objects accidentally touching the front lens element.
My favourite solution is to put a 46mm to 37mm step down ring as hood. This gives some basic protection of the front lens element, while keeping the overall package compact.

I've checked that there is no extra vignetting caused by the step-down ring.
In addition, you'll need a 37mm front lens cap. Both can be gotten from various auction sites for about US$10 in total.
This lens features a traditional focus mechanism, in which the whole lens assembly moves back and forth. Adding extra weight to this assembly is generally not a good idea. However, the step-down ring doesn't add that much weight. Less than a glass filter would, anyway.
Another solution is to get a 46mm metal screw in hood designed for Leica Summicron:

While this hood looks stylish, I think it adds too much bulk. Besides, you might not be able to fit the front lens cap inside it.
Panasonic Leica Lumix DG 45mm f/2.8 1:1 macro
This lens does come with a hood, however, I am sad to say that I find the hood completely hideous:

This hood does look stylish, and reminds me of the older Leica hoods. However, it is much too wide, and could have been used for a wide angle lens. But this lens is a short tele. So the hood does not do a good job of keeping stray light out.
I prefer a hood that is a narrow as possible, while still not inducing any extra vignetting. I found the solution I like by adding three extra elements to the front lens thread: First a 46mm stand off ring (glassless filter), then a 46mm-37mm step-down ring, and finally, a 37mm-28mm step-down ring:

I was almost a bit surprised when I verified that this combination does not add any extra vignetting. But the front lens element of the 45mm macro has a rather narrow diameter, so I suppose it makes sense.
This "hood" does not add any extra diameter to the lens, which is good. In addition, you'll need a 28mm front lens cap. Such a cap is pretty inexpensive.
Olympus M.Zuiko Digital 45mm f/1.8
In a move which has annoyed quite some fans, this lens is not sold with a hood included. There is a hood you can buy from Olympus, which fits in to the bayonet mount. However, it is quite expensive.
I bought a collapsible rubber hood for screwing into the 37mm front threads. It works great:

This rubber hood cost me US$13, including shipment from China.
Panasonic Lumix G 14mm f/2.5 pancake
Just like the 20mm pancake, this lens does not come with a hood. Again, I've used the same solution as with the 20mm pancake lens: A 46mm to 37mm step down ring as hood:

In this case, I had bought a grey ring by a mistake, so I had to paint it black with enamel paint. No big deal.
This lens features internal focusing, so I am not afraid of putting some extra stuff onto the front lens thread.
Panasonic Lumix G 45-200mm f/4-5.6 Mega O.I.S.
This lens does come with a hood, and I think the hood is very well designed:

The only problem I can see, is that it is awkward to insert and remove the front lens cap.
I still changed this hood, since it was a tad bit too long for my camera bag. I got a 52mm screw in metal hood:

This alternative hood is probably not as good for protection, but is is more practical to use, and it's easier to add the front lens cap after use.
Other lenses
The kit zoom lenses generally have well designed hoods, and I see no reason to replace them.
Panasonic Lumix G 20mm f/1.7 pancake
This lens does not come with a hood at all. While a hood is probably not much needed from a stray light perspective, I still like to put a hood on my lenses for protection against objects accidentally touching the front lens element.
My favourite solution is to put a 46mm to 37mm step down ring as hood. This gives some basic protection of the front lens element, while keeping the overall package compact.

I've checked that there is no extra vignetting caused by the step-down ring.
In addition, you'll need a 37mm front lens cap. Both can be gotten from various auction sites for about US$10 in total.
This lens features a traditional focus mechanism, in which the whole lens assembly moves back and forth. Adding extra weight to this assembly is generally not a good idea. However, the step-down ring doesn't add that much weight. Less than a glass filter would, anyway.
Another solution is to get a 46mm metal screw in hood designed for Leica Summicron:

While this hood looks stylish, I think it adds too much bulk. Besides, you might not be able to fit the front lens cap inside it.
Panasonic Leica Lumix DG 45mm f/2.8 1:1 macro
This lens does come with a hood, however, I am sad to say that I find the hood completely hideous:

This hood does look stylish, and reminds me of the older Leica hoods. However, it is much too wide, and could have been used for a wide angle lens. But this lens is a short tele. So the hood does not do a good job of keeping stray light out.
I prefer a hood that is a narrow as possible, while still not inducing any extra vignetting. I found the solution I like by adding three extra elements to the front lens thread: First a 46mm stand off ring (glassless filter), then a 46mm-37mm step-down ring, and finally, a 37mm-28mm step-down ring:

I was almost a bit surprised when I verified that this combination does not add any extra vignetting. But the front lens element of the 45mm macro has a rather narrow diameter, so I suppose it makes sense.
This "hood" does not add any extra diameter to the lens, which is good. In addition, you'll need a 28mm front lens cap. Such a cap is pretty inexpensive.
Olympus M.Zuiko Digital 45mm f/1.8
In a move which has annoyed quite some fans, this lens is not sold with a hood included. There is a hood you can buy from Olympus, which fits in to the bayonet mount. However, it is quite expensive.
I bought a collapsible rubber hood for screwing into the 37mm front threads. It works great:

This rubber hood cost me US$13, including shipment from China.
Panasonic Lumix G 14mm f/2.5 pancake
Just like the 20mm pancake, this lens does not come with a hood. Again, I've used the same solution as with the 20mm pancake lens: A 46mm to 37mm step down ring as hood:

In this case, I had bought a grey ring by a mistake, so I had to paint it black with enamel paint. No big deal.
This lens features internal focusing, so I am not afraid of putting some extra stuff onto the front lens thread.
Panasonic Lumix G 45-200mm f/4-5.6 Mega O.I.S.
This lens does come with a hood, and I think the hood is very well designed:

The only problem I can see, is that it is awkward to insert and remove the front lens cap.
I still changed this hood, since it was a tad bit too long for my camera bag. I got a 52mm screw in metal hood:

This alternative hood is probably not as good for protection, but is is more practical to use, and it's easier to add the front lens cap after use.
Other lenses
The kit zoom lenses generally have well designed hoods, and I see no reason to replace them.
Wednesday, 1 December 2010
Testing the effect of the GH1 hack
For a while now, it has been a well known fact that the Panasonic Lumix GH1 firmware can be adjusted to yield higher video bitrate, among other things. This is referred to as using "the hack", or "hacking" the GH1. Similar adjustments can also be done to the GF1 and G2 cameras.
I wanted to test the effect of the hacked GH1. Is it possible to measure the improvement of the video after installing the hack? I know many people have praised the quality of the hacked GH1 video before, but I wanted to make sure this test has exactly the same moving subject and lightning before and after installing the new firmware.
Test setup
Here is my test setup:

The camera is on a tripod, with the Leica Lumix 45mm f/2.8 macro lens. The camera is set to f/5, 1/60s, ISO400. The LEGO figure is on a platform that rotates at a constant speed.
I recorded one video file before installing the hack, and one after. When adjusting the firmware, I upped the max bandwidth from 16,000,000 to 50,000,000. Both videos were recorded at Full HD, 1920x1080 pixels. This can only be done using the AVCHD format. My camera is the PAL version, meaning that I get a framerate of 25fps.
The first video is 11s, and 20,754,432 bytes, 1.89MB/s. The second video is also 11s, and 31,395,840 bytes, 2.85MB/s, 50% higher than before the hack. So already here there is an indication that the hacked video contains a higher bandwidth.
Video examples
Here are the videos. You can double-click on the video to get to the YouTube page, where you can see them in higher resolution, up to 1080p.
Before the hack:
After the hack:
Of course, just watching the videos on YouTube isn't enough to judge the quality. For an extra test, I have made some framegrabs from the videos, to compare the quality.
First, two full size framegrabs from the video.
Before:

And after:

It's still difficult to compare the quality of the images. Here are 100% crops from the 1920x1080 framegrabs. I chose four consecutive frames from each video stream. Click on the image for a larger version.

Conclusion
Based on these screenshots, I believe it looks like the there is some more clarity and sharpness in the hacked video stream. Also, the colours are more washed out without the hack. The hacked video stream is better. But from my experiment, I don't see a dramatic difference.
Other effects
After recording the second video, I was not able to playback the videos any more. Just showing the thumbnail in the viewer was enough to freeze the camera. To reset it, I needed to remove the battery. Just flipping the on/off switch was not enough. This is, of course, quite annoying.
I wanted to test the effect of the hacked GH1. Is it possible to measure the improvement of the video after installing the hack? I know many people have praised the quality of the hacked GH1 video before, but I wanted to make sure this test has exactly the same moving subject and lightning before and after installing the new firmware.
Test setup
Here is my test setup:

The camera is on a tripod, with the Leica Lumix 45mm f/2.8 macro lens. The camera is set to f/5, 1/60s, ISO400. The LEGO figure is on a platform that rotates at a constant speed.
I recorded one video file before installing the hack, and one after. When adjusting the firmware, I upped the max bandwidth from 16,000,000 to 50,000,000. Both videos were recorded at Full HD, 1920x1080 pixels. This can only be done using the AVCHD format. My camera is the PAL version, meaning that I get a framerate of 25fps.
The first video is 11s, and 20,754,432 bytes, 1.89MB/s. The second video is also 11s, and 31,395,840 bytes, 2.85MB/s, 50% higher than before the hack. So already here there is an indication that the hacked video contains a higher bandwidth.
Video examples
Here are the videos. You can double-click on the video to get to the YouTube page, where you can see them in higher resolution, up to 1080p.
Before the hack:
After the hack:
Of course, just watching the videos on YouTube isn't enough to judge the quality. For an extra test, I have made some framegrabs from the videos, to compare the quality.
First, two full size framegrabs from the video.
Before:

And after:

It's still difficult to compare the quality of the images. Here are 100% crops from the 1920x1080 framegrabs. I chose four consecutive frames from each video stream. Click on the image for a larger version.

Conclusion
Based on these screenshots, I believe it looks like the there is some more clarity and sharpness in the hacked video stream. Also, the colours are more washed out without the hack. The hacked video stream is better. But from my experiment, I don't see a dramatic difference.
Other effects
After recording the second video, I was not able to playback the videos any more. Just showing the thumbnail in the viewer was enough to freeze the camera. To reset it, I needed to remove the battery. Just flipping the on/off switch was not enough. This is, of course, quite annoying.
Sunday, 28 November 2010
Lumix 14mm, insufficient distortion correction
Just like a host of other Micro Four Thirds lenses, the Lumix G 14mm f/2.5 pancake lens utilizes in camera distortion correction.
However, when using the lens on the Panasonic GH1 camera, I've noticed that the distortion correction is not sufficient. There is still some residual barrel distortion after the in camera correction.
Here are a couple of examples. First, let's look at an example at a close focus distance, close to the minimum focus distance of the lens:
In this example, even when looking at the small image (above, left), it is easy to see that there is still some barrel distortion in the upper, horizontal line. The line is not straight. You can click on the image to view a larger version of it. The corrected image to the left is the JPEG output from the camera.
The right image shows the image as captured by the sensor, without any distortion correction at all. I used the UFRaw RAW processing software. But any software that allows for disabling the distortion correction could be used for this purpose.
And one example with a longer focus distance:
In this latest example with a longer focus distance, it appears that the remaining distortion is not so significant. I added a red, straight guideline to the left in the JPEG image, above left. You can see that there is some barrel distortion still, but not much.
Conclusion
It appears that when using the Lumix G 14mm f/2.5 pancake lens on a Panasonic GH1 camera, there is some residual barrel distortion. This is most apparent at shorter focus distances.
One could speculate why this is so. I don't think it is a firmware issue, since I have the newest firmware available for my camera.
Another speculation is that Panasonic chose to not correct all the barrel distortion, since that would have decreased the diagonal angle of view. The diagonal angle of view for this lens is specified to 75°. Further correction of the barrel distortion would reduce this figure, albeit with a small margin.
The Lumix G 14mm f/2.5 pancake lens uses internal focusing, and it is not uncommon that these designs lead to changes to the distortion properties, and field of view, at closer focus distances.
However, when using the lens on the Panasonic GH1 camera, I've noticed that the distortion correction is not sufficient. There is still some residual barrel distortion after the in camera correction.
Here are a couple of examples. First, let's look at an example at a close focus distance, close to the minimum focus distance of the lens:
 |  |
Corrected JPEG | Uncorrected RAW |
In this example, even when looking at the small image (above, left), it is easy to see that there is still some barrel distortion in the upper, horizontal line. The line is not straight. You can click on the image to view a larger version of it. The corrected image to the left is the JPEG output from the camera.
The right image shows the image as captured by the sensor, without any distortion correction at all. I used the UFRaw RAW processing software. But any software that allows for disabling the distortion correction could be used for this purpose.
And one example with a longer focus distance:
 |  |
Corrected JPEG | Uncorrected RAW |
In this latest example with a longer focus distance, it appears that the remaining distortion is not so significant. I added a red, straight guideline to the left in the JPEG image, above left. You can see that there is some barrel distortion still, but not much.
Conclusion
It appears that when using the Lumix G 14mm f/2.5 pancake lens on a Panasonic GH1 camera, there is some residual barrel distortion. This is most apparent at shorter focus distances.
One could speculate why this is so. I don't think it is a firmware issue, since I have the newest firmware available for my camera.
Another speculation is that Panasonic chose to not correct all the barrel distortion, since that would have decreased the diagonal angle of view. The diagonal angle of view for this lens is specified to 75°. Further correction of the barrel distortion would reduce this figure, albeit with a small margin.
The Lumix G 14mm f/2.5 pancake lens uses internal focusing, and it is not uncommon that these designs lead to changes to the distortion properties, and field of view, at closer focus distances.
Saturday, 27 November 2010
Camera sales statistics from Japan
Update: There is newer sales data from the end of December 2010 here.
BCN Ranking provides monthly sales statistics for various items in Japan. One of them is system cameras, which includes DSLRs and mirrorless systems.
Here is the most recent sales statistics for Micro Four Thirds camera systems. The number in the graph is the ranking the given month. So a "4" means that the specific model was the fourth most sold model during that month. In the first two places you typically find the basic kit models from Nikon and Canon.

There are a lot of interesting findings here. For example, two Panasonic models have had a second birth: Both the GF1 and GH1 have seen an increase of sales, probably due to the discounted prices awaiting the arrival of the newer models GF2 and GH2. This also applies to the Olympus E-P1 camera, which saw a significant sales increase in the third quarter of 2010.
Another finding is that while the Panasonic Lumix G1 sold pretty stably, it was the Olympus E-P1 which made a big difference in the Japanese market. This is consistent with what I saw in the Nordic market. Even though the G1 has, in my opinion, better photographic functionality, it was the E-P1, with the retro styling, and somewhat slimmer body, which got the landslide sales. The E-P2 never was a big seller, it seems.
In the mean time, some competitors have also launched systems. I was not able to find statistics for the Samsung NX system, but the Sony NEX was easy to find. In the diagram below, it is apparent that the Sony NEX was a big hit in Japan.

The top model Sony NEX 5 got an impressive second place in June 2010, and retained the third place in July and August.
BCN Ranking provides monthly sales statistics for various items in Japan. One of them is system cameras, which includes DSLRs and mirrorless systems.
Here is the most recent sales statistics for Micro Four Thirds camera systems. The number in the graph is the ranking the given month. So a "4" means that the specific model was the fourth most sold model during that month. In the first two places you typically find the basic kit models from Nikon and Canon.
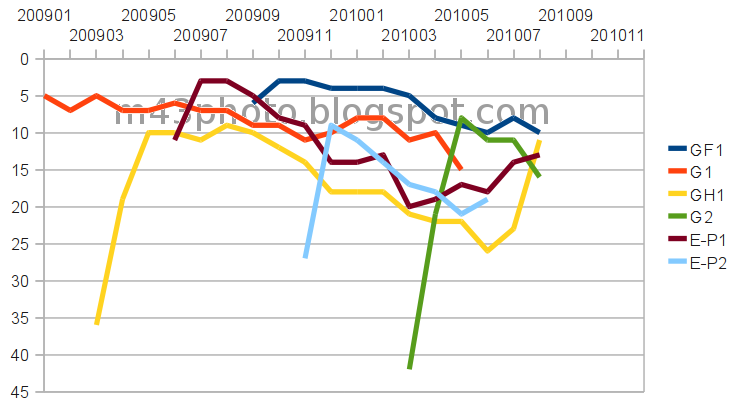
There are a lot of interesting findings here. For example, two Panasonic models have had a second birth: Both the GF1 and GH1 have seen an increase of sales, probably due to the discounted prices awaiting the arrival of the newer models GF2 and GH2. This also applies to the Olympus E-P1 camera, which saw a significant sales increase in the third quarter of 2010.
Another finding is that while the Panasonic Lumix G1 sold pretty stably, it was the Olympus E-P1 which made a big difference in the Japanese market. This is consistent with what I saw in the Nordic market. Even though the G1 has, in my opinion, better photographic functionality, it was the E-P1, with the retro styling, and somewhat slimmer body, which got the landslide sales. The E-P2 never was a big seller, it seems.
In the mean time, some competitors have also launched systems. I was not able to find statistics for the Samsung NX system, but the Sony NEX was easy to find. In the diagram below, it is apparent that the Sony NEX was a big hit in Japan.

The top model Sony NEX 5 got an impressive second place in June 2010, and retained the third place in July and August.
Saturday, 20 November 2010
Using the 8mm fisheye lens as a macro lens
Using a fisheye lens as a macro lens is probably a very strange idea. But the Panasonic Lumix G 8mm Fisheye lens has a remarkably short minimum focus distance, so it actually makes some sense.
The closest focus distance is specified as 0.1m. However, this is measured from the sensor plane. So the distance from the front element is about 0.02m, or 20mm.
This corresponds to a magnification of 0.20x, or 1:5, which is not very impressive. We should keep in mind, though, that the field of view is more compressed in the corners, hence this magnification measure doesn't make much sense for the fisheye lens.
Here's my setup for photographing a LEGO figure at the closest focus distance:

The camera is on a tripod, and the figure is about 2cm from the front lens element. At this close distance, it is inevitable that the lens casts some shadow on the subject.
And here is the resulting image, taken at ISO 100, f/5.6, 1.3 second exposure:

The very close focus distance possible with the Lumix 8mm lens can be used to make interesting compositions. Especially when combined with the deep depth of field associated with a wide angle lens.
The closest focus distance is specified as 0.1m. However, this is measured from the sensor plane. So the distance from the front element is about 0.02m, or 20mm.
This corresponds to a magnification of 0.20x, or 1:5, which is not very impressive. We should keep in mind, though, that the field of view is more compressed in the corners, hence this magnification measure doesn't make much sense for the fisheye lens.
Here's my setup for photographing a LEGO figure at the closest focus distance:

The camera is on a tripod, and the figure is about 2cm from the front lens element. At this close distance, it is inevitable that the lens casts some shadow on the subject.
And here is the resulting image, taken at ISO 100, f/5.6, 1.3 second exposure:

The very close focus distance possible with the Lumix 8mm lens can be used to make interesting compositions. Especially when combined with the deep depth of field associated with a wide angle lens.
Friday, 19 November 2010
Measuring the field of view of the Lumix 14mm f/2.5 pancake lens
There has been some uncertainty as to the actual field of view of the Lumix 14mm f/2.5 pancake lens. While I personally don't doubt Panasonic's specifications, I decided to make my own measurement.
I placed the camera level, facing 90° towards a window. On the window, I placed a measuring band. The distance from the camera's mount to the measuring band is 870mm. This means that the distance to the sensor is 890mm, since the register distance of Micro Four Thirds is 20mm.
Here is the setup:

And this is the resulting image, after in-camera distortion correction:

It's easier to measure the width when looking at 100% crops of the endpoints:

We can see that the total horizontal distance is 1039mm.
Doing the basic trigonometrical calculation, we get the horizontal angle of view to be: 2*arctan((1039mm/2)/890mm)° = 60.5°.
Now, we want to find the diagonal angle of view. The diagonal width is sqrt(10392+(1039*3/4)2) = 1298.75. Hence, the diagonal angle of view is 2*arctan((1298.75mm/2)/890mm)° = 72.2°.
Panasonic's specifications state that the diagonal angle of view is 75°. However, we know that the angle is specified at infinity focus. And in my case, the focus is just below 1m. It is also a fact that the angle of view can change with the focus, especially with internal or rear focusing mechanisms. So this is probably the explanation for the difference.
I placed the camera level, facing 90° towards a window. On the window, I placed a measuring band. The distance from the camera's mount to the measuring band is 870mm. This means that the distance to the sensor is 890mm, since the register distance of Micro Four Thirds is 20mm.
Here is the setup:

And this is the resulting image, after in-camera distortion correction:

It's easier to measure the width when looking at 100% crops of the endpoints:

We can see that the total horizontal distance is 1039mm.
Doing the basic trigonometrical calculation, we get the horizontal angle of view to be: 2*arctan((1039mm/2)/890mm)° = 60.5°.
Now, we want to find the diagonal angle of view. The diagonal width is sqrt(10392+(1039*3/4)2) = 1298.75. Hence, the diagonal angle of view is 2*arctan((1298.75mm/2)/890mm)° = 72.2°.
Panasonic's specifications state that the diagonal angle of view is 75°. However, we know that the angle is specified at infinity focus. And in my case, the focus is just below 1m. It is also a fact that the angle of view can change with the focus, especially with internal or rear focusing mechanisms. So this is probably the explanation for the difference.
Thursday, 18 November 2010
Lumix 14mm distortion correction
Just like most other Micro Four Thirds lenses, the Panasonic Lumix G 14mm f/2.5 pancake lens is corrected for barrel distortion in camera. This is applied when looking through the viewfinder, when producing JPEG images or videos, and when using some RAW converter programs. So many users are probably not aware of this at all.
It is easy to see the effect of the distortion correction when opening the RAW image file in a converter program that allows for not applying distortion correction. One such example is UFRaw.
Here is an example image. It was taken at f/2.5, ISO 400, 1/13 second exposure. Both the out of camera corrected JPEG, and the non-corrected RAW image are shown below:
It is apparent that there is some barrel distortion in the RAW image. To correct this requires about -14.5 adjustment in the Lens Distortion filter within The Gimp image processing software. This is slightly more than for the Lumix 20mm lens, for which I found that -13.5 was an appropriate adjustment.
This picture shows what sensor area is lost during this conversion: The area outside the white frame is unused when applying the distortion correction.

This corresponds to around 12% of the sensor area, and hence you lose around one megapixel of resolution with the normal 12 megapixel sensor. This is nothing to worry about.
The upside is that if you need a wider field of view, you can use the whole sensor output from the RAW file. The normal diagonal field of view for this lens is 75°. Using the extra sensor area output to the RAW file gives you around 80° field of view. Of course, this will not be distortion corrected, but as long as you don't photograph any straight objects, this shouldn't be any problem. For nature and people, this might not be an issue.
Framing your picture will be difficult, though, since the viewfinder only shows the image after the distortion correction. And you might experience more vignetting in the extreme corners.
Insufficient distortion correction
To my surprise, I noted that the distortion correction is in fact not fully sufficient. After the in camera distortion correction, there is still some residual barrel distortion, especially at shorter focus distances. You can note this in the top left image: The pillar to the left is not entirely straight. Also, the ceiling is slightly distorted.
It could be that newer cameras do a better job of correcting the distortion.
It is easy to see the effect of the distortion correction when opening the RAW image file in a converter program that allows for not applying distortion correction. One such example is UFRaw.
Here is an example image. It was taken at f/2.5, ISO 400, 1/13 second exposure. Both the out of camera corrected JPEG, and the non-corrected RAW image are shown below:
 |  |
Corrected JPEG
|
Uncorrected RAW
|
It is apparent that there is some barrel distortion in the RAW image. To correct this requires about -14.5 adjustment in the Lens Distortion filter within The Gimp image processing software. This is slightly more than for the Lumix 20mm lens, for which I found that -13.5 was an appropriate adjustment.
This picture shows what sensor area is lost during this conversion: The area outside the white frame is unused when applying the distortion correction.


This corresponds to around 12% of the sensor area, and hence you lose around one megapixel of resolution with the normal 12 megapixel sensor. This is nothing to worry about.
The upside is that if you need a wider field of view, you can use the whole sensor output from the RAW file. The normal diagonal field of view for this lens is 75°. Using the extra sensor area output to the RAW file gives you around 80° field of view. Of course, this will not be distortion corrected, but as long as you don't photograph any straight objects, this shouldn't be any problem. For nature and people, this might not be an issue.
Framing your picture will be difficult, though, since the viewfinder only shows the image after the distortion correction. And you might experience more vignetting in the extreme corners.
Insufficient distortion correction
To my surprise, I noted that the distortion correction is in fact not fully sufficient. After the in camera distortion correction, there is still some residual barrel distortion, especially at shorter focus distances. You can note this in the top left image: The pillar to the left is not entirely straight. Also, the ceiling is slightly distorted.
It could be that newer cameras do a better job of correcting the distortion.
Subscribe to:
Posts (Atom)